Dijon Chicken with Sour Cream Mashed Potatoes….

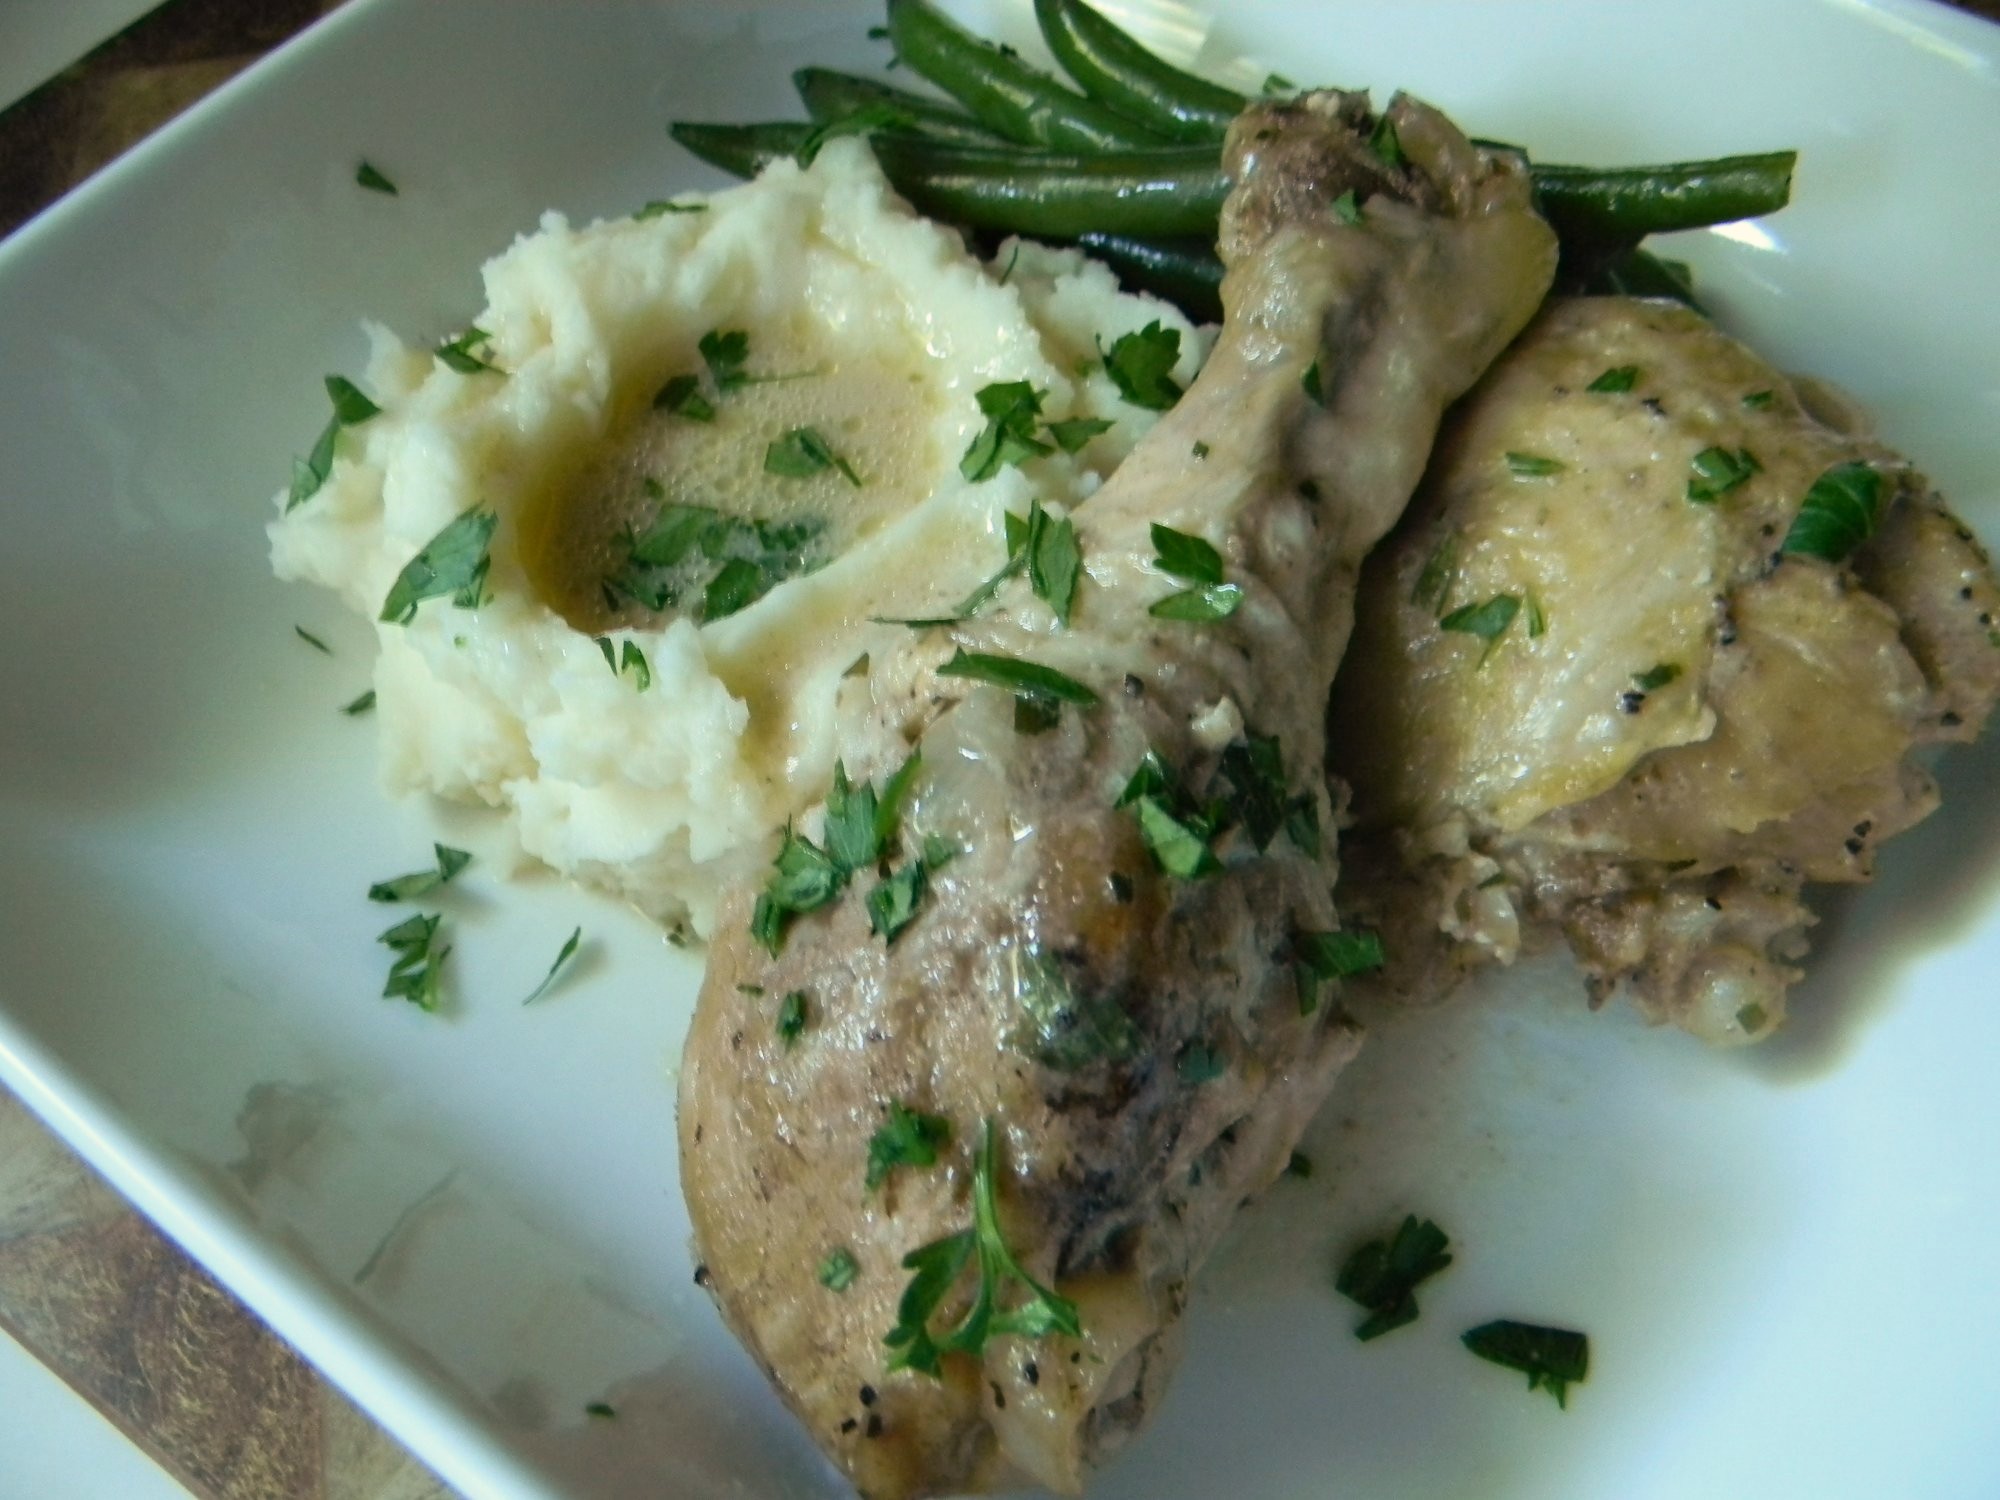
This chicken is tender and luscious.  I served it with sour cream mashed potatoes which was great with the pan sauce.  Throw in a salad and you have a spectacular dinner!  The best part about it is that it’s so simple. I used legs and thighs as they end up being incredibly moist and succulent.   Prep time takes about 20 minutes then finish in the oven.  I would definitely serve this at a dinner party.

If you’re serving mashed potatoes with this chicken, prep the potatoes into the boiling pot before you start the chicken.

Dijon Chicken

3 lbs. chicken legs and thighs
Salt and pepper
Olive oil, about 2-3 tablespoons
1 large onion, finely chopped
2 large cloves garlic, finely chopped
1 1/2 cups chicken broth or water
2 teaspoons coriander
2 tablespoons dijon mustard
1/4 cup sour cream
1 tablespoon dried tarragon

1)  Preheat the oven to 325′.
2)  Season the legs and thighs with kosher salt and pepper.  Heat a heavy skillet that has a tight fitting lid over medium-high heat.   Brown each seasoned piece of chicken.  Remove from the pan onto a plate.
3)  Add the onion to the pan.  If you have a lot of goodies sticking to the bottom of the pan, add a couple of tablespoons of the broth to deglaze.  Once the onions are soft, add the garlic and cook another minute.  Add the coriander and broth to the pan and add the browned chicken pieces.  Cover with the lid and into the oven for 45 minutes.
4)  Remove the pan from the oven.  Remove the lid (carefully!) and remove the cooked chicken onto a serving platter, cover with foil to keep warm.
5)  Put the pot over medium heat.  Whisk the dijon mustard, sour cream, and tarragon in a small bowl until all ingredients are incorporated.  Whisk into the pan juices.  Cook about a minute.  Pour the sauce over the cooked chicken…Serve immediately.  Makes 6 servings.

Sour Cream Mashed potatoes

2 lbs. russet or yukon gold potatoes, peeled and sliced to 1/4″ inch
2 teaspoons salt
Water to cover
2 tablespoons butter
1/4 cup sour cream
1 cup (or more) milk, zap in the microwave for a minute so that it’s warm

1)  Peel and slice the potatoes and put them into a large pot.  Cover with water and add salt.  Bring to a boil and cook for 20-25 minutes.  Poke a potato with a fork while in the pot to be sure they’re tender.  Drain well and put the potatoes right back into the pot.  Add the butter, sour cream and warm milk.  Cover with the lid and allow to stand for about 5 minutes.
2)  Beat with a hand mixer for about a minute so that it doesn’t have large lumps.  Add additional milk if too thick.  Taste.  Add additional seasoning if necessary.   Cover with the lid until ready to serve with the chicken.  Makes about 6 servings.

Enjoy!

Have a great day!

Angie

Simple Acorn Squash…Only 2 points!

 If you’re like me and have a sweet tooth and are watching your calorie intake, this squash is for you!  So completely satisfying that you will not be scrounging around for a small piece of chocolate or a small cookie after dinner.  The great thing about squash is that it has a zero point value.  It requires few ingredients; a pinch of salt, a little butter, a sprinkle of cinnamon, and a good sprinkle of brown sugar.  Walla…a fantastic dessert like side dish.  Pair it with any roasted or grilled chicken or pork.  YUMMY!

This is acorn squash.  The great thing about it is that it’s easy to cut in half and seed.  It can be cooked in the microwave in about 20 minutes or baked in the oven for 45.  I’ve gotten the best result, of course, in the oven.  When cooking the squash it is important that it becomes very soft.  I find this squash compared to others has the most creamy consistency when cooked to the right doneness.

The way most people enjoy it is right out of the shell.  After it’s baked you add all ingredients right into the squash and put it back in the oven for another 10 minutes to melt the butter and brown sugar.

I think it might be easier to get the kids to try it if it’s removed from the shell…..you know how kids are!  I don’t think my little guy would ask for a try if it were in the shell.  He DID ask me to try it the last time I made it and he LOVED it!  What’s not to love???

Simple Acorn Squash

2 large acorn squash, rinsed well
water
2 pinches kosher salt
4 teaspoons of butter
2 teaspoons cinnamon
8 teaspoons (or more to your taste) brown sugar

1)  Preheat the oven to 350′.  Cut the squash in half and remove the seeds.  Place cut side down on a foil lined cookie sheet.  Add enough water so that there is about 1/8″ in the bottom of the pan, don’t let the water completely evaporate from the pan, add more if needed half way through baking.  Bake for about 45 minutes.  The shell should be completely soft when you (carefully) touch it.
2)  Remove from the oven and with a spatula, carefully turn the squash over.  Cool for at least 10 minutes.  While holding a clean kitchen towel, hold the warm squash in your hand.  Scoop out all of the flesh of the squash into a medium size mixing bowl.
3)  Add the salt and mix the squash well.  Use a hand mixer if you wish.
4)  Place into4 individual serving dishes or into a small casserole dish.  Top with butter.  Sprinkle with cinnamon and brown sugar.
5)  Back into the oven for 5-10 minutes.  Makes about four 1/2 cup servings.

*you can use real maple syrup in lieu of the brown sugar if you like
**If you’d like to microwave the squash to save time, place the squash cut side down on a microwavable dish, add water to 1/8″.  One squash (2 pieces) will take about 10 minutes.  Two squash (four pieces) will take about 20 minutes.  Be sure it is soft.
***Make this squash ahead of time and refrigerate.  Bake for 20-25 minutes.  Would be a GREAT Thanksgiving side dish!

Eggplant Parmesan With Fresh Mozzarella And Marinara Sauce…..

I’m crazy about eggplant.  This is my version of eggplant parmesan, only a little prettier.  I’ve coated white and purple eggplant with Italian bread crumbs and fresh grated parmesan, fried it in olive oil, and layered it with fresh mozzarella and topped it with fresh marinara sauce

Let’s begin…

I came across white eggplant and was very intrigued, I had to buy it!  I did not notice a difference in taste between the white and the purple.  When buying eggplant, you’ll want to pick out eggplant that is firm and is free of bruises. 

A must in the preparation of eggplant is to remove the bitterness and excess moisture by lightly salting it and allowing it to sit on paper towels for 20-30 minutes.  Blot off the liquid that accumulates with paper towel.  This will keep the eggplant from absorbing too much oil when cooking.

I LOVE parmigiano reggiano cheese.  It has a rich nutty flavor.  I buy it in a chunk and cut it into 1/2″ pieces, then into the blender for perfectly grated cheese.

Beat a couple of eggs in a bowl with a little water into one bowl, and Italian bread crumbs and parmigiano reggiano into the other.

 Add 1/4 teaspoon of black pepper and mix well.

Dip the eggplant into the egg first, then into the bread crumb mixture, coat well.

Heat skillet over medium heat until very hot and add a couple of tablespoons of olive oil, swirel around the pan and add the eggplant, cook until nicely browned.

The eggplant is equally delicious plain!  Enjoy!

Eggplant Parmesan With Fresh Mozzarella and Marinara Sauce

2 medium size eggplant, sliced into 1/4″ rounds
salt
1 1/4 cup Italian bread crumbs
1/4 cup parmesano reggiano
1/4 teaspoon black pepper
2 eggs, beaten well
2 tablespoons water
Olive oil
8 ounces fresh mozzarella
2 cups Marinara sauce or your favorite bottled sauce

1)  Slice the eggplant in 1/4″ slices, lightly coat both sides of the eggplant with table salt and place on a layer of paper towel.  Allow to stand for about 30 minutes.  Blot the eggplant with paper towel to remove excess moisture.
2)  Combine the bread crumbs, parmigiano cheese, and black pepper in another dipping bowl.
3)  Beat the eggs and water in a dipping bowl.
4)  Dip the eggplant into the egg, then into the bread crumb mixture, coat well. 
5)  Heat a heavy skillet over medium heat until very hot.  Add enough olive oil to coat the pan.  Fry each piece of eggplant in olive oil until nicely browned.  You will have to add more olive oil to the pan with each batch.
6)  Layer thin slices of mozzarella cheese between the cooked eggplant.  Top with warm marinara sauce.  Garnish with a fresh sprig of basil. (optional)  Serve immediately.  Makes 8 servings.

Enjoy!

Angie

Archived Recipe Fav’s…..

One of my favorite events of  this summer was reconnecting with my cousins at the Henderson family reunion.  I’m pictured here with my cousin Diane.  LOVE HER!!  Anyway, we talked at length about the past and she brought up “The Green Bean Incident.”  I am posting this link for Diane:-)   I love our reunion picnics as everyone brings their best “go to” dish to share.  The food was amazing!  This got me thinking that since I haven’t posted recipes in awhile, I thought I might repost a few of my fav’s.  Comfort foods come to mind when the days start getting shorter and it is getting pleasantly cooler.

I serve pasta at least once a week.  My kids LOVE it!  So easy to prepare and when I make the sauce, I always make extra for the freezer.  It is awesome to have a sauce stashed away in the freezer to use when you’re pinched for time.  Try changing up the shapes of the noodles too.  It all tastes the same but to a kid, new and interesting shapes make for a more enjoyable dinner.  Pictured here,
Rigatoni with Meat Sauce.

There is still plenty of time left for grilling.  I do this so simply.  I toss whole mushrooms and quartered onions into a bowl and drizzle with a small amount of olive oil.  Season with salt and pepper.  Skewer them each on their own skewers. (onions take much longer to grill, cook them first then the mushrooms)  Personally, I do not think a good steak needs much more seasoning than good ole kosher salt and fresh ground pepper.  Flank steak doesn’t need to be marinated to oblivion.  Cooked to medium (a 1″ thick steak should be grilled about 6 minutes per side and turned only once) and thinly sliced on the diagonal is all you need for a flavorful and simple supper.  If you’re ever in doubt as to whether your steak is done the way you want, use an instant read thermometer and follow the guidelines below.

*Internal temperatures for different degrees of doneness:
Rare-120′ to 130′
Medium rare- 130′ to 140′
Medium- 140′ to 150′
Medium well- 150′ to 160′
Well- 160+

Oh…and potato.  Noting like a killer potato with a great piece of steak, right?  If you love twice baked potatoes, you must try my
Twice Baked Potato Casserole.  Perfectly sized or shaped potatoes are not needed for this recipe.  

I hope you had a restful weekend!

Angie

Tabbouleh Salad…..(Only 3 points plus per serving!)

This is my favorite salad to date.  For a quick and satisfying lunch serve over a bed of nutrient rich red cabbage and garnish with fresh diced plum tomatoes.   Great with grilled fish or chicken.  Simple to prepare and it will keep for 5-7 days in the refrigerator.  I especially like to make a big tub of it and eat it for lunches or side dishes throughout the week.

The base of this salad is bulgur wheat.   I love the texture of this healthy grain.  One half cup serving contains 5 grams of protein and 7 grams of fiber.    One half cup cooked equals 3 Weight Watcher’s points plus.  As you may already know, whole grains such as bulgur digest slowly, keeping you full longer.

You can soak it in water for an hour and drain off excess water, but I think the best way to prepare it is to cook it.  It only takes 12-15 minutes to cook and I like the texture much better when it’s cooked as opposed to soaking.

Tabbouleh Salad

1 cup bulgur wheat, cooked and cooled
2 large bunches (or more) fresh flat leaf parsley, finely chopped
1/4 cup fresh mint, finely chopped
2 tablespoons olive oil
3 tablespoons fresh or bottled lemon juice
2-3 large cloves fresh garlic, crushed
1 cup sweet onion, finely chopped
2 medium plum tomatoes, seeded and finely chopped
1 large cucumber, seeded and finely chopped
2 pinches of kosher salt (or to taste)
2 pinches of black pepper (or to taste)

1)  Prepare bulgur according to package directions, allow to cool completely.  I use Bob’s Red Mill bulgur.  Add 1 cup bulgur to 2 cups of water, bring to a boil, reduce heat and cover.   Allow to simmer for 12-15 minutes.  Dump the cooked bulgur into a large bowl to promote quick cooling.  Stir often to release the heat.
2)  You can use a food processor to blend the parsley, mint, garlic, lemon juice, and olive oil.  It is not necessary, but it’s a lot easier than chopping the parsley and mint by hand.  Either way, it’s all good.
3)  Add all salad ingredients to the bulgur.  Mix well to blend.  Refrigerate the leftovers immediately.  Enjoy!

*makes about 8- 1/2 cup servings
**1/2 cup serving=3 Weight Watcher’s Points!

Quinoa Salad with Artichokes and Lemon…..

If you haven’t tried quinoa, this is the perfect recipe to introduce yourself!  It lends itself beautifully to the subtle flavor of the artichoke, lemon and garlic.   Love to serve this high protein grain alongside a delicious piece of grilled fish or chicken.  It’s fresh and light, perfect for bikini season, right?  Make this for your next picnic or barbecue, it’ll have your friends oohing and ahhing.

Quinoa Salad with Artichokes and Lemon

2 cups cooked quinoa (1 cup uncooked)
1 14 ounce can artichokes, drained well and quartered
1 large bell pepper, I used yellow, red would be beautiful too
1 cup halved grape tomatoes
1 cup chopped flat leaf parsley
1 small red onion, finely chopped
1 tablespoon chopped fresh oregano
1 tablespoon olive oil
1 large clove fresh garlic, crushed
1/2 teaspoon kosher salt, or more to taste
1/4 teaspoon black pepper, or more to taste
2 tablespoons fresh or bottled lemon juice

1)  Cook the quinoa according to package directions.  Place into a large bowl to cool.
2)  Once the quinoa is cool, add the artichokes through the black pepper.  Gently toss to coat.  Add the lemon juice to the mixture and toss to coat.  Taste.  Add additional salt or pepper to your taste.  Makes about ten 1/2 cup servings. 

*Only 2 Weight Watcher’s points per 1/2 cup!
*Add any of your favorite vegetables, hearts of palm would be a lovely addition.
*One half cup of cooked quinoa has 3 grams of fiber and 5 grams of protein.

Grilled Vegetable Salad with Balsamic Vinaigrette…..

This is an absolutely beautiful salad made with readily available  fresh summer produce.  Simply season with olive oil, salt, and pepper.  Grill and add a drizzle of balsamic vinaigrette.  Serve with anything from grilled Italian sausage to a simple cheese and garlic pasta.  You could top with some fresh shaved pecorino romano cheese or bleu cheese crumbles.  Try chopping the vegetables into 1/2″ pieces and serve on top of crusty grilled italian bread, delish!

Balsamic vinaigrette

1/4 cup olive oil
2 tablespoons balsamic vinegar
2 tablespoons honey
2 cloves fresh garlic, crushed
1 teaspoon dried oregano
1 teaspoon dijon mustard
1/2 teaspoon kosher salt
1/4 teaspoon black pepper

1)  Whisk all of the vinaigrette ingredients together in a small bowl.  Refrigerate immediatley unless you’ll be using right away.

For the salad:

8 ounces white mushrooms
2 small zuchinni squash, cut lenthwise into quarters
2 small yellow squash, cut lenthwise into quarters
1 large red onion, sliced into three large slices
1 small red, yellow, and orange pepper
2 tablespoons olive oil
3-4 pinches salt
2 pinches black pepper

1)  In a small bowl, add the mushrooms and a tablespoon of the vinaigrette.  Toss to coat and allow to marinate for 10-15 minutes, continue to toss to coat.  Skewer and place on a platter.
2)  For the onion, drizzle a little olive oil on each slice and season with salt and pepper.  Drizzle the rest of the vegetables with olive oil, season with salt and pepper.  Toss to coat. 
3)  Grill over medium-high heat.  The vegetables will vary in cooking time.  The onions will take the longest, followed by the peppers and the mushrooms.  The squash will cook relatively quick.    The vegetables should all have nice grill marks.  Remove from the grill and slice the squash into bit size pieces on the diagonal.  Do the same for the peppers.  Slice the onion slices and the mushrooms into quarters.  Toss into a medium size mixing bowl.  Drizzle the vinaigrette over the vegetables and gently toss to coat.  Serve or refrigerate immediately.

Parsley Pesto and Cheese Tortellini Salad with Toasted Pine Nuts…..

This beautiful salad is a step above any other pasta salad.  I’ve made my own pesto, but feel free to buy it if you’re in a time pinch.   I’ve taken a short cut in my salad by buying my roasted peppers from the deli.  Refrigerate immediatelly.  Reserve a cup of pasta water before draining to add to the salad for moisture if neccessary after refrigeration.  Be sure to refrigerate the pasta water as well.

Here we go….

Start by toasting the pine nuts.  Spread over a cookie sheet and toast in 325′ oven for 8-12 minutes.  Keep an eye on them, they can burn easily.  Remove from oven, set aside.

Cook the tortellini according to package directions, drain and rinse.  Place in a large mixing bowl.

Add the roasted red peppers…

Add the fresh basil….

Add the toasted pine nuts, reserving about a tablespoon for garnish at the end.

Add the pesto…gently mix until all ingredients are well coated.  Place salad in a pretty serving dish and top with reserved pine nuts and a sprig of fresh basil.  Enjoy!

Pesto Tortellini Salad

 For the pesto:

 1 large bunch fresh parsley, rinsed and drained
2 cloves fresh garlic
1 tablespoon lemon juice
2-3 tablespoons olive oil
¼ cup toasted walnuts
½ cup grated parmesan cheese
½ teaspoon salt
¼ teaspoon pepper

 For the salad:

1 lb. cheese tortellini
1 cup pasta water
1 cup roasted red peppers, sliced into thin strips
1 small bunch fresh basil, sliced into fine strips
1/3 cup pine nuts, toasted (325’ for 8-11 minutes) Reserve one tablespoon for garnish

 1)  Place all of the pesto ingredients into a blender or food processor and blend until you have a nice smooth consistency.
2)  Cook the pasta according to package instructions.  Reserve 1 cup of pasta water.  Drain and rinse.
3)  Place pasta into a large mixing bowl.  Add the roasted red peppers, fresh basil, pine nuts, and about ¼ cup of pasta water.    Mix gently to coat all ingredients with pesto. 
4)  Place into a pretty serving bowl and garnish with 1 tablespoon pine nuts and a sprig of basil.  Refrigerate immediately when you’re done serving.

 *If you’ll be making this salad ahead of time, reserve the 1 cup of pasta water in the refrigerator.  Before serving if the salad seems like it needs more moisture, add a splash at a time and gently mix to moisten.

Orzo Pasta Salad with Roasted Garlic Vinaigrette…..

The roasted garlic dressing makes this salad over the top delicious!  I used orzo pasta that was pretty tiny, just be sure that you have a colander that the pasta won’t go through when draining.  Always reserve a good amount of pasta water for moisture if needed.  This is especially important if making pasta salads ahead of time.  Pasta tends to soak up excess moisture sometimes leaving the pasta a bit dry.  Simply pour small amounts of the pasta water into the salad and mix well until you get a moist consistency.  Pasta water is much more “waistline” friendly than extra oil.

We’ll start with the dressing…..

Into a small sauce pan, add 3/4 cup of olive oil and 6 large cloves of garlic cut in half or smaller so that the olive oil covers them.  Place over very low heat and watch carefully.  Cook only until the garlic is slightly browned and soft, about 35-45 minutes.  Pour the cooked garlic/oil right into the blender.  Allow to cool for 15 minutes.  Add 1/4 cup of red wine vinegar and blend.  Place in refrigerator until you’re ready to assemble the salad.

Cook the pasta according to package directions. 

Reserve a couple of cups of pasta water.  Be sure to refrigerate the pasta water.  Drain, rinse, and drain well.   Place the pasta into a large mixing bowl.

Add the halved kalamata olives, halved grape tomatoes, feta, fresh basil, and the dressing to the orzo.  Mix well.

Season with a couple of pinches of kosher salt, a pinch of black pepper, and a tablespoon of dried oregano.  Mix well.  Serve immediately or refrigerate until ready to serve.

Orzo Pasta Salad with Roasted Garlic Vinaigrette
 
 For the dressing: 
¾ cup olive oil
¼ cup red wine vinegar
6 large cloves fresh garlic halved
 
Salad Ingredients:
 
1 pound cooked orzo pasta, 2 cups pasta water reserved
8 ounces crumbled feta cheese
1 cup kalamata olives, halved
2 pints grape tomatoes, halved
1 large bunch fresh basil, thinly sliced
1 tablespoon dried oregano
2 pinches kosher salt or to taste
1 pinch black pepper or to taste
1) Place the oil in a small sauce pan and add the fresh sliced garlic. Place over low heat. You want to see small bubbles and to know it’s cooking. Do not over brown. Pour into blender, cool for 15 minutes. Add the red wine vinegar and give it a whirl until well blended. Refrigerate if you’re not mixing the salad right away.
2) Cook the pasta according to package directions. Before draining, reserve a couple of cups of water. Drain pasta and rinse. Drain well. Add to large mixing bowl.
3) Add the rest of the salad ingredients to the bowl. Pour the dressing over the salad and mix well. Serve immediately or refrigerate until ready to serve.

*If you’re serving the pasta after refrigeration, add pasta water a small amount at a time to moisten.

Spicy Sauteed Rapini with Garbanzo Beans, Olive Oil and Garlic…..

Rapini is also known as Italian broccoli.  It’s a little bitter and requires blanching.  Blanching is quick, partial cooking and then immediately plunged into cold water to stop the cooking.  This removes the bitterness of the vegetable.  It is now ready for a quick saute with lots of garlic and red pepper flakes.  Add to hot linguine and top with fresh grated Parmesan and you have a delicious vegetarian main dish.  I’ve added garbanzo beans, omit if you wish.  

Here we go…

Start by putting a very large pot of water on the stove to boil.  Add a teaspoon of salt.

Rapini somewhat resembles broccoli but is actually in the turnip family.  It’s very leafy and has broccoli like crowns throughout. 

Trim about an inch off the bottom.

Chop the rapini in 1″ increments.

Soak the chopped rapini in cold water for about 5 minutes.  Drain.

Add the chopped and cleaned rapini to the salted boiling water.   Fill a large bowl with cold water and add a hand full of ice cubes.  Allow to cook for about 3 minutes.

Using a slotted spoon, remove the blanched rapini from the pot right into the bowl of cold water.

Drain well.

Now for the seasonings.  You’ll need some olive oil, a couple of cloves of fresh garlic, red pepper flakes, and kosher salt. 

You’ll also need a can of garbanzo beans, drained and rinsed.  Heat a large skillet over medium-high heat.

Add the olive oil, red pepper flakes, and fresh garlic to the hot skillet.  Saute for a couple of minutes.

Add the drained rapini.  Season with kosher salt.  Saute for about 3 minutes.

Add the garbanzo beans and cook another 3-4 minutes.  Serve immediately with a wedge of fresh lemon.  Healthy and delicious!

Spicy Rapini with Olive Oil and Garlic

1 bunch fresh rapini
1 teaspoon salt
1 tablespoon olive oil
1/4 teaspoon red pepper flakes
2 large cloves garlic, sliced
1 14 ounce can garbanzo beans, drained and rinsed
1-2 pinches of kosher salt

1)  Trim an inch off of the bottom of the rapini.  Put a large pot of water to boil on the stove, add 1 teaspoon of salt.
2)  Chop the rappini in one inch increments.  Submerge in cold water to soak and clean.  Drain.
3)  Add cleaned rapini to the boiling water.  Cook about 3 minutes.  While rapini is cooking, fill a large bowl with cold water and a handful of ice cubes.
4)  When rapini is done, remove with a slotted spoon and put into the ice water.  Drain well.
5)  Heat a large skillet over medium-high heat.  Add olive oil, garlic, and red pepper flakes cook for a couple of minutes.  Add rapini and cook for about 3 minutes.  Add drained garbanzo beans and cook for an additiona 3 minutes.  Enjoy immediately.