Black & Whites…..

orng chx slm patDSCN2939_2619

It’s been quite some time since I’ve posted a recipe and I sure miss it!

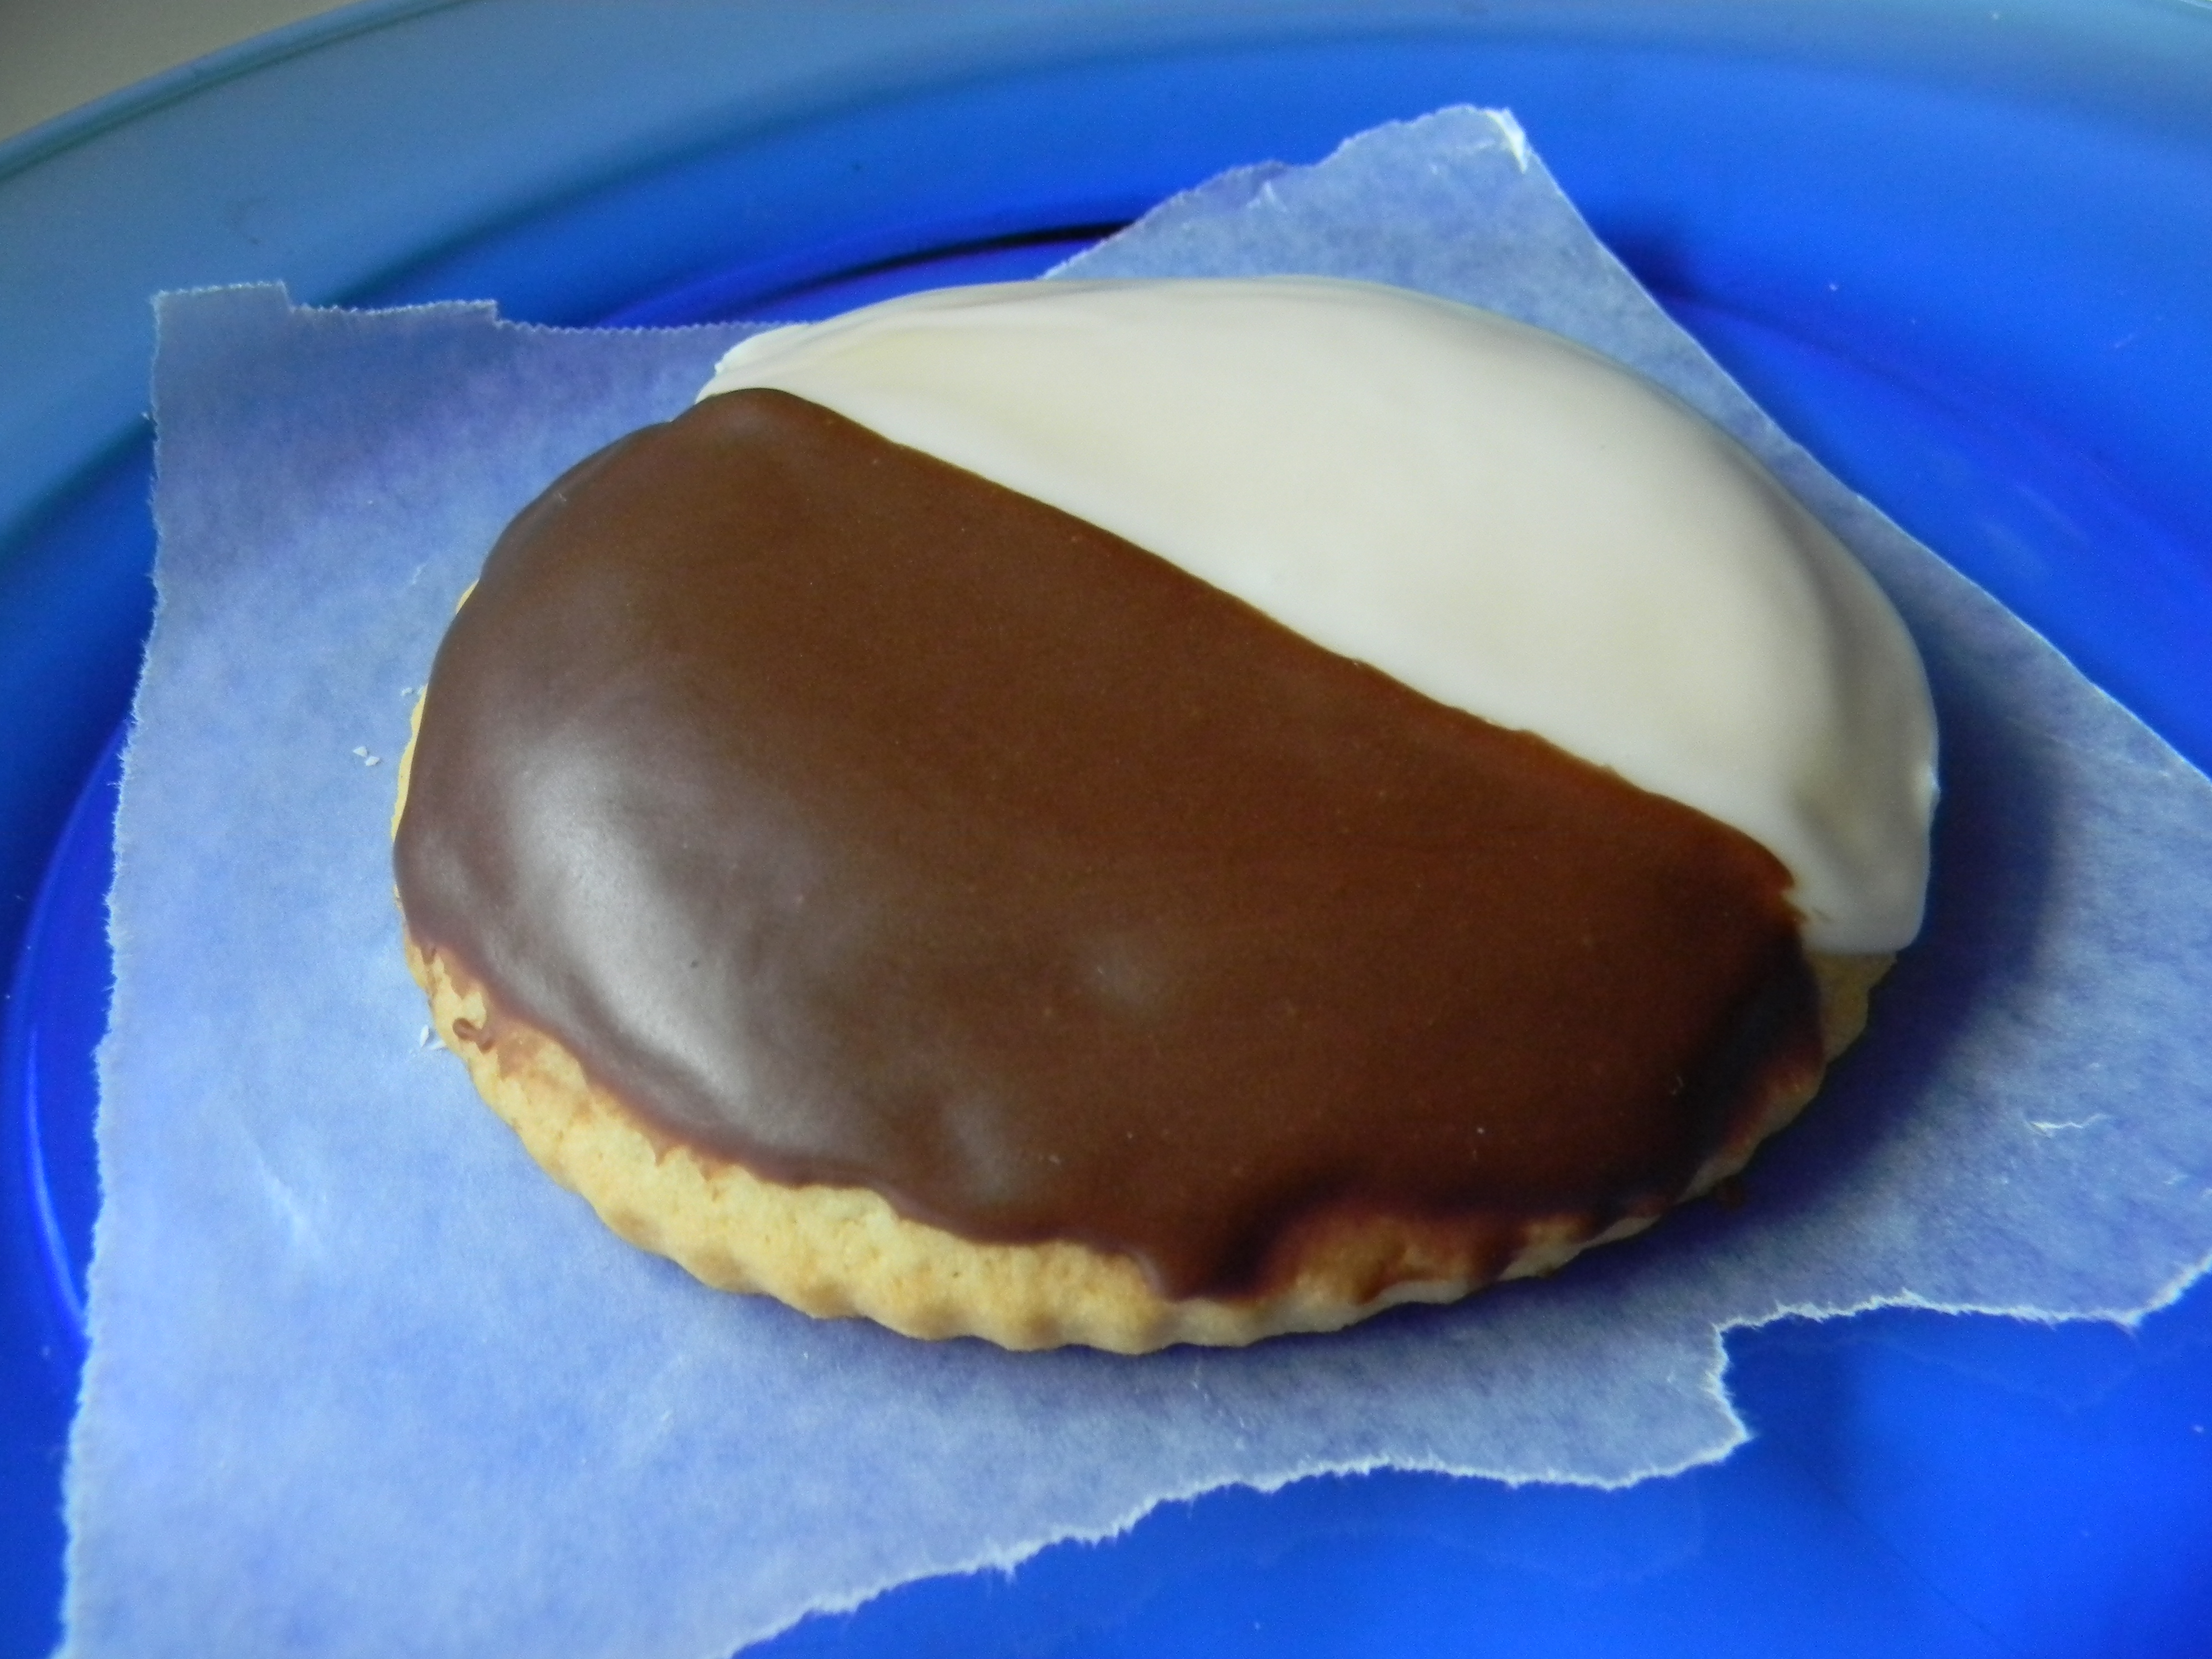
Ever had one of these?  It is believed they originated from New York.  The original cookie calls for a thin layer of icing then half vanilla fondant and half chocolate fondant. I am not particularly fond of fondant so I simply ice the cookie with half vanilla and half chocolate icing.  I use my go to sugar cookie cut out recipe.

Icing this cookie takes a little practice.  I recommend making the vanilla icing first, icing half of the cookie, and letting it set up at room temperature, uncovered for at least an hour.  You then add Hershey’s Cocoa to the vanilla icing with a little more milk and ice the other half.  Be careful not to add too much liquid as the icing will ooze off the cookie.  Allow it to set up for 3 or more hours.  Then they’re good to go!  Iced cookies such as these do not freeze well.  If you want to freeze them I suggest freezing them un-iced, then icing them upon thawing.

This cookie recipe is large.  If you’re not up to making 6 dozen cookies, freeze half of the dough.  Wrap it tightly in plastic wrap, then into a freezer bag.  Label and date.  Use it within 3 months or so, the sooner the better.  Thaw in the refrigerator for 24-48 hours before using.

Best Roll Cut Out Sugar Cookie Recipe  (makes about 6 dozen large round  5″cookies)

2 cups sugar
4 sticks unsalted butter, one pound at room temperature
5 large eggs
1 tablespoon vanilla
7 ½ cups all-purpose flour
4 teaspoons baking powder
1 teaspoon salt

1) In a large mixing bowl, beat butter until fluffy and add one half of the sugar, beat, then add the rest. Add two eggs and beat. Scrape down the side of the bowl. Add the remaining three eggs and vanilla, beat until nicely incorporated.
2) Lightly measure out flour into a separate mixing bowl. Add baking powder and salt, whisk until blended.
3) Add half of the flour mixture to the egg/butter mixture and beat well. Add remaining flour and blend until all ingredients are incorporated.
4) Shape into a large ball and wrap in plastic wrap, then put into a large zip bag. Refrigerate for an hour or overnight.  It is easier to roll if you refrigerate it for the lesser amount of time.  If it’s chilled overnight, let it sit at room temperature for 45 minutes or so to warm up a bit.
5) Preheat your oven to 375’ and line cookie sheets with parchment paper. Have cooling racks ready to receive hot cookies.
6) Cut off a chunk and begin working with your hands to make it pliable enough to roll out on a floured surface. Roll to 3/8” to 1/4″ thickness. Cut into large circles and place on prepared sheets, leaving at least 1” of space between cookies. Bake for 10-12  minutes. Cool for five minutes before removing from cookie sheet onto a rack. Cool completely before icing.

Vanilla Icing (this will be enough for half of the recipe, if you bake the entire batch of dough, double the icing recipe)

3 cups powdered sugar
3 tablespoons milk, any kind
1 teaspoon vanilla extract

1)  Mix well, add more milk to make it spreadable but not so loose that it will run completely off the cookie.  Ice 1/2 of the cookie, starting at the center with an icing spatula and continue to the edge.  Again, this will take some practice.  (They will taste incredible even if the frosting isn’t perfect!) Allow the cookies to sit for an hour or so to set up before you start with the chocolate half.

2)  Add 2 tablespoons Hershey’s Cocoa to the bowl.  Begin to mix, you may notice that more milk is needed.  Add more milk a teaspoon at a time.  The cocoa will give it an even better texture than the plain vanilla.  Want it more chocolatey?  Add more cocoa, 1 tablespoon at a time.  Carefully ice the other half of the cookie, starting with the seam down the center then going to the outer edges.   Need more icing?  Add 1/2 cup powdered sugar to the bowl, a tablespoon cocoa and add enough milk to stir into a rich consistency again.  It is best to let them sit out overnight to completely set up.  Layer in a plastic container with parchment paper between layers.  Enjoy within 2-3 days if they last that long!

Enjoy!
Angie

Interesting Variations:

*Ice the whole cookie with chocolate and immediately add chocolate shavings.
*Ice the whole cookie with vanilla icing and immediately add confetti sprinkles.
*Add a little instant coffee to the chocolate icing and ice the whole cookie chocolate & top with chocolate covered coffee beans.
*If you like orange and chocolate add a tablespoon or two of fresh orange zest to the white icing, YUM!


Snickerdoodles….

Make this cookie if for nothing else, the smell in your house!  This delightful chewy cookie is made with real ingredients, butter, flour, sugar, eggs…no preservatives, and no long crazy ingredient list.  Make them with your kids!  The recipe is really simple and they’ll really enjoy coating the dough balls with the cinnamon/sugar.

Be prepared for the kiddies to line up to taste!

Snickerdoodles

1 stick + 7 tablespoons softened unsalted butter
1 ½ cups sugar
2 large eggs
2 2/3 cups all-purpose flour
2 teaspoons cream of tarter
1 teaspoon baking soda
½ teaspoons salt
2 tablespoons sugar mixed with 2 teaspoons cinnamon

1) Preheat oven to 375’. Line a cookie sheet with parchment paper, set aside.
2) In a large mixing bowl, with an electric mixer, beat butter until creamy and add sugar, beat until fluffy. Add eggs and beat until well combined.
3) Combine the flour through the salt in a small mixing bowl.
4) Add half of the flour to the butter mixture and beat until mixed. Add the rest and mix until well combined.
5)Mix the sugar and cinnamon in a small mixing bowl until well combined.
6) Roll into 1” balls and coat evenly with the cinnamon sugar. Place on cookie sheet 1 ½” inches apart.
7) Bake for 10-12 minutes. Slide the parchment off the hot sheet right on to the cooling rack. Cool completely. Makes about 30 cookies.

Enjoy!
Angie

Oatmeal Raisin Cookies….

I  love a good, old fashioned, chewy oatmeal raisin cookie.  It took my a very long time to perfect this recipe.  The measurements may be a little unusual, but believe me, they’re right on.  The key is to carefully measure the dry ingredients.  For the flour, gently spoon into the measuring cup and level off with a knife.  Most recipes call for large eggs, be sure to use them here.  Make this cookie dough a good base for most any kind of cookie you like.  Add chocolate chips, craisins, dried cherries, or any kind of chopped nuts.  For a really different twist, add chocolate covered raisins, now there’s an idea!
Oatmeal Raisin Cookies

1 ½ sticks softened butter
¾ cup firmly packed light brown sugar
½ cup + 1 tablespoon sugar
½ cup finely chopped walnuts, optional
2 large eggs
1 teaspoon vanilla
2 ¼ cups +2 tablespoons all purpose flour
1 ½ cups + 2 tablespoons old fashioned oatmeal, uncooked
1 teaspoon salt
1 teaspoon baking soda
1 teaspoon cinnamon
½ cup raisins, soaked in warm water for 30 minutes, drain well

1) Preheat oven to 375’. Parchment line a cookie sheet, set aside.
2) In a large mixing bowl, beat butter. Add brown sugar and white sugar, beat until fluffy. Add eggs and vanilla, beat well. Add walnuts and give a quick mix.
3) In a medium mixing bowl, combine flour, oats, cinnamon, salt, and baking soda.
4) Add half of the flour mixture to the butter mixture, beat until incorporated. Add remaining flour and beat
until well blended. Add drained raisins and mix by hand with a large heavy spoon.

5) Drop by tablespoons onto prepared cookie sheet. I find a medium size cookie scoop the easiest for evenly shaped professional looking cookies. Space 2” apart. Bake for 11-12 minutes. Makes about 3 dozen. For smaller cookies, reduce baking time.

Butter Cut Out Cookies….

Isn’t this a pretty cookie?  What I love most about this cookie is that it isn’t overly sweet.   Because there is no leavening in the recipe, it is the perfect dough to make two layered cookies.  Fill with your favorite fruit preserves or try filling with melted chocolate.  Dust with powdered sugar for a lovely finishing touch.  If you don’t want to make a filled two layer cookie, try baking your favorite shape and half dip into chocolate with sprinkles or chopped nuts.

There is something about a pretty little package of goodies I find irresistible!  It’s the perfect small gift to say Merry Christmas in a very special way.  Great for your kid’s bus driver or crossing guard.

Butter Cut Out Sugar Cookies

¾ lb. softened unsalted butter
1 cup sugar
1 ½ teaspoon vanilla
2 eggs
3 ¾ cups all purpose flour
1 teaspoon salt

1) With an electric mixer, beat softened butter in a large mixing bowl. Add sugar and vanilla. Beat mixture until fluffy. Scrape down sides of bowl.
2) Add eggs and beat for 30 seconds, scrape down sides, beat another 30 seconds.
3) Lightly spoon flour into measuring cup and level off with a knife into a medium bowl and add salt. Mix to blend. Add flour about a cup at a time and mix on the lowest speed of your mixer until all flour is incorporated.
4) Dump cookie dough onto counter top and shape into two discs. Wrap in plastic wrap and put into a large zip bag. Refrigerate for at least 2 hours.
5) Preheat oven to 375’. Cut parchment paper to fit cookie sheets and set aside.  No need to use any cooking spray or fat on parchment, nothing will stick!
6) Lightly flour your counter top and roll out a softball size piece of dough to about 3/16”. Cut with cookie cutters and place on parchment lined sheet. Bake for 7-9 minutes. 

*To make the two layer cookie:
1)   You will need your favorite shape and a small round cutter to cut out the centers of the top cookie.  When assembling cookies, place the bottom of each cookie together (after you add fruit filling of course)
2)  Dust each cookie through a fine sieve or a sugar shaker with powdered sugar.  Allow to sit on the counter overnight for the cookies to set up.  Store in an air tight container.

To dip into chocolate:
1)  Simply melt semi sweet chocolate chips in the microwave for 30 second increments, stirring between.  Do not over heat, chocolate will burn.  Dip cookie into chocolate and allow to set on a piece of parchment or wax paper.  Add any sprinkles or nuts right after dipping.
**You can refrigerate the dough overnight if you wish. Allow the dough to sit at room temperature for 30 minutes before you start shaping into cookies. You will need to knead the dough before you attempt to roll it out.
***Gather all of the dough scraps after cutting and knead that dough into some of the fresh dough. The dough will soften a bit and be easier to work with after the initial rolling.
****Be sure to watch the first batch while in the oven closely. Baking times can vary depending on your oven. Set your timer for 7 minutes and bake additionally as needed. Make a note on your recipe the exact baking time.

Iced Pumpkin Sugar Cookies…..

I don’t know anyone who can pass up an iced sugar cookie!  I have made these cookies for years.   In fact, Jack and Chris remind me the minute October comes around that I need to make my pumpkin cookies.  I have the boys plop the candies on while I ice.  It goes very quickly and they LOVE to help!  I love the fact that there is no “piping” involved, too time consuming.  Ice the cookie with the orange, add the candies, and at the very end, do the stems. 

If you’re feeling generous, why not share with others?  Isn’t this a pretty package?  I alternate which way the cookies face in the bag to make it stay upright.
Here are a few cookie baking tips:

As always, flour your board.  Use 1-2 tablespoons and be sure to get some flour on the top of the dough as well.

After the dough has been chilled, it’s a bit hard to manage.  Use a small amount at a time.  Your first batch will be the hardest, don’t worry, it gets much easier once you’ve worked the dough.  Once you’ve cut out your first batch, remove the scraps from the floured board and add another chunk of the cold dough, knead into a ball and continue.

Utilize as much of the rolled out dough as possible.  Do not place dough onto a hot cookie sheet, they will start to bake.  Always line with parchment paper.  The cookies will never stick and you can cool them on the parchment as well.

I have cookie sheets that do not have sides.  This is extremely convenient while baking.  I slide the hot cookies right off the sheet and onto the cooling rack. (above)

This recipe is larger than most.  It will make about 68 good sized cookies.  You can keep in the refrigerator for up to 2 weeks.

Best Roll Cut Out Sugar Cookie Recipe

2 cups sugar
4 sticks unsalted butter, one pound at room temperature
5 large eggs
1 tablespoon vanilla
7 ½ cups all purpose flour
4 teaspoons baking powder
1 teaspoon salt

Icing (recipe below)

Orange gel food coloring (You can find at a craft store)
Green gel food coloring
Candy Corn
Chocolate chips
Cellophane bags for packaging (optional)
Raffia ribbon for packaging (optional)

1) In a large mixing bowl, beat butter until fluffy and add one half of the sugar, beat, then add the rest. Add two eggs and beat. Scrape down the side of the bowl. Add the remaining three eggs and vanilla, beat until nicely incorporated.
2) Lightly measure out flour into a separate mixing bowl. Add baking powder and salt, whisk until blended.
3) Add half of the flour mixture to the egg/butter mixture and beat well. Add remaining flour and blend until all ingredients are incorporated.
4) Shape into a large ball and wrap in plastic wrap, then put into a large zip bag. Refrigerate for a couple of hours or overnight.
5) When ready to bake, allow to sit at room temperature for 30 minutes. Preheat your oven to 375’ and line cookie sheets with parchment paper. Have cooling racks ready to receive hot cookies.
6) Cut off a chunk and begin working with your hands to make it pliable enough to roll out on a floured surface. Roll to 1/8” thickness. Cut out with your favorite shapes and place on prepared sheets, leaving at least 1” of space between cookies. Bake for 7-8 minutes. Cool for five minutes before removing from cookie sheet onto a rack. Cool completely before icing.

For icing:

6 cups powdered sugar
2 teaspoons vanilla
5-7 tablespoons water
Orange gel coloring
Green gel coloring

1) Measure powdered sugar into a medium size mixing bowl. Add vanilla and 5 tablespoons of water. Mix well until there are no lumps. Add additional water by the teaspoon to get a smooth, spreadable consistency.
2) Remove a couple of tablespoons of icing and put into a very small bowl. Add a small amount of green food coloring and mix well. Add about ¼ teaspoon of the orange to the rest of the icing, mix well. Add more if you want a more vibrant orange.
3) Ice each cookie with the orange icing and add decorations to each cookie as you ice. Add the green icing to the stems at the very end, after you’ve completed icing with the orange.   Makes about 5 1/2 dozen cookies.

Icing tips:

*Cover the icing with a damp towel when you’re not using to keep it from drying out.
*If the icing is running off the cookie because it’s too thin, add more powdered sugar a tablespoon at a time, mixing between until the consistency is thicker.
*Have all decorations ready to go in small bowls so that when you ice the cookie, you can immediately put the eyes and smile on the cookie.
*Allow to air dry several hours or overnight. The icing will set up and you won’t have to worry about messing them up when packaging. These cookies travel very well but do not last long!

Simple Coconut Macaroons…..

Coconut Macaroons, French Macarons…know the difference?  A macaron is a delicate, beautiful sandwich confection made with beaten egg whites and filled with a decadent butter cream center or gnache.  http://en.wikipedia.org/wiki/Macaron  I found it a bit confusing, when I googled French Macaroons I found recipes for Macarons.  It seems macaron and macaroon are used interchangably. 

This recipe is simple and delicious.  I think this cookie is very much like a rich piece of candy, yum!

1 14 oz. package sweetened flaked coconut
3 tablespoons flour
1 14 oz. can sweetened condensed milk
1 teaspoon vanilla
1 jar of maraschino cherries, halved
1 ½ cup semi sweet chocolate chips (optional)

1) Preheat oven to 350’. Line your cookie sheet with parchment paper-very important!
2) Empty bag of coconut into a large mixing bowl. Measure flour into coconut and toss to coat, break up any clumps of coconut.
3) Add vanilla and pour condensed milk over coconut mixture. Mix well.
4) Using a 1 ½ teaspoon cookie scoop, portion out onto parchment paper, being sure to level off when scooping to make for evenly sized cookies. There is no leavening in this cookie, so you can place them pretty close together on your sheet.
5) Top cookie with a halved maraschino cherry.
6) Bake for 20 minutes. Remove from oven, slide entire sheet of cookies off of baking sheet onto cooling rack. Cool completely.
7) Pour chocolate chips in a microwaveable glass dish, shallow enough to dip the bottoms of your cookies into. Microwave in 30 second increments, stirring between, do not over heat chocolate, it will burn! You want to stir until smooth and all chips seem to be melted. It does not have to be hot.
8) Carefully dip each cookie bottom into the chocolate and place right back onto your parchment paper. Allow chocolate to set. To move the process along, you can place the entire sheet in your refrigerator. When they’re set you’re good! They can be packaged or put onto a tray without mess.

Enjoy!

Peanut Butter Chocolate Chip Bars….aahhhhh….hello!

What’s better than the smell of peanut butter whafting through the house?  Having Ryan, my aspiring baker by my side to help!  Truly, kids simply love to help in the kitchen.  It is so good for them and this recipe is a snap!  It goes together in about 10 minutes and baking time is only about 20 minutes.  The beauty of a bar cookie is that there is no chilling of the dough involved…instant gratification, yeah, that’s what I’m talkin’ about….

You MUST try these, good luck waiting until they’ve completely cooled!   Enjoy!!

Peanut Butter Chocolate Chip Bars

½ cup sugar
½ cup brown sugar
½ cup creamy peanut butter
½ cup butter, softened
1 teaspoon vanilla
1 tablespoon water
1 egg
1 ¼ cups unbleached flour
½ teaspoon baking soda
½ teaspoon salt
¾ cup semi sweet or milk chocolate chips

1) Preheat oven to 350’. Coat a 9x13x2 inch pan with cooking spray, set aside.
2) In a small mixing bowl, combine flour, baking soda, and salt, set aside.
3) In a medium mixing bowl, beat brown and white sugar, peanut butter, butter and vanilla. Beat in water and egg. Add flour mixture all at once and mix well. Stir in chocolate chips. Spread evenly into prepared pan.
4) Bake until light brown, 20-23 minutes. Cool and cut into bars.

Old Fashioned Peanut Butter Cookies

This is a house favorite.  It’s very simple to put together, and the ingredients are very basic.  This recipe is one of the first cookies I mastered as a 12 year old.   I believe the recipe is out of one of my Grandma’s cookbooks, which did not have a cover it was so worn.  There is nothing like the smell of peanut butter cookies in the oven, enjoy!

1 cup light brown sugar
1 cup sugar
1 cup melted butter
1 cup creamy peanut butter
½ teaspoon salt
1 teaspoon soda
2 eggs
2 ½ cups all purpose flour

1) Preheat oven to 375’. Line cookie sheet with parchment paper.

2) In medium mixing bowl, combine flour, salt & soda. In a large mixing bowl combine melted butter, peanut butter, sugars and eggs, mix well.

3) Add flour mixture to peanut butter mixture, mix well. Roll into 1” (or larger) balls and press with fork to make cross hatch marks in cookies.

4) Bake 10-12 minutes. Allow to set for 5 minutes before removing from parchment paper.

Coconut Macaroon Cookies Dipped in Chocolate

I love this recipe, it’s beautiful and festive and doesn’t involve that much time for decorating.  Dipping them in chocolate is optional, I perefer them with chocolate, of course!  I also love that the ingredient list is so short, you just mix the first three ingredients together, top with a cherry, & bake. 

I also love to package my cookies in a small goodie bag, I usually put 1/2 dozen in each bag and tie with a pretty ribbon.  These make the most beautiful gifts, and I feel like I’m sharing a small piece of my heart!  Merry Christmas!

Recpie:

1 14 oz. package sweetened flaked coconut
3 tablespoons flour
1 14 oz. can sweetened condensed milk
1 jar of maraschino cherries, halved
1 ½ cup semi sweet chocolate chips (optional)

1)  Preheat oven to 350’.  Line your cookie sheet with parchment paper-very important!
2)  Empty bag of coconut into a large mixing bowl.  Measure flour into coconut and toss to coat.
3)  Add vanilla and pour condensed milk over coconut mixture.  Mix well.
4)  Using a 1 ½ teaspoon cookie scoop, portion out onto parchment paper, being sure to level off when scooping to make for evenly sized cookies.  There is no levening in this cookie, so you can place them pretty close together on your sheet.
5)  Top cookie with maraschino cherry, I cut them into pieces if they’re too large.
6)  Bake for 20 minutes.  Remove from oven, slide entire sheet of cookies off of baking sheet onto cooling rack.  Cool completely.
7)  Pour chocolate chips in a microwaveable glass dish, shallow enough to dip the bottoms of your cookies into.  Microwave in 30 second increments, stirring between, do not over heat chocolate, it will burn!  You want to stir until smooth and all chips seem to be melted.  It does not have to be hot.
8)  Carefully dip each cookie bottom into the chocolate and place right back onto your parchment paper.  Allow to set up.  To move the process along, you can place the entire sheet in your refrigerator.  When they’re set you’re good!  They can be packaged or put onto a tray without mess.

Enjoy!

Santa Thumbprint Cookies

Ahhhhh, a butter cookie topped with some delicous raspberry preserves, what’s not to love?  I love this simple, old fashioned cookie. 

1 cup softened unsalted butter
¼ cup sugar
1 teaspoon vanilla
2 cups sifted flour
½ teaspoon salt
1 cup finely chopped nuts
¾ cup raspberry jam, or your favorite

1)  Preheat oven to 400’.  Cut a sheet of parchment paper to cover your cookie sheet.
2)  In a large mixing bowl or stand mixer, cream butter, vanilla & sugar until light & fluffy.
3)  Combine flour and salt; add to butter mixture and blend well.
4)  Place nuts into a small bowl.  Shape dough into 1” balls and roll in nuts to coat.  Place on cookie sheet and press a divot with your thumb into the center of each cookie.
5)  Bake for 10-12 minutes.  Remove from heat and carefully slide the parchment with the hot cookies onto your cooling rack.
6)  Using a small spoon, carefully spoon about ½ teaspoon of jam into centers.  Cool completely.  I like to let these cookies sit out overnight for the jam to set.  Store in an air tight plastic container being careful not to disturb centers.