Tip: Freeze Over Ripe Bananas…..

Good morning!

What to do with those over ripe bananas?  Maybe you don’t have the time to bake within a couple of days?  Simple peel and freeze them.  Use a zip plastic bag, get as much air out of the bag as possible.  As always, label and date.  They’ll keep in the freezer for about 3 months.

When you thaw them out, they will be the most unappealing looking bananas ever, but they will make the most moist and delicious banana bread ever!  In this recipe, use 2 cups of the frozen bananas, liquid and all.  If you have an immersion blender, it’s best to liquefy the wet ingredients before adding to the dry ingredients.  You can also do this in a blender.

Have a great spring day!

Angie
TGIF!!

Hello Everyone-

Well, winter break is coming to an end….THANK GOD!  Two teens and a six year old without a schedule for two weeks is just too much for me!

I am in need of a night out so I am going out to dinner with my friend Amy to my favorite Italian restaurant, Cucina Paradiso.    I’m going to have a glass or two of prosecco,  a lovely mixed green salad with toasted walnuts, bleu cheese, and strawberries, and maybe some spicy artichoke pasta.   Meatless and delicious!

One of my goals going forward in the new year is to use less meat/protein in my cooking and eating.  My Aunt Irene recently became  a vegetarian and totally inspired me!   I am not going to become a vegetarian, rather, I will consume many more vegetable/grain/vegetarian entrees while enjoying meats occasionally.  I would be considered a “flexitarian.” 

In the 50’s meat was considered a luxury.  It wasn’t used as frequently or in the portion sizes people are now consuming.   The appropriate serving size of meat for a woman is about 3 ounces.  Most steaks you order in restaurants start at 8 ounces and go on up to well over 16!  There many creative ways to incorporate flavor into your cooking without mass amounts of protein.

A couple of my favorite ways to incorporate big flavor without a lot of added fat/calories is to use crisp crumbled bacon or parmisano reggiano cheese.    A so called “big bang for your buck.”  The same goes for flavorful cuts of meat.  One can incorporate a 2-3 ounce portion of meat into a veggie loaded stir fry.  Try sauteing shredded veggies and adding to your next meatloaf.   The moisture from the veggies will make the meatloaf incredibly moist and delicious and you’ll have an added bonus serving of veggies.

This week I came up with Veggie Lasagna Rolls.  I used a blend of shredded zucchini and yellow squash, onions, garlic and sweet bell peppers.  I sauteed them in a little olive oil and then mixed in some ricotta cheese.  I cooked lasagna noodles and rolled them around a dollop of the veggie/cheese mixture.  Topped the dish with some homemade marinara sauce and mozzarella cheese.  Walla, an incredibly flavorful and satisfying vegetarian dinner.  Gotta share this one!

I seldom look forward to Mondays but happy to be back on a schedule next week!

Have a great weekend!

Angie

Thanksgiving…..

Thanksgiving is my favorite holiday!  An entire holiday with the focus on wonderful food and getting together with friends and family.  Good times.

I am cooking, are you?   There are many things to think about like how am I going to cook all that food and serve it hot with only one oven!  Check out my tips for a stress free Thanksgiving holiday.  https://www.angiespantryblog.com/stress-free-thanksgiving-day/

Here’s what I’ll be making:

TURKEY-I am a purist when it comes to a Thanksgiving bird.  I don’t want my turkey to have an Asian or Southwestern twist.  I want good old fastioned turkey, very close to how it was originally served on this momentous holiday.  The meat is so mild that I don’t want to cover up that lovely gentle taste.  I do not want it to taste like chicken….ok, you get my drift.  Don’t mess with the turkey.

STUFFING-I love sage stuffing.  I also happen to be a big fan of sausage, so I’ll be making sage and sausage stuffing.  I will stuff the bird as I think that makes for the most delicious stuffing.  I will make it in advance so I’ll be stuffing my cold turkey with cold stuffing.  Will post recipe tomorrow.

PAN ROASTED BRUSSEL SPROUTS WITH BACON– I bought them on a stalk.   Made me feel like a pilgrim.  Don’t have much else to say about these but YUM!

FRESH CRANBERRY SAUCE-so simple.  Just follow the directions on the back of the package of fresh cranberries.  I do not add lemon or orange zest, I just like the cranberries.  I grew up on the jellied canned stuff….can’t stand it!

SWEET POTATOES-I’m going to first roast them in the oven.   Toss in lemon juice, honey, olive oil and salt and pepper.  I will them mash them.  Simple and delish!

PIES-Traditional Pumpkin Pie made with fresh pumpkin I made a couple of days ago and Blueberry Crumb. 

My peeps will be making the salad, mashed potatoes,  and rolls.  I think we’re good!

Have a great week!

Angie

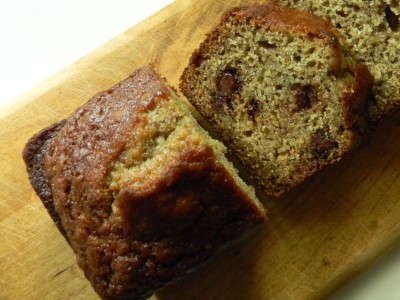
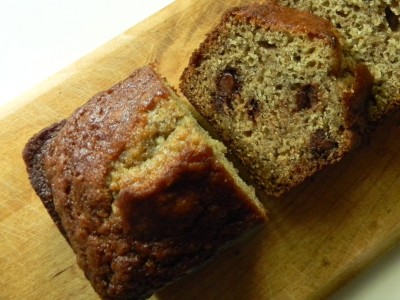
Homemade Banana Chocolate Chip Bread…..

Today is the perfect day for banana bread, don’t you think?  Our lovely sunny and perfect weather is gone.  It’s a bit gloomy outside.  Nothing like a sweet quick bread with chocolate chips to lift our spirits!  This recipe is a very simple one bowl recipe that is consistently delicious.

I always make my quick breads in mini loaf pans.  I do this for three reasons. 1)  They take far less time to bake thus, we’re baking green.  2)  When you bake a quick bread in a large loaf pan they often times dry out due to the very long baking time.  3)  I usually give half of what I bake away as little gifts or pick me ups to my friends.  These are the perfect size to share with someone who might need a little lift.  You can find disposable ones at most any baking isle in the grocery store. I also found them at Bed Bath & Beyond in packages of four for around $10.

What to do with over ripe bananas if you’re not ready to bake?  Don’t throw them away!  Simply remove the peel and put into a zip freezer bag. Remove as much air as possible, seal, and date.  When they thaw they are not the most appetizing fruit but let me tell you, frozen bananas make the BEST banana bread!  I find that when I pulverize the bananas with the other wet ingredients before adding to the dry, you get the best result.  I use an immersion blender but a regular blender will work just fine.

When adding chocolate chips, raisins or nuts to a quick bread, always mix them in with the dry ingredients.  This will prevent the goodies from sinking to the bottom of the bread while baking.  Even chocolate distribution….very important.
Homemade Banana Chocolate Chip Bread

1 1/2 cups ripe bananas (about 3 large bananas)  I’ve made it with four smaller bananas, the measurement doesn’t have to be exact
3 eggs
2/3 cup oil
2 cups all purpose  flour (you can do half whole wheat flour with half all purpose flour if you like)
1 cup sugar
1 teaspoon salt
2 teaspoons baking soda
1 cup chocolate chips, any variety you like, I love milk chocolate chips:-)

1)   Preheat the oven to 350′.  Coat 4 mini loaf pans well with cooking spray.  They should be about 6″x3″.
2)  If you’re using an immersion blender, place the bananas, eggs, and oil into a large mixing bowl.  Blend well with the immersion blender.  If you’re using a regular blender, blend the bananas, eggs, and oil in the blender and pour into a large mixing bowl.
3)  In a medium size bowl, mix the flour through the chocolate chips until well blended.
4)  Add the dry ingredients to the wet ingredients and mix until just blended.  Divide among the prepared pans.  Bake for 30 minutes.  Test with a toothpick if you’re unsure if they’re done.  If it comes out clean, you’re good to go.  Allow them to cool on a rack in the pans for about 10 minutes before removing.  Cool completely.  Wrap with cling wrap or put into a cellophane gift bag and tie with a pretty ribbon.

*This bread freezes brilliantly!

Enjoy!

Angie

Fried Brown Rice, Only 11Points!

I get very tired of “typical” lunches.  Sandwiches, salads, soup, etc.  Yesterday, I made a killer lunch that took me all of 10 minutes and only cost me 11 Weight Watcher’s points!  I would have taken a picture, but I was hungry…..

I often suggest making a good amount of brown rice whenever you make it so that you have some for later in the week or to put in the freezer.  I did just that this week.  Listed are the ingredients I threw into my fried rice, add whatever you like!  You can easily bulk up your portion by adding extra veggies like red peppers, purple onion, broccoli, pea pods…whatever you have would be great! 

What I had on hand…

1)  canola oil, about one teaspoon
2)  an ounce of grilled chicken or pork, or no meat at all (this would lower the point value, of course!)
3)  frozen peas, 1/4 cup
4)  fresh ginger, 1 teaspoon minced or 1/2 teaspoon dried
5)  scallions, 1/2 cup
6)  an egg, scrambled
7)  cold brown rice, 3/4 cup
8)  low sodium soy sauce, a few shakes
9)  toasted sesame oil, 1/2 teaspoon for flavor

I heated a non stick skillet until very hot and added the canola oil.  Quick fried the chicken until heated through, added the peas, ginger,  and scallions, cooked for about 2 minutes.    I made an opening in the center of the pan and added the beaten egg and cooked it through, mixing and chopping up the cooked egg.  I dumped in the rice and added a drizzle of soy sauce, stirring and turning the rice to heat it through.  Finally, a small drizzle of the sesame oil. 

Healthy, delicious, hot lunch.  Ten minutes.

Always treat yourself as you would your best friend.  You’re SO worth it!

Have a great day!

Angie

Cooking and More Cooking…..

I spend most of my time every day in the kitchen.  I often will come up with something I completely love it and think to myself, “gee, this would be great for my blog.”  About this time my people are starving and there is simply no time to break out the camera.

The other night I made tilapia.  It was one of the simplest preparations I’ve done but we all loved it! 

First I processed a couple of pieces of whole wheat baguette in the food processor.  I gave the crumbs a little olive oil drizzle and a sprinkle of granulated garlic.  I toasted them at 275′ for about 20 minutes, tossing every 5 minutes or so for even toasting.  Make an extra large batch and store in an air tight container.  Top salads or hot pasta dishes with them, such a nice touch.

I then seasoned my fish fillets with salt, pepper, and granulated garlic.   I then dredged them in flour and placed them on a non stick foil lined cookie sheet that I lightly coated with olive oil.  I gave the fish a little extra drizzle of olive oil.  I baked them at 425′ for 6 minutes, basted the fish with the oil in the pan with a pastry brush, topped them generously with the toasted bread crumbs and back into the oven for another 3 minutes.  Wa la…dinner.  I served it with fresh lemon wedges, brown basmati rice (I cooked in homemade chicken broth) and frozen peas.  That little bit of crunch of the savory and delicate fish was incredibly delicious.

So you see really great food does not have to be complicated.  Just the right seasoning and good timing while cooking.  Practice.  Practice. Practice.  Like anything else, you’ll get out of it what you put into it.  Step out.  Try new things, every week if you can.  You’ll become a great cook, I promise!

Keep on cookin’!

Have a great week-
Angie

Grind Your Own Meat…..

Like most people, I use a good amount of ground meats in my cooking.  When I make gyros I use part lean ground beef, ground turkey, and ground lamb.  I have yet to find a very lean commercially ground lamb.  I thought why not buy a boneless leg of lamb, trim it, cut it into 1″ cubes, and grind it myself! 

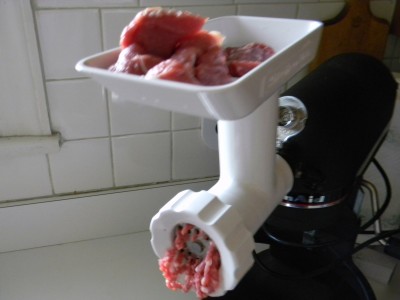
I was given this fabulous Kitchen Aid meat grinder attachment by my Mom.  Today I used it for the first time.  One word: FABULOUS!  This attachment was really simple to use, the attachment goes on the mixer in less than a minute!  The process is a little slow, but well worth the wait.  Once the lamb was ground there was no comparison as to how very lean it looked compared to the pre-ground lamb I’ve purchased in the past.  If you don’t have a meat grinder, you can also use the food processor, it works great too.  Simply put the 1″ cubes of lean meat in the food processor with the blade attachment.  Pulse several times until you have an evenly ground consistency.  Very easy.

I got to thinking about all the things I can make with my grinder, or even my food processor for that matter.  Who doesn’t love Italian sausage?  It’s very flavorful but loaded with saturated fat.  Whole Foods makes a fantastic Italian chicken sausage but it’s $6.99/lb!  After enjoying their version, I made my own chicken sausage with boneless, skinless and trimmed chicken thighs….most excellent!  Buy lean roasts when they’re on sale and enjoy lean and delicious ground beef.  Great for homemade meatballs and meatloaf…… 

Well, I think  I’ve found my next inspiration.  As our economy continues to be less wallet friendly,  I’m going to be working on recipes for meats we can grind in our own kitchens.  Inexpensive,  lean, and healthy meats that will go a long way and will stretch your food dollars.  

Have a great evening!

Angie

New Developments on Cutting Up a Pineapple!

Just in…..I spoke to a lady at the grocery store and she told me that when you bring your pineapple home, you should turn it upside down for a day or two to get the juices flowing throughout the pineapple….

Well, of course I had to try it!  The results are in….YES!  I believe the juices evened out a bit by setting my pineapple upside down for 2 days.  Do you think this is where they got the idea for Pineapple Upside Down Cake???

Anyway, enjoy fruits at room temperature.  The sweet taste is more prominent at room temperature and salt is more prominent cold.

Have a great day!

Angie

How To Cut Up a Fresh Pineapple….

Don’t you just love fresh pineapple?  Whenever I see it on sale I just have to buy a couple.  (I bought mine today at Jewel, they were $1.99)  Here are a couple of things to look for when picking out fresh pineapple…. 

The skin should be firm and the skin should be yellow at the base and throughout the skin to the top.   Do not choose pineapple that has brown on or near the bottom.

Next, carefully grab ahold of an inner leaf….

Gently pull on the leaf.  If it comes out easily, it’s ripe.

Give the pineapple a rinse.  Lie the pineapple on its side on a large cutting board.
Cut the top and the bottom off about 1/2″ into the pineapple.

Turn the pineapple upright.  You can see the round core in the center.  You’ll need to remove the tough skin. Using a sharp knife, cut from the top straight down around the pineapple removing between 1/4″ and 3/8″ skin and some of the ripe fruit.

You can see that I’ve removed all of the skin and there are no little “eyes” left on the fruit.  Cut straight down the center and cut the pineapple into quarters.
Next remove the core.  Cut straight down removing the core.

Cut each quarter in half after the core has been removed….

Cut into bite size pieces….refrigerate.  Enjoy right out of the bowl…or….try my recipe for Fresh Pineapple Cake With Caramel Sauce.  Just a thought:-)
Have a wonderful evening!
Angie

Greek Yogurt…..

I have used plain non fat yogurt in my recipes for years.  I enjoy the challenge of lightening mayonnaise laden salads, dressings, and dips with non fat Greek yogurt.   Light and Creamy Egg SaladCreamy Yogurt Ranch Dressing, Light and Creamy Bleu Cheese Dressing are some of my most favorites.  Additionally, yogurt makes for a delicious twist in  Vanilla Yogurt Whole Grain Pancakes,  and makes for a fantastic marinade in Yogurt and Rosemary Marinated Chicken.   I love artichoke dip, but 1 1/2 to 2 cups of mayonnaise don’t love me!  Try my Light Artichoke Dip, you won’t miss the fat!  If you love sour cream on your potatoes or tacos, why not mix half yogurt with half sour cream?  Half the fat and none of the funky ingredients you find in low fat sour cream. 

You probably have noticed that Greek yogurt has soared in popularity over the past couple of years.   There are many health benefits associated with yogurt.   You’ve probably heard the term “probiotic.”  These are active cultures found in yogurt that is a friendly bacteria to aid our stomachs in digestion.

Non fat Greek yogurt is rich and creamy because it is triple strained, most commercial yogurts are strained only twice.  This means that most of the watery whey is removed, resulting in it’s rich texture.  Greek yogurt is also higher in protein and lower in sodium than other commercial yogurts.

There are many brands to choose from.  My favorites are Chobani and Fage.  Stonyfield Farm Organic and Yoplait make nice Greek yogurts as well.

Have a great day!
Angie