Cutest Dog Birthday Cake!

2016-03-06 12.58.27

Yes, this is a cake.  Isn’t she sweet?  I made it for my dear friend’s daughter Maddie as you can see.  I used a special tip, it’s got tiny holes in it and was actually quite hard to squeeze the frosting out.  It was called a fur and grass tip, I found it on Etsy quite easily.  As always, I ONLY make real butter cream so I had to add a little more milk to make it come out of the tip more easily.  Unlike frosting made with shortening, butter cream frosting gets very soft by the warmth of your hands on the piping bag.  I piped the cake in sections, putting it into the refrigerator to allow the butter cream to set up.  I left the piping bag on the counter, if you were to refrigerate it, it would be impossible to squeeze the frosting out.  Best to use a heavy duty piping bag, the heat transfer is far less than using a plastic or disposable one.

2016-03-06 12.57.55

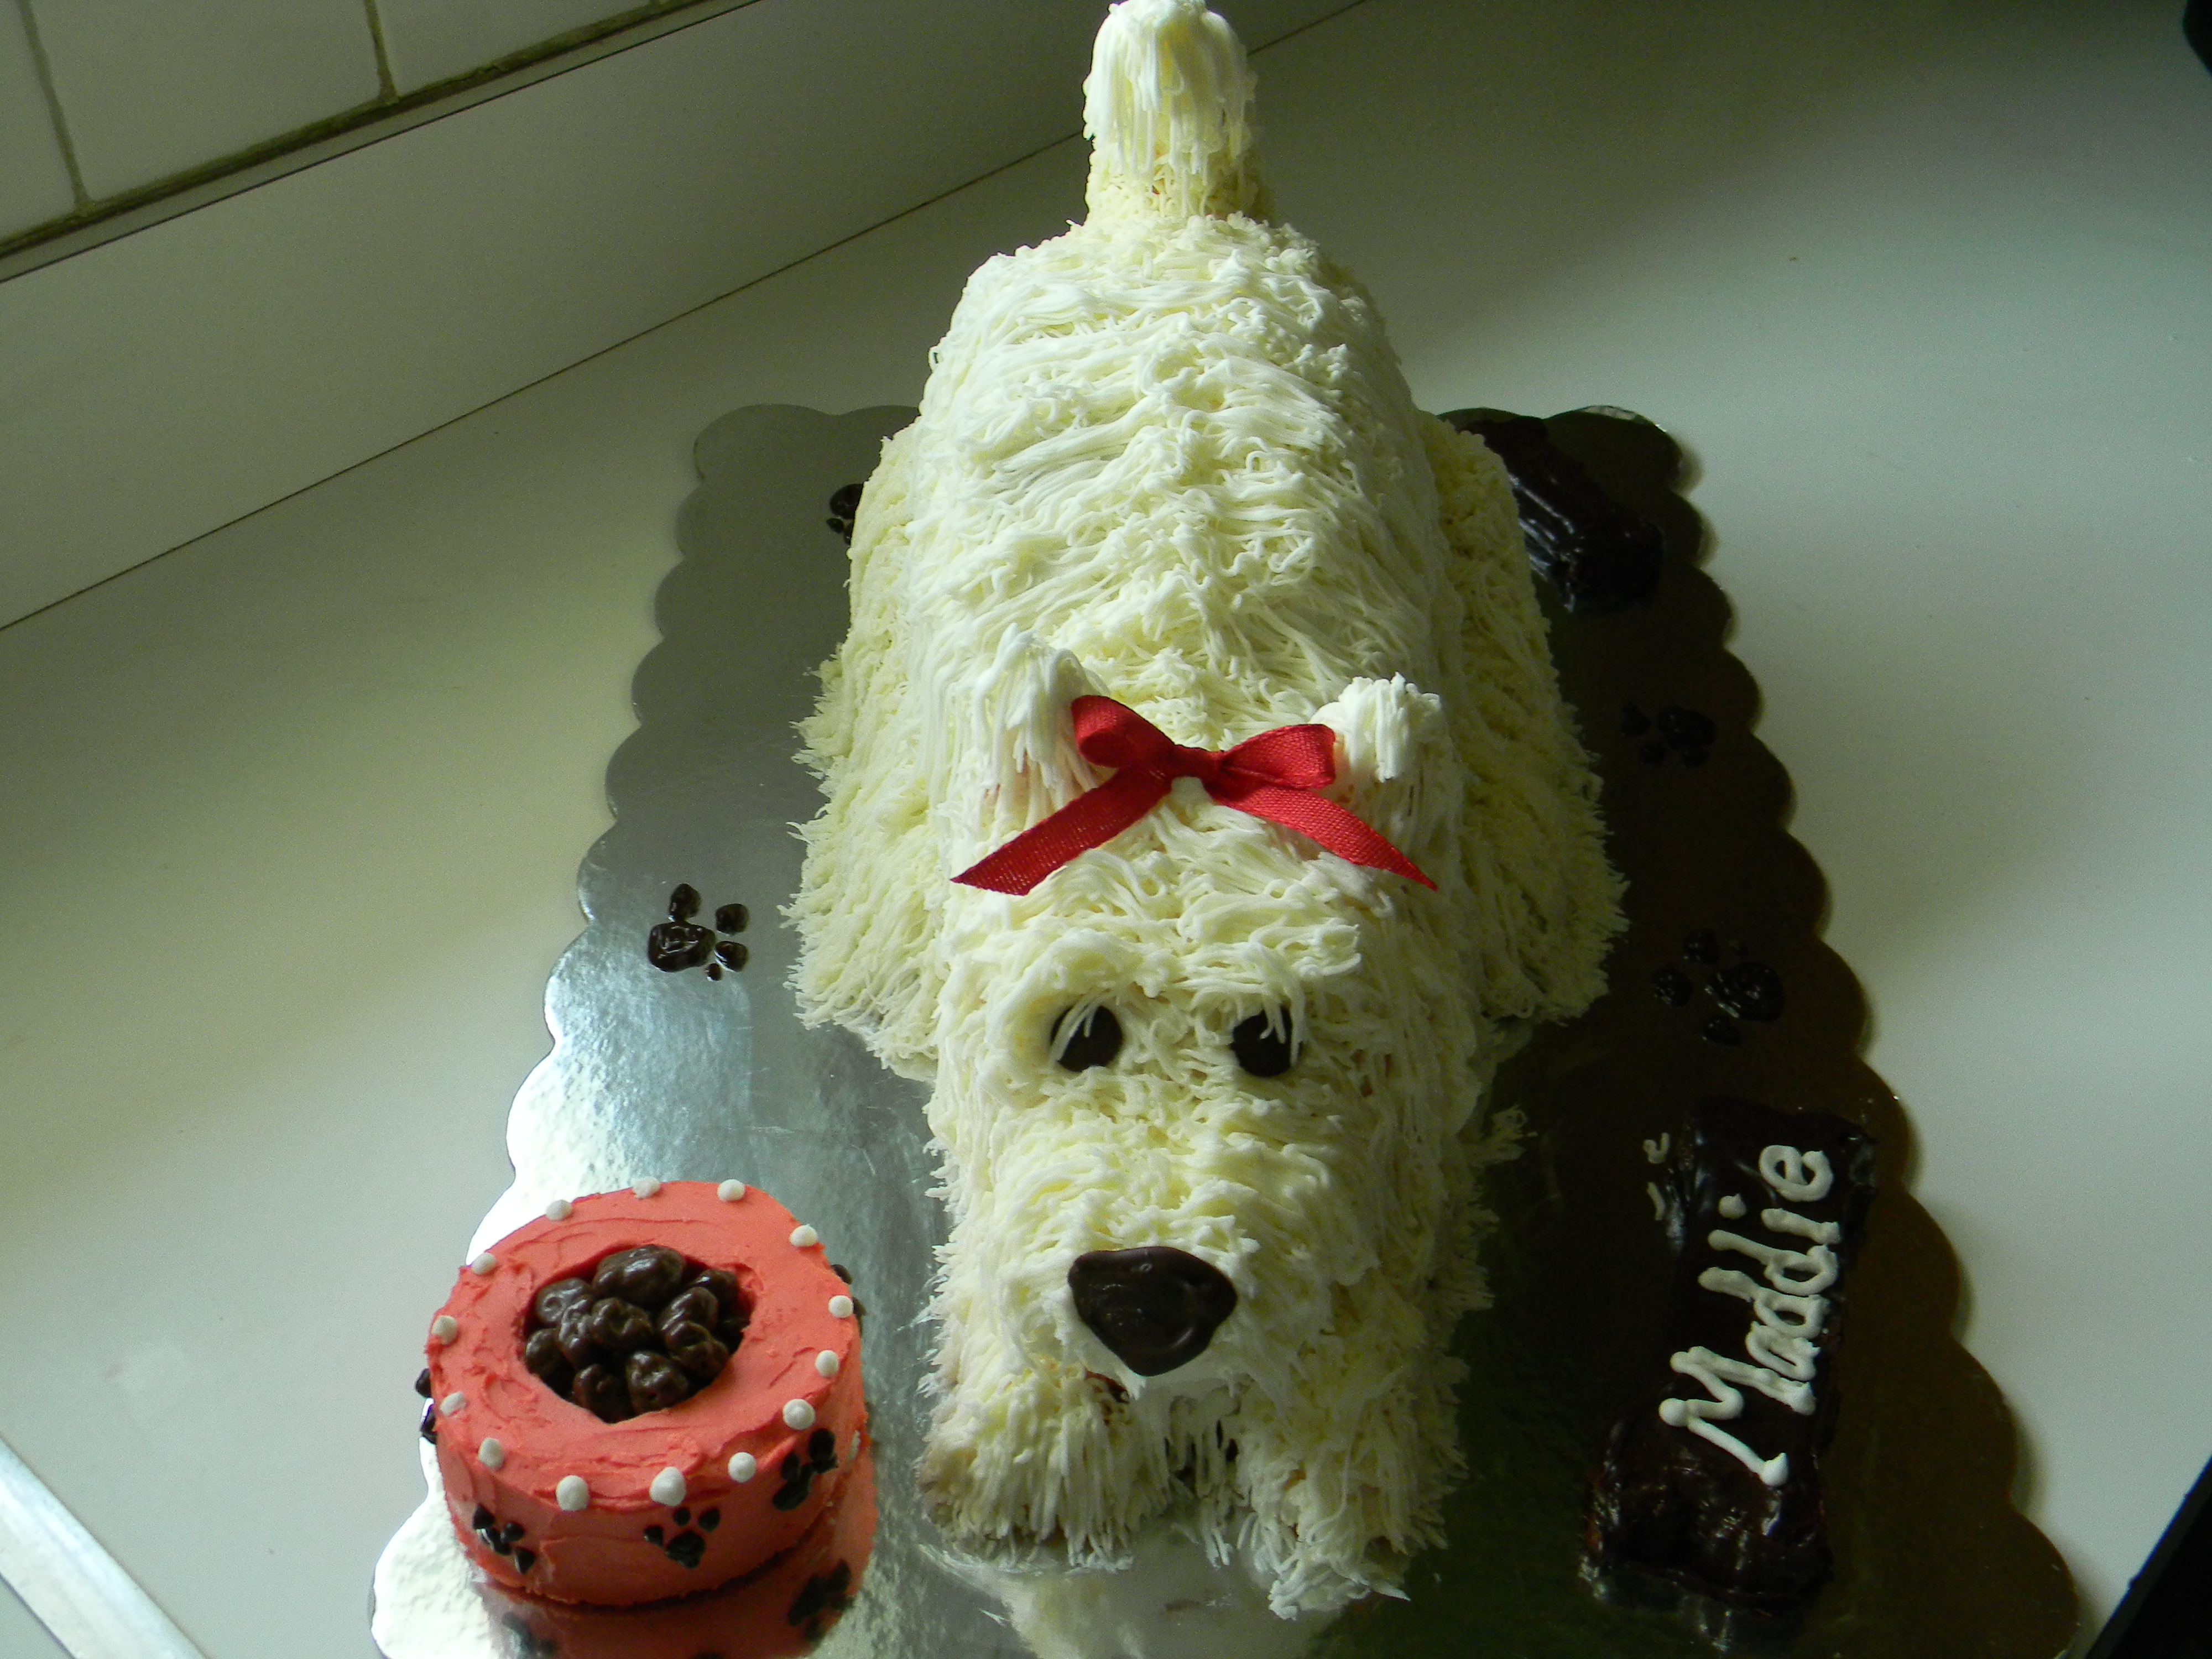
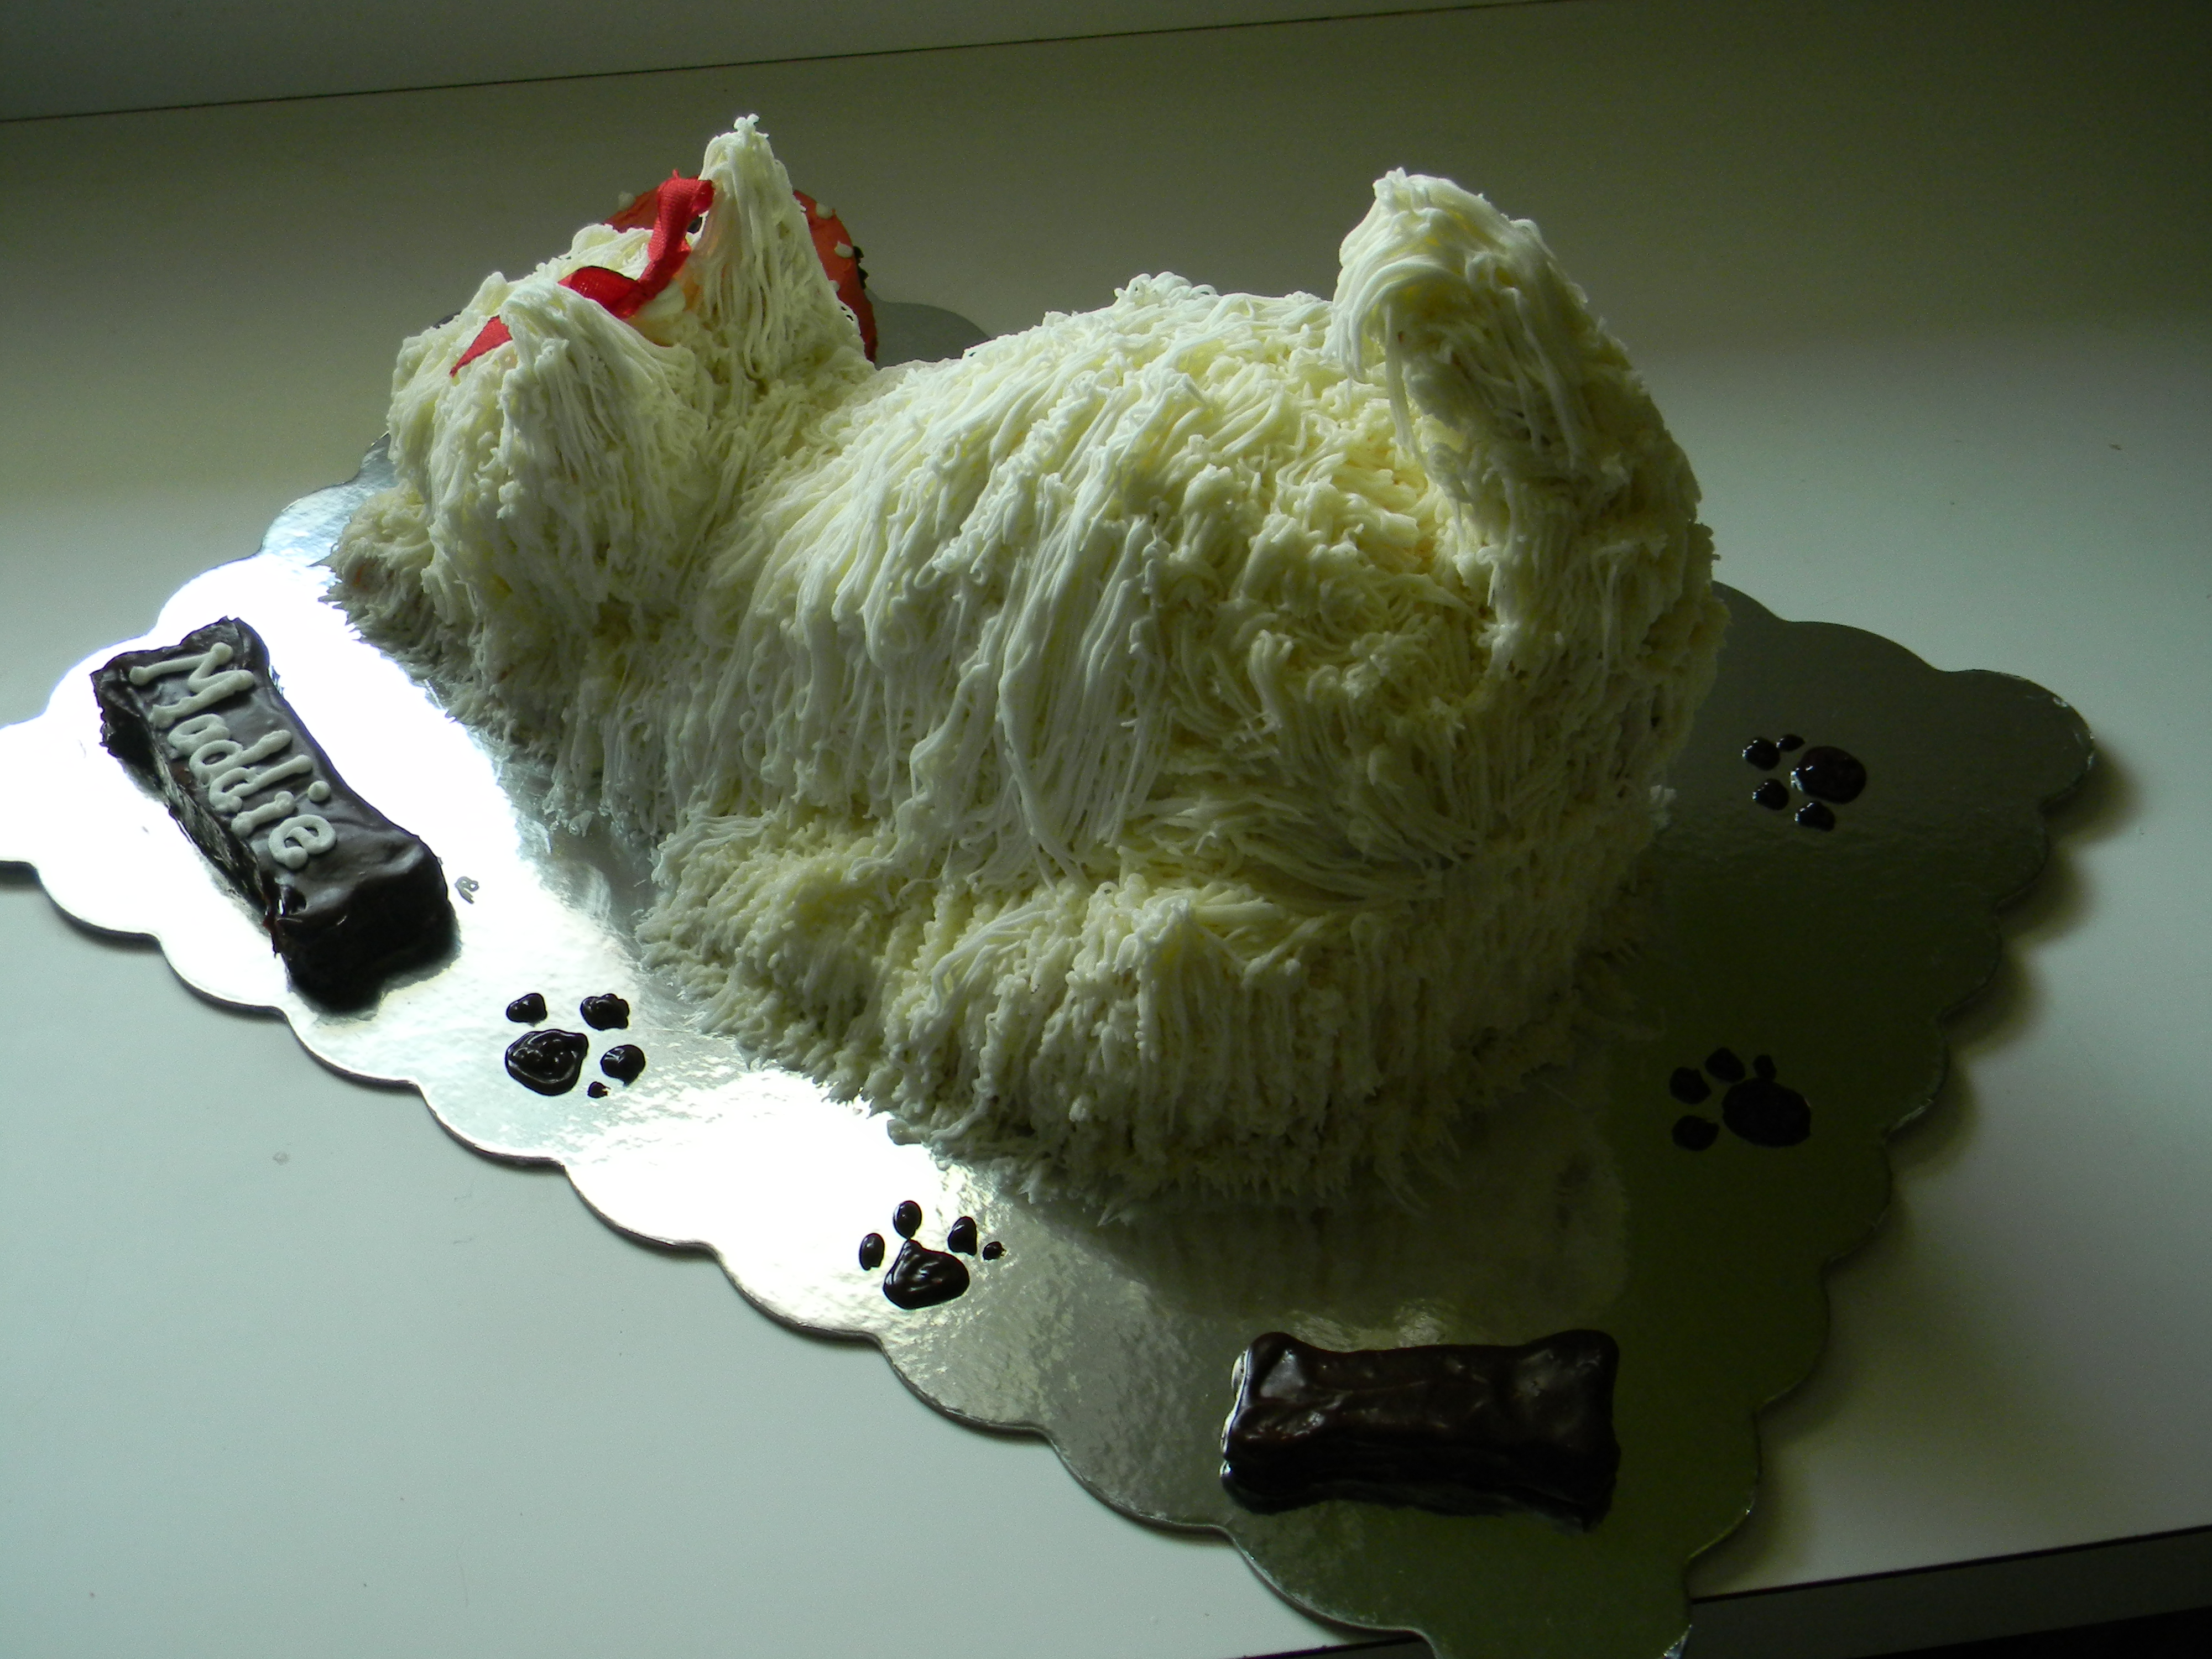
I added an edible dog bowl filled with raisinettes, chocolate dog foot prints and a couple of gnash covered pieces of cake cut into dog bones.  If I were to make another cake like this I would trace around the bones with white icing to better define them.  Next time.  The eyes and nose are melted semi sweet chocolate chips.  I piped them onto a piece of wax paper and refrigerated them until they were set.  You can’t really handle them until you’re 100% sure you’re ready to set them into the face.

2016-03-06 12.59.14

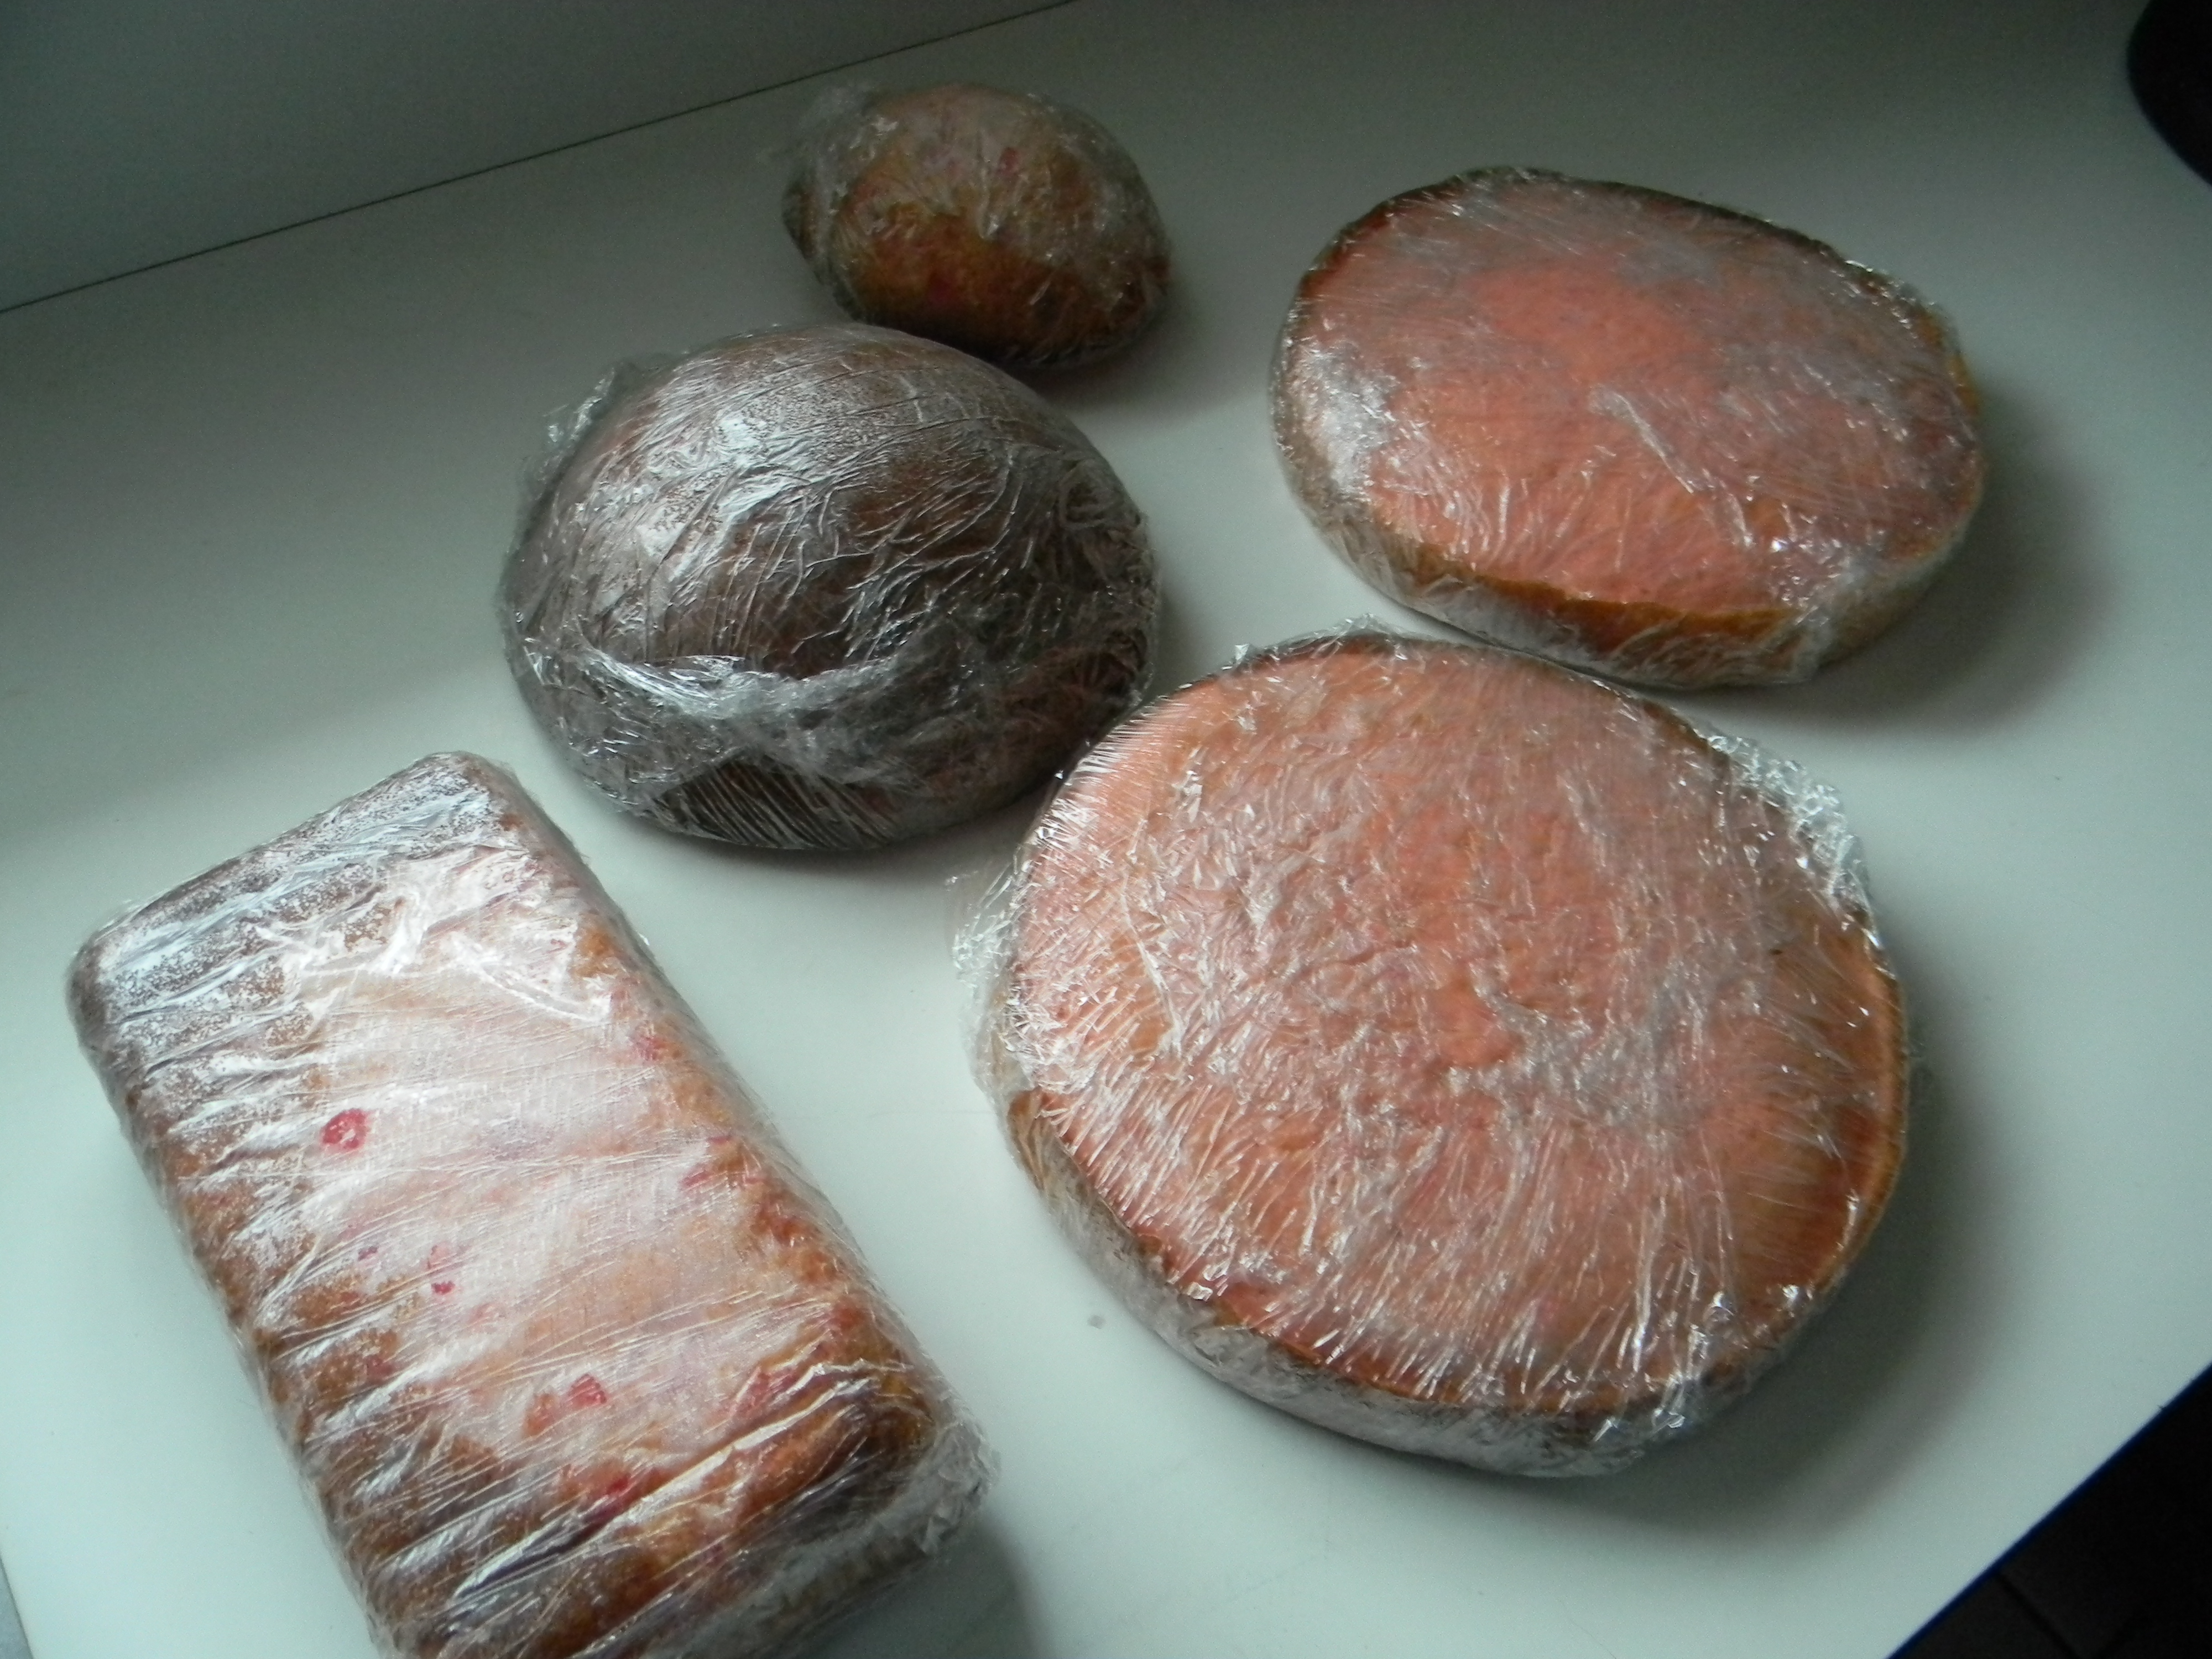
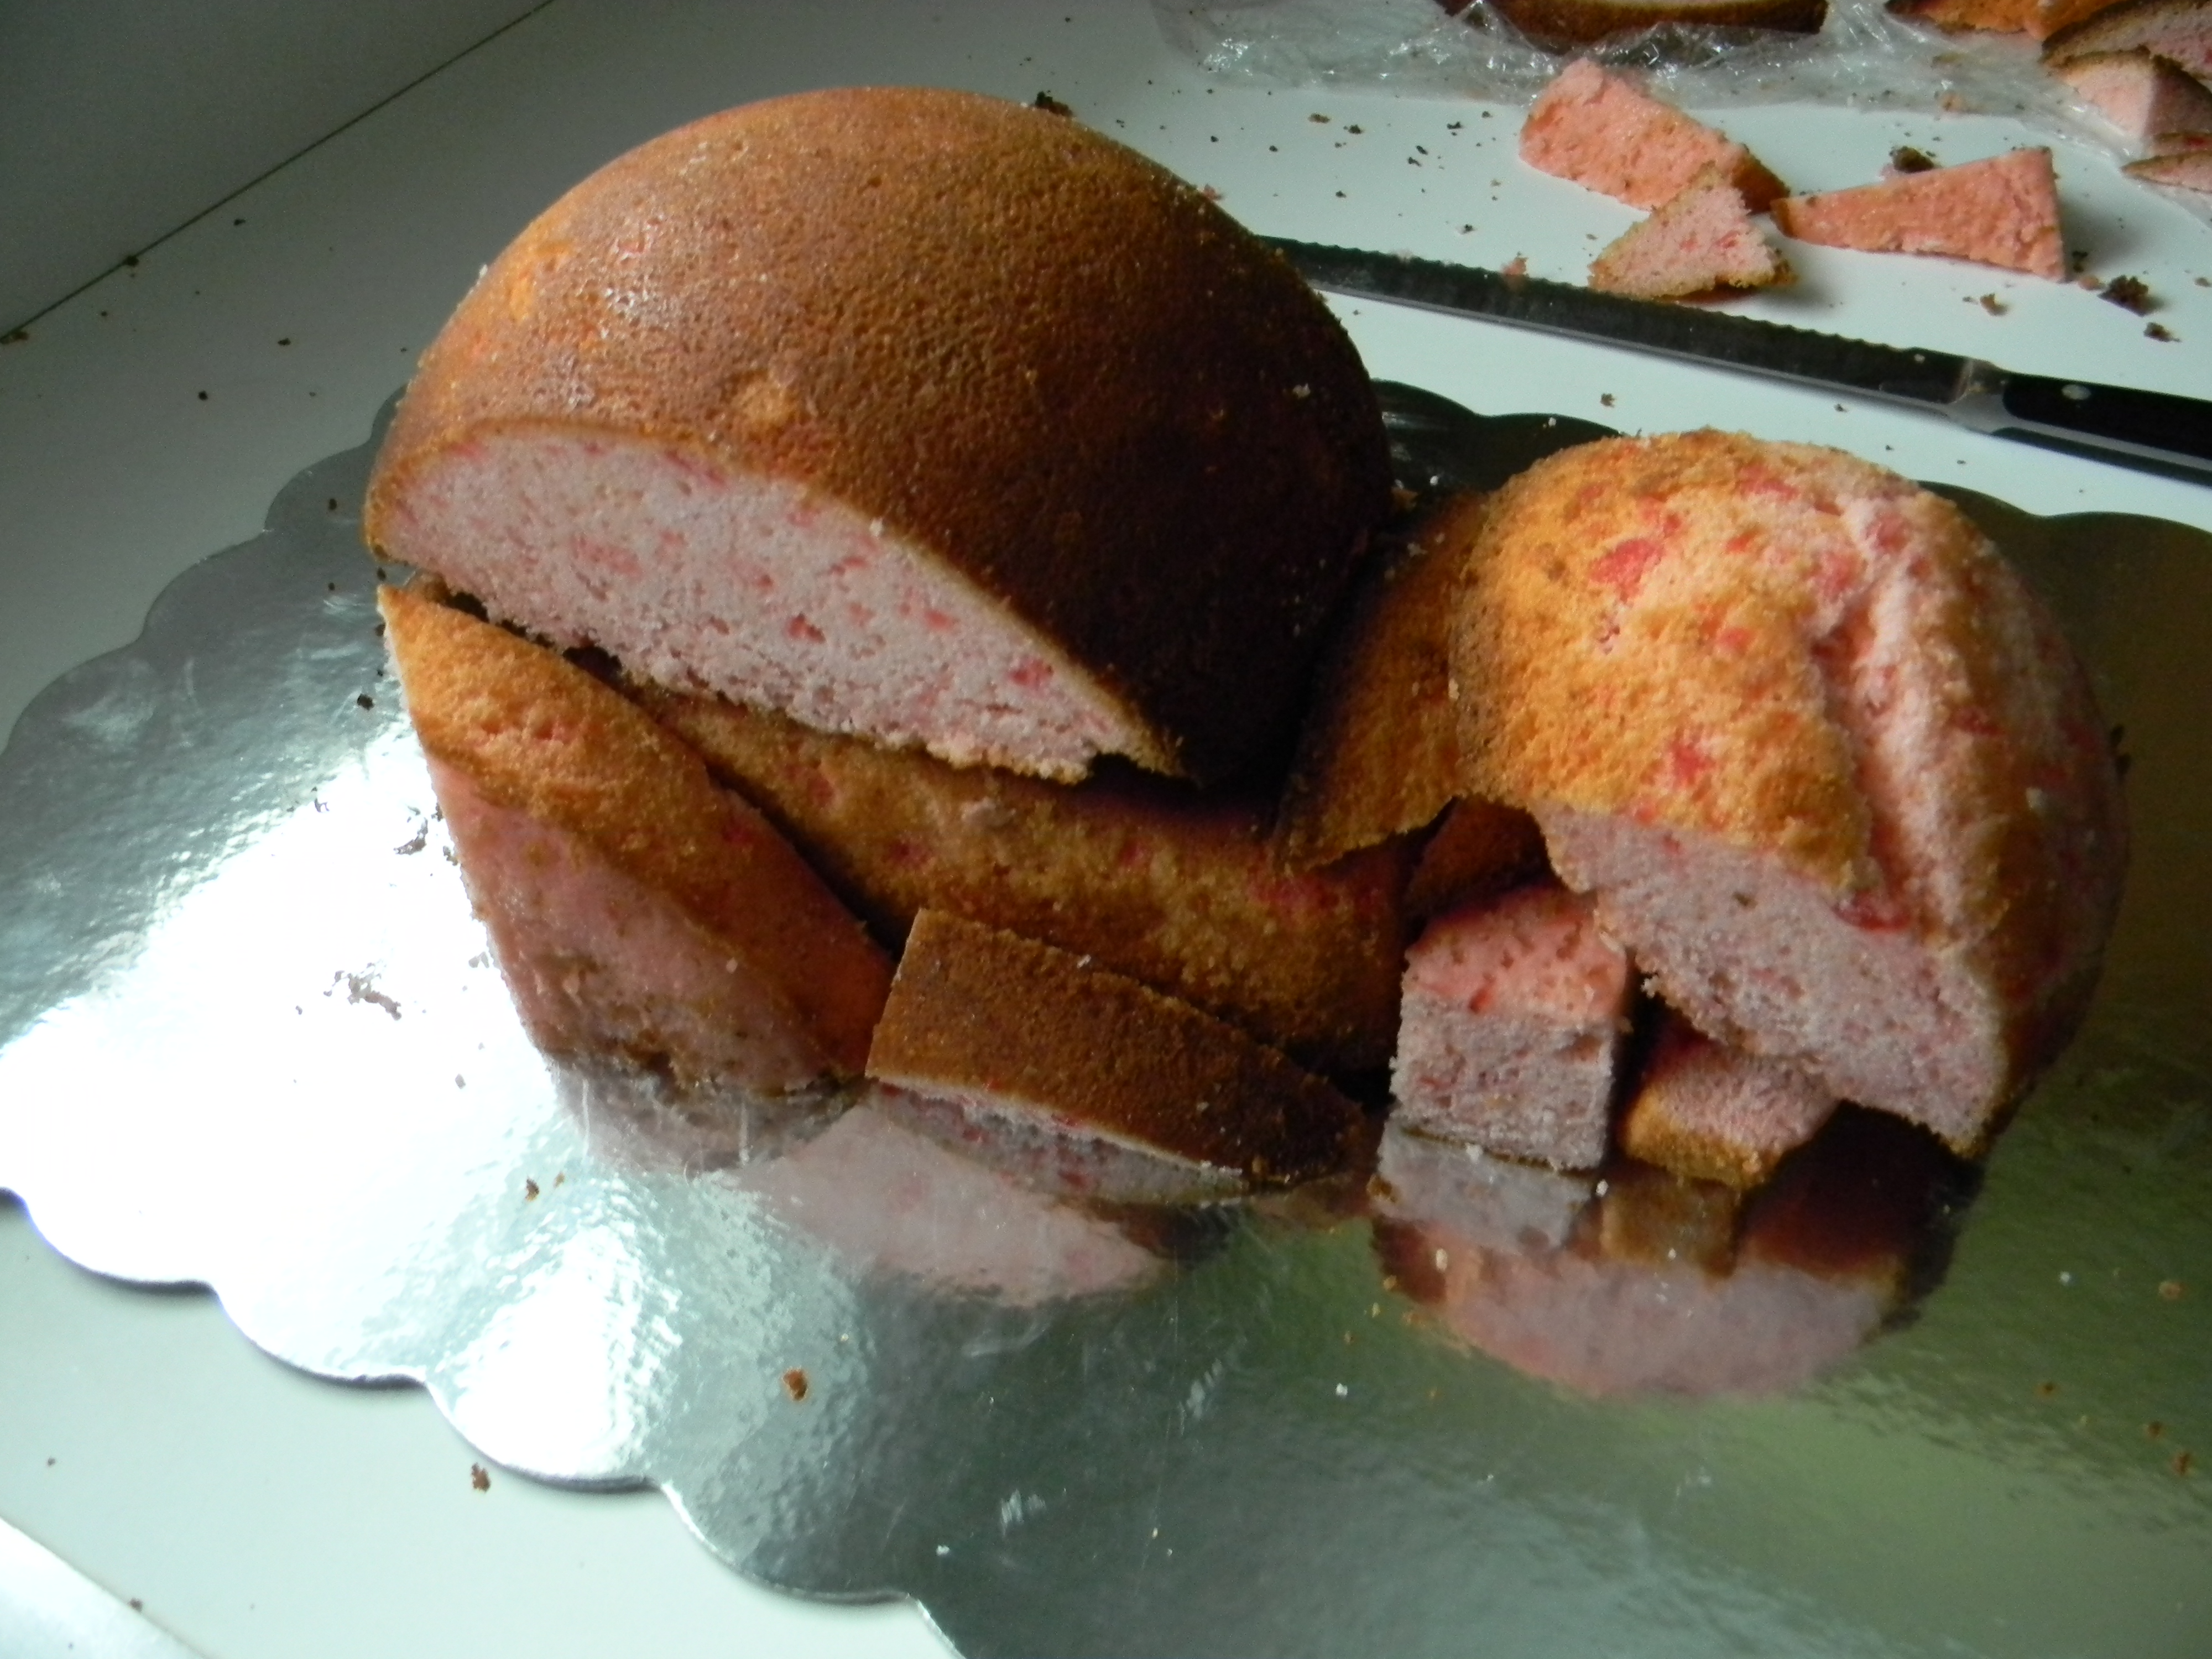
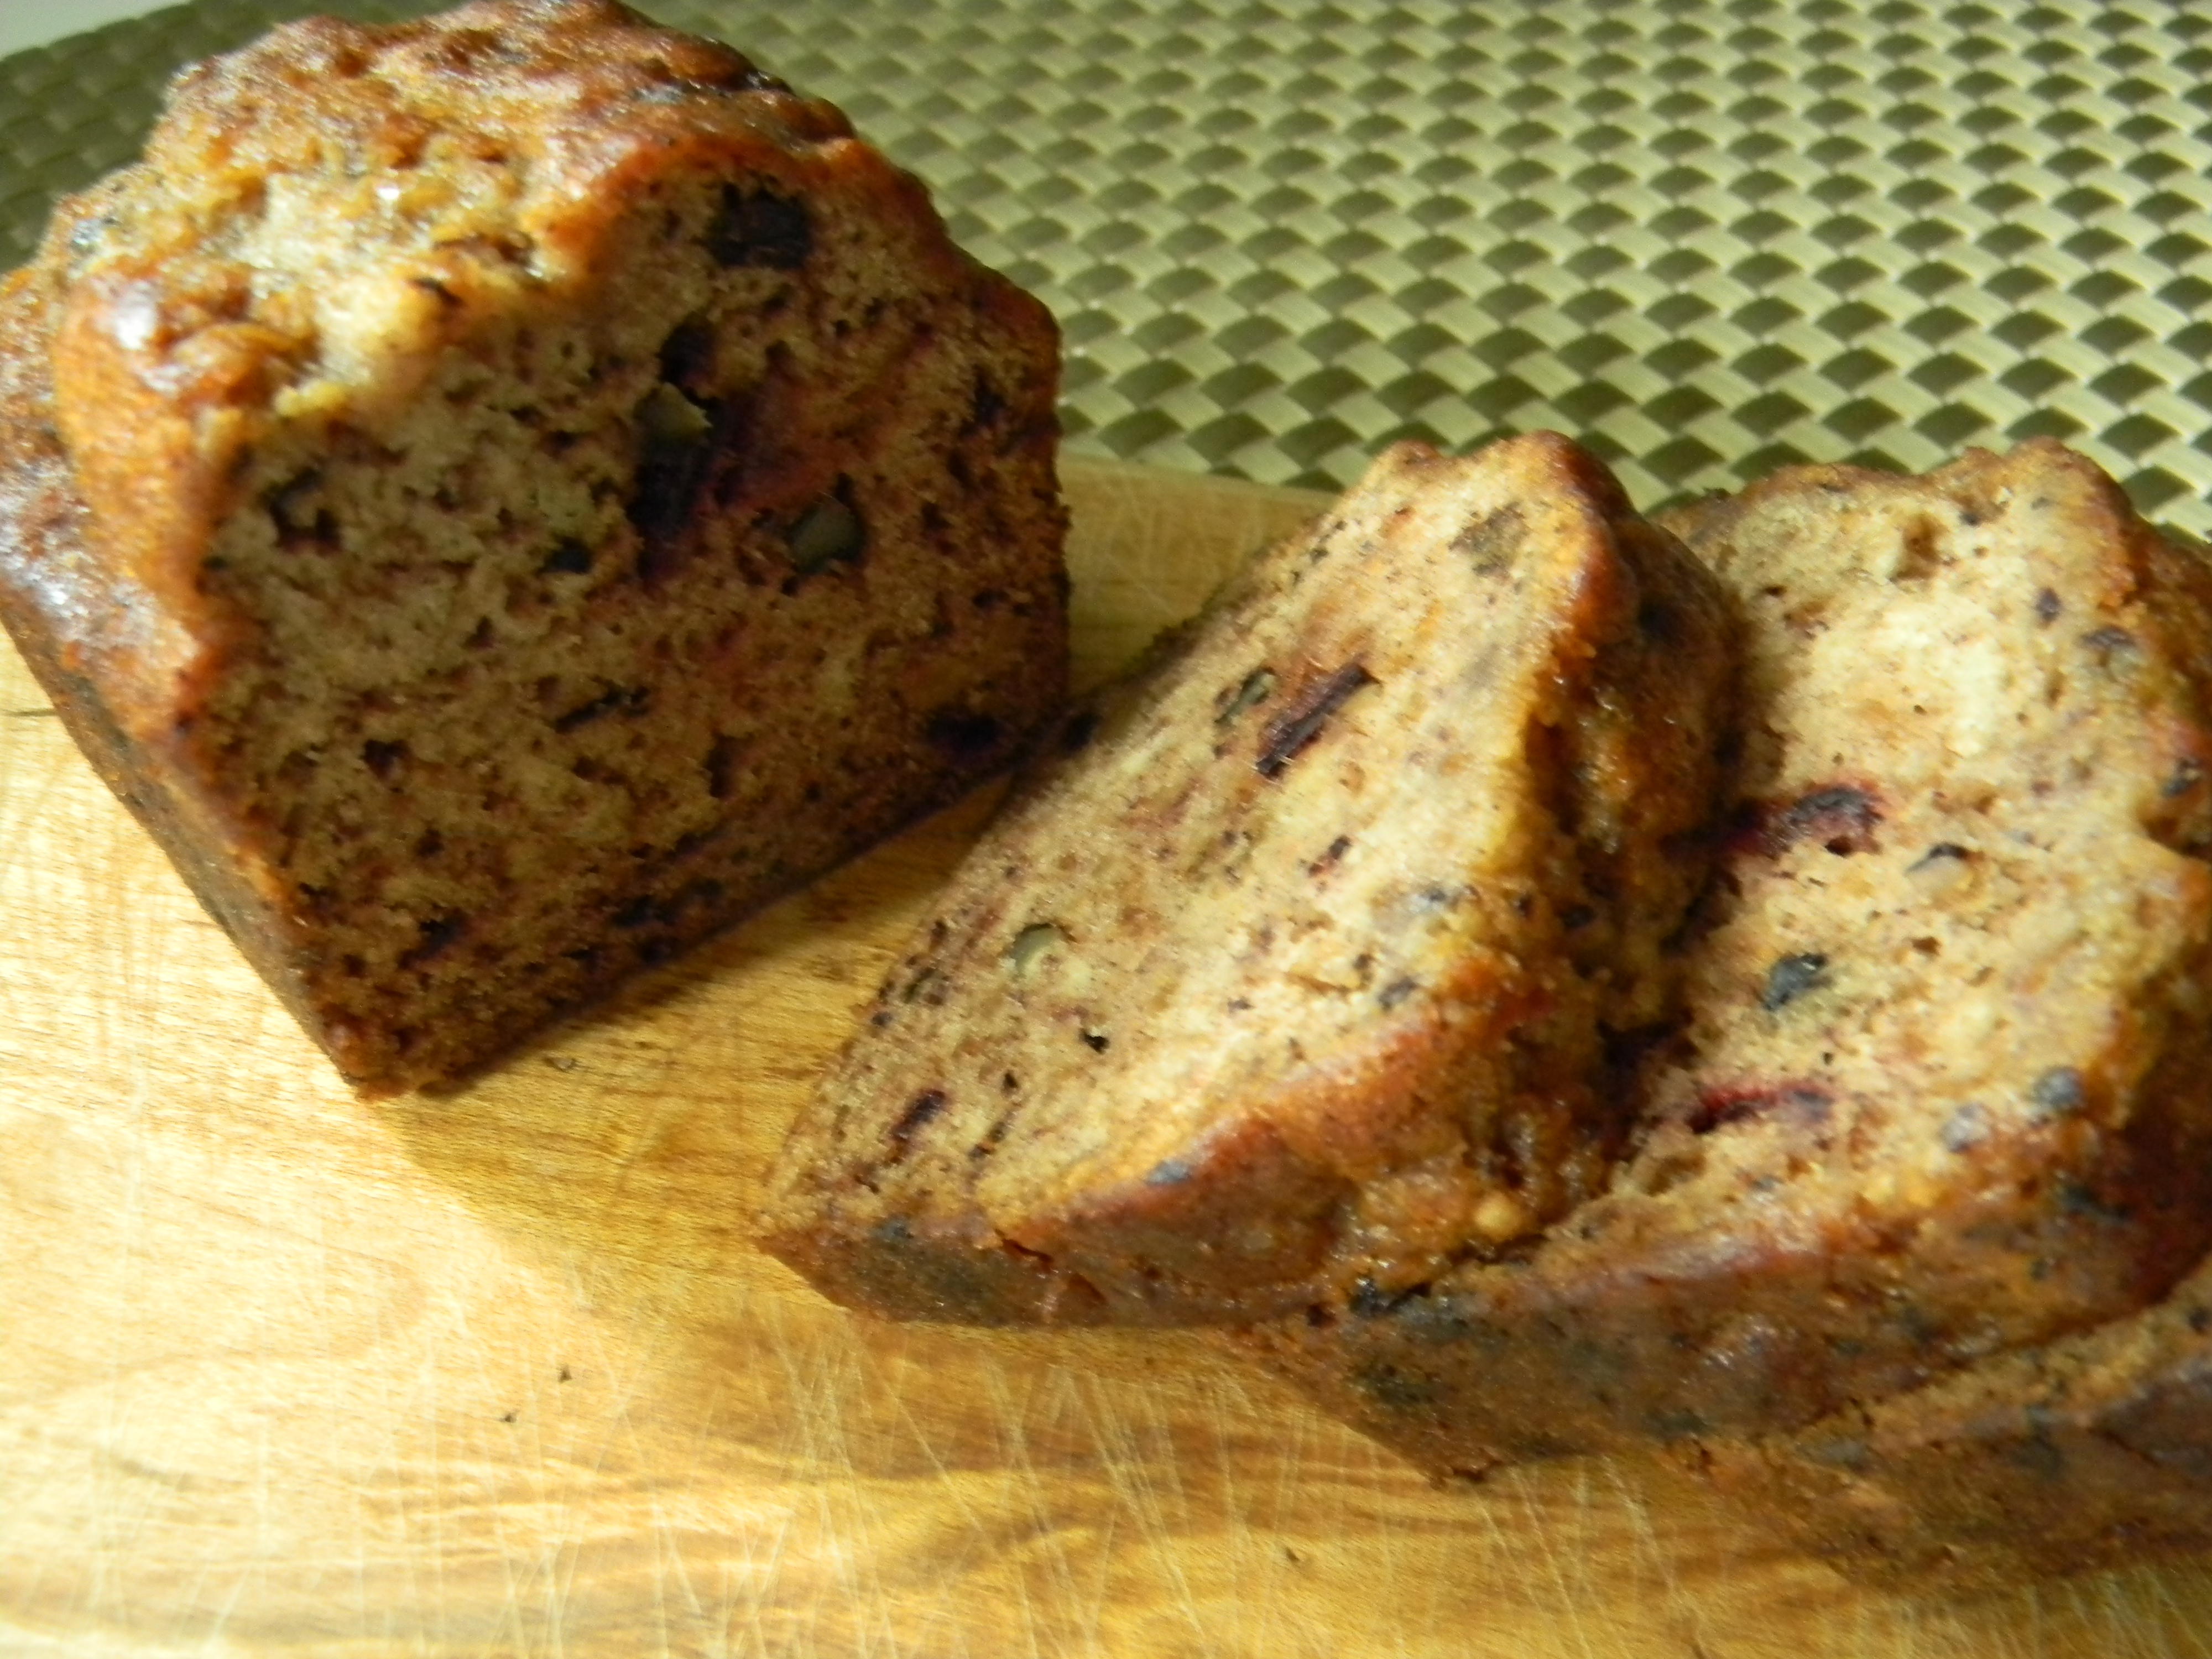
I wanted you to see all angles…I absolutely LOVED making this cake!  I’m going to now show you what I did to create her.  I baked a double recipe of yellow cake.  The guest of honor wanted a cherry cake so  I added rinsed, drained and minced maraschino cherries.  You can use your favorite recipe or even a box recipe.  Bake plenty of cake, you’ll need it.  Most importantly, make your cake ahead of time, wrap with Saran wrap well and freeze. Working with partially frozen cake is a total must!   Fresh room temperature cake is too soft and crumbly and would be way too hard to work with.

I used a couple of dome-shaped pans, one for the head and one for the little bottom that sticks up in the back.  I used a regular loaf pan for the body and thought I could use two 9″ cakes for the legs, tail and ears.  There was a good amount of one cake left, I put it back in the freezer to make a dessert trifle later.  Or there may be family members available to help with those pesky left over delicious pieces of cake!

2016-03-05 10.01.36

It is time to make a big batch of butter cream frosting or, the glue you will need to sculpt your cake.  You’ll also want to apply a “crumb” layer of frosting to the entire cake once you’ve got it into the shape you like.

2016-03-05 10.02.50

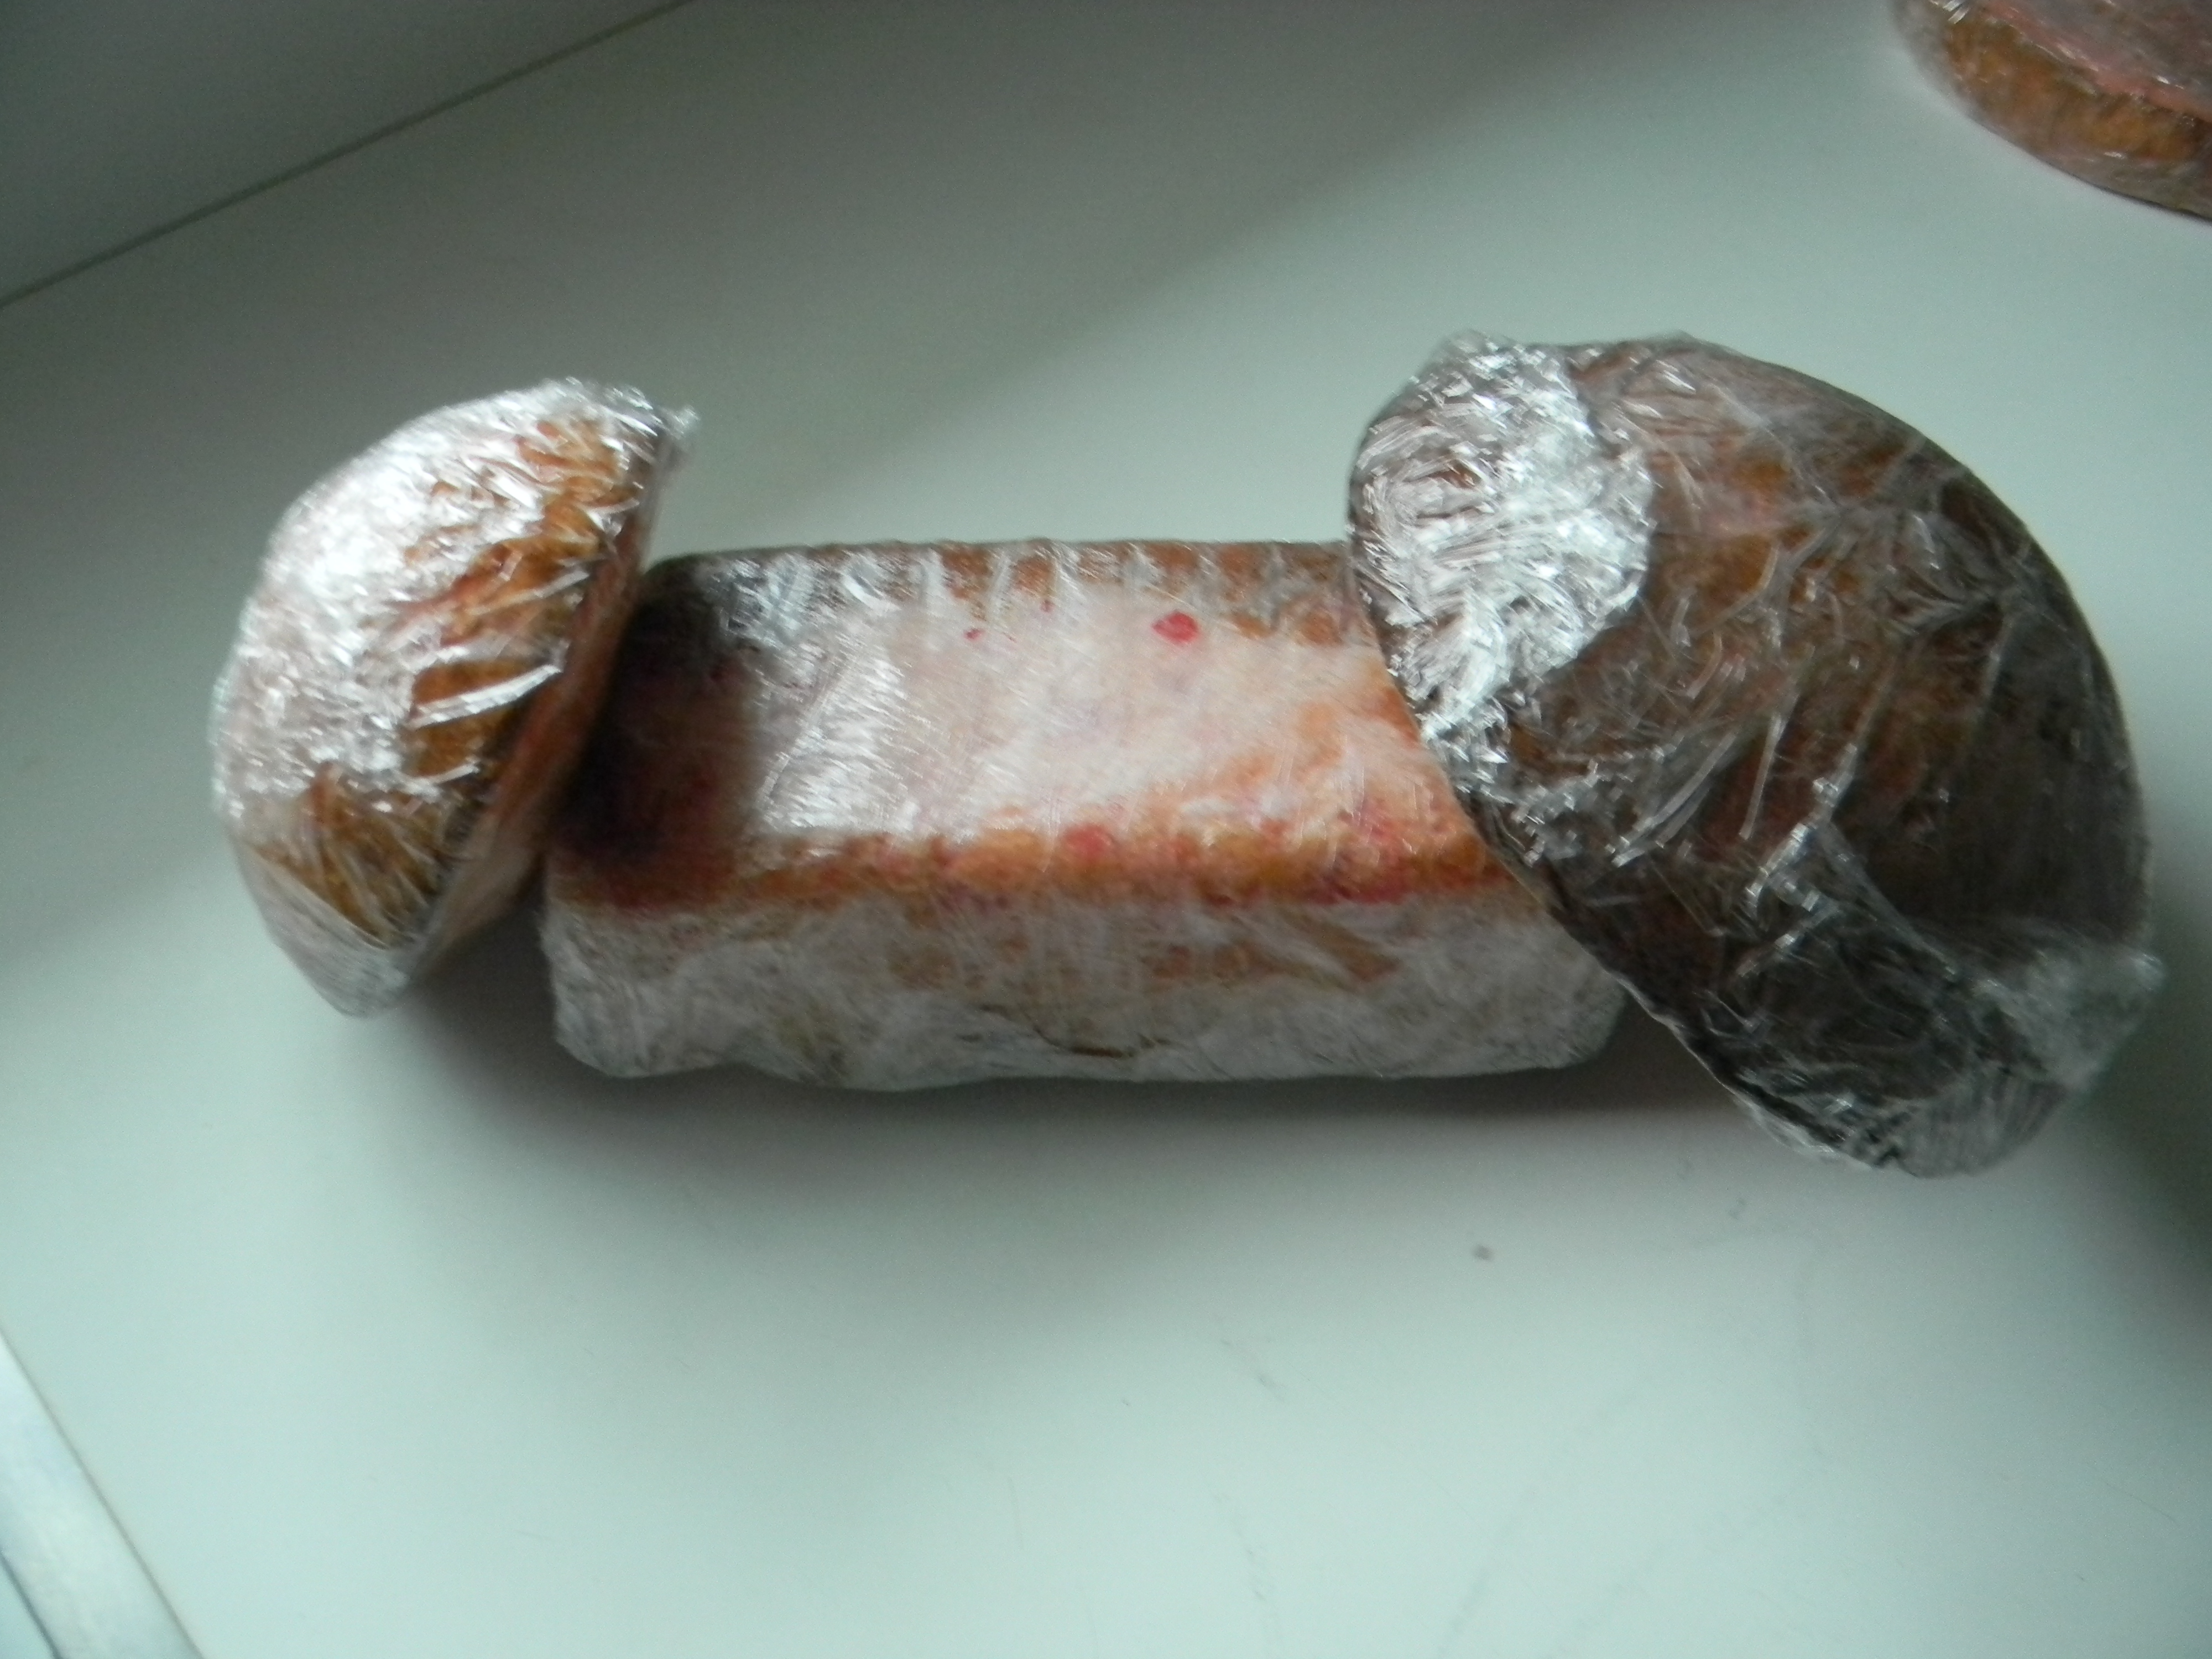
I started playing with the pieces, like a puzzle.  Time to unwrap the cakes and start sculpting.  The cool thing here is you can add or cut away pieces as you to shape the cake.

2016-03-05 10.41.29

At first I thought to place the cake on another cake base, no way!  Would’ve been way too hard to keep the bottom layer clean.  I thought to assemble the cake on another pan but the transfer would’ve been disastrous!  This was the best bet.  I could easily rid the board of crumbs or unwanted frosting.  You can get nice cake boards at Michael’s Craft Store.

2016-03-05 10.55.30

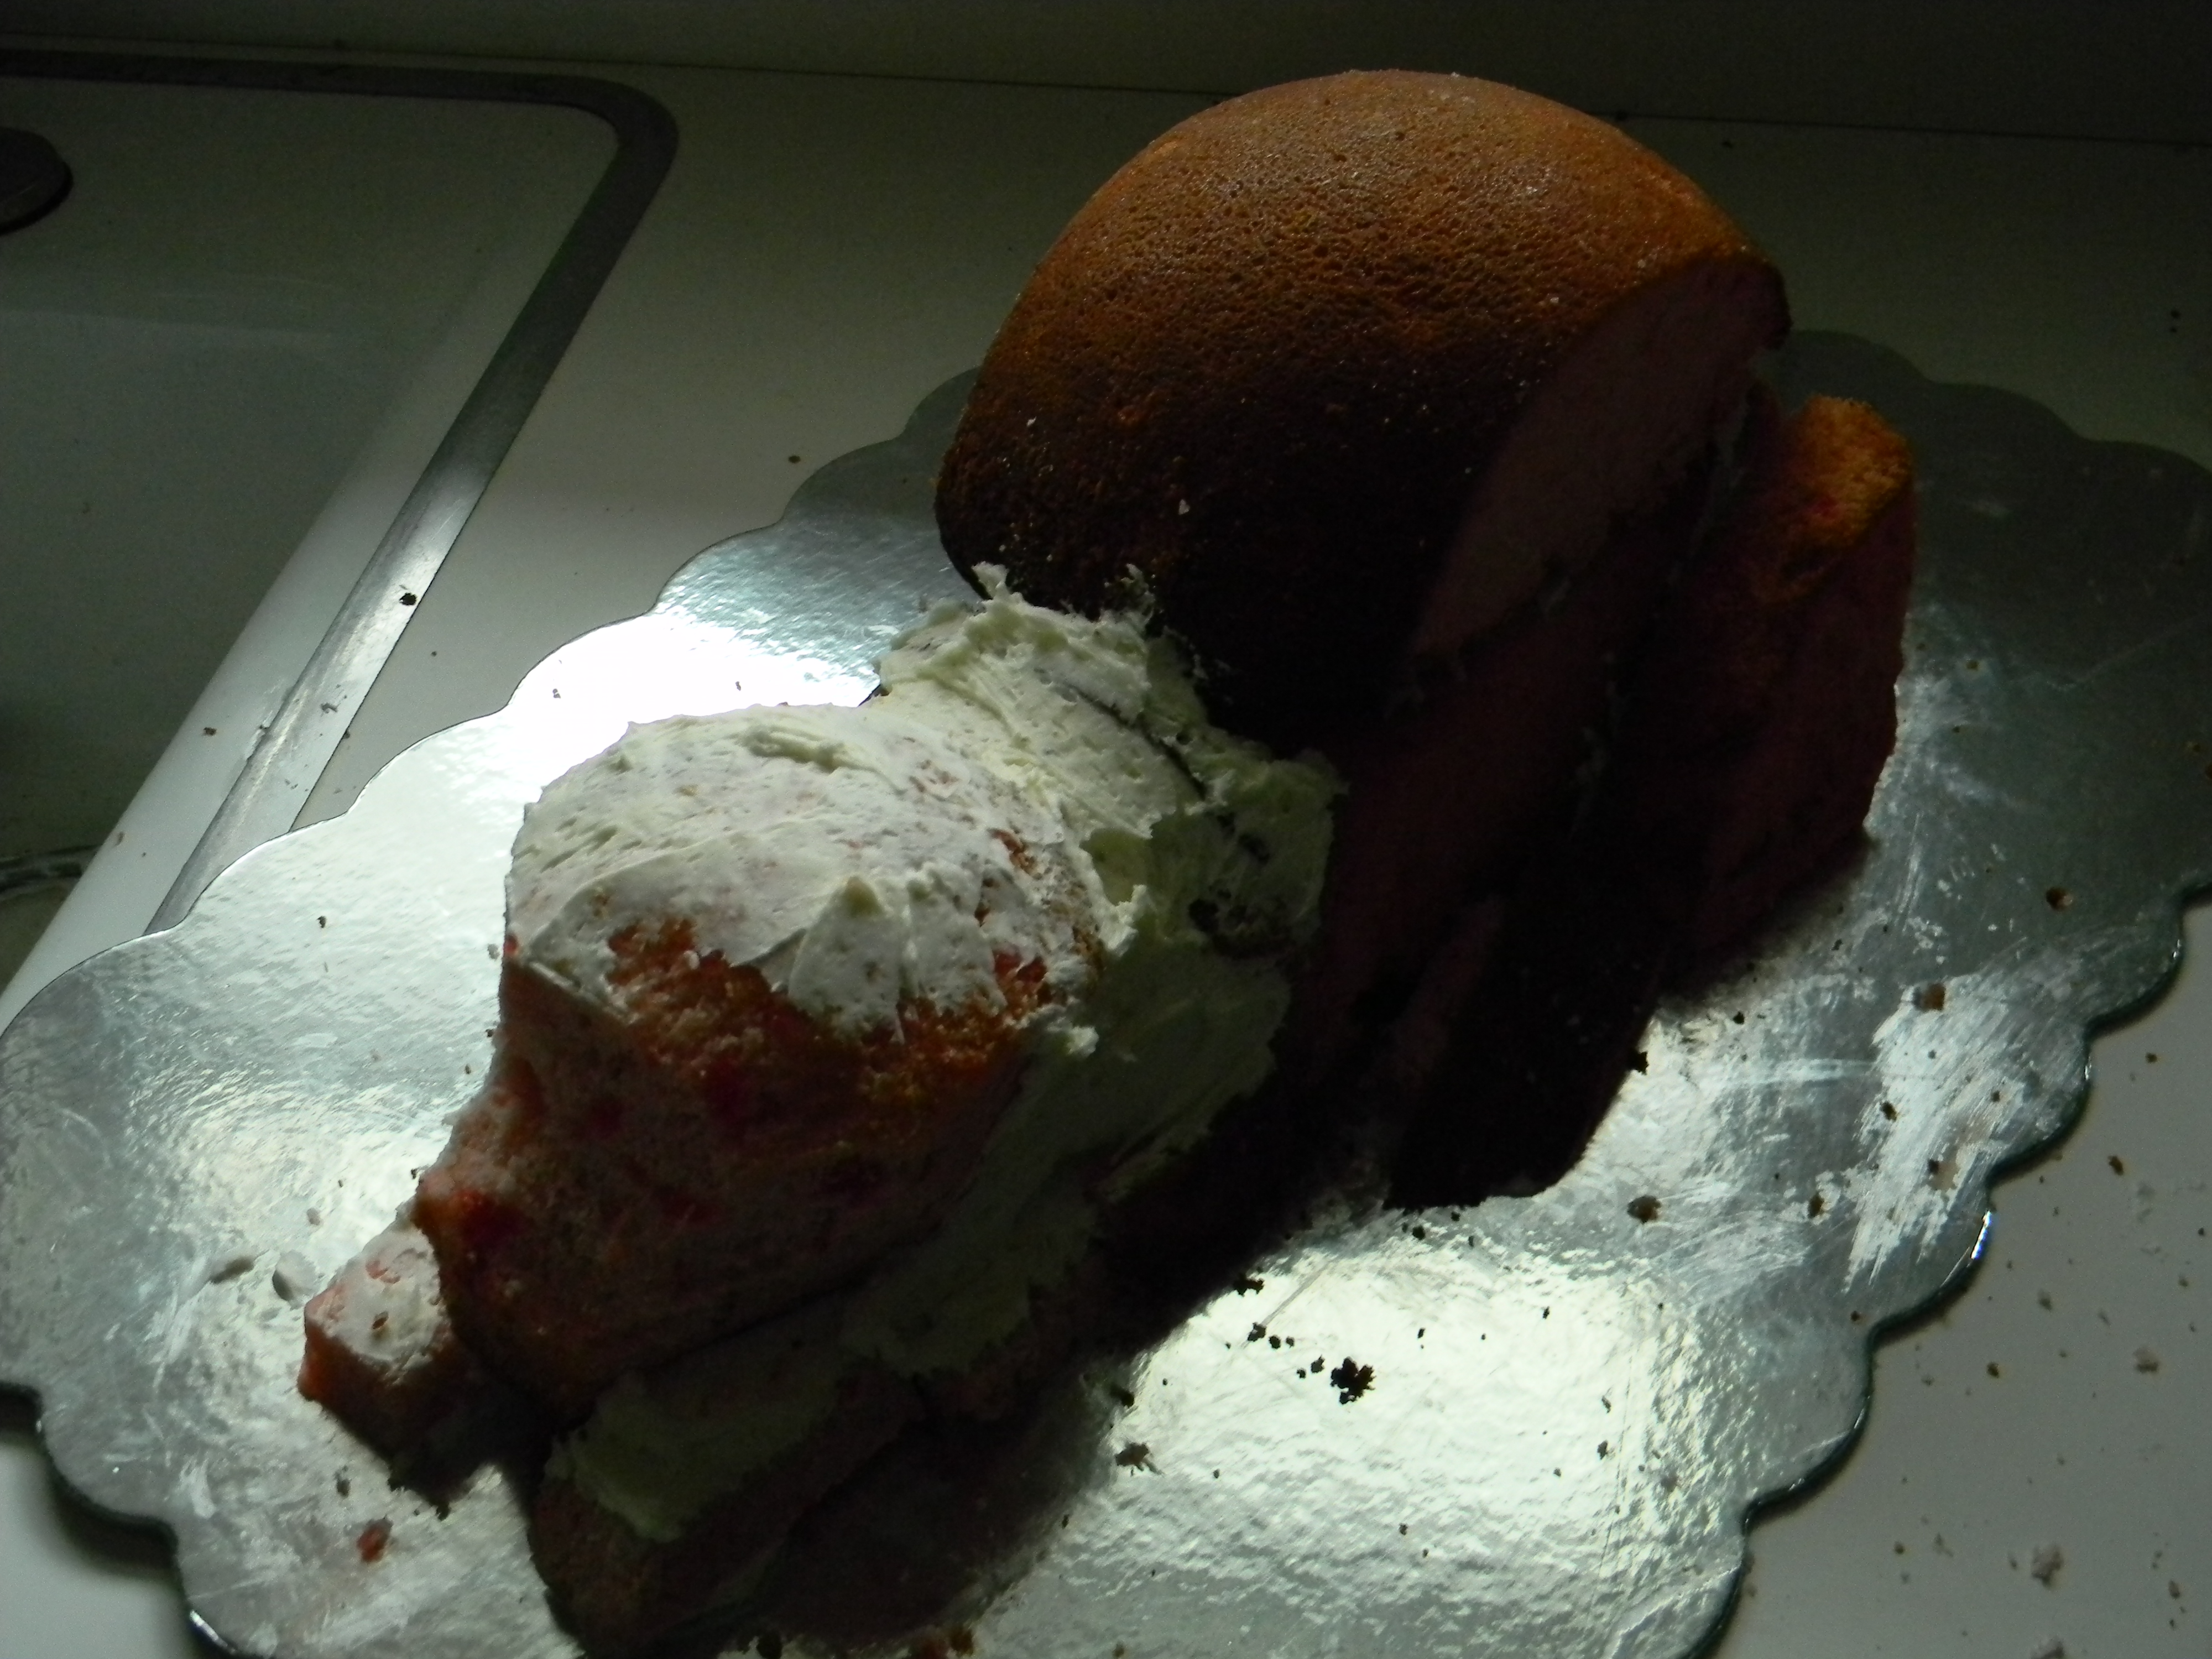
Here I began the gluing process.  You want all cake components to be solid.  Might be a bit messy at this point, it’s fine!  Plenty of time to clean up the board using a moist paper towel.

2016-03-05 11.17.26

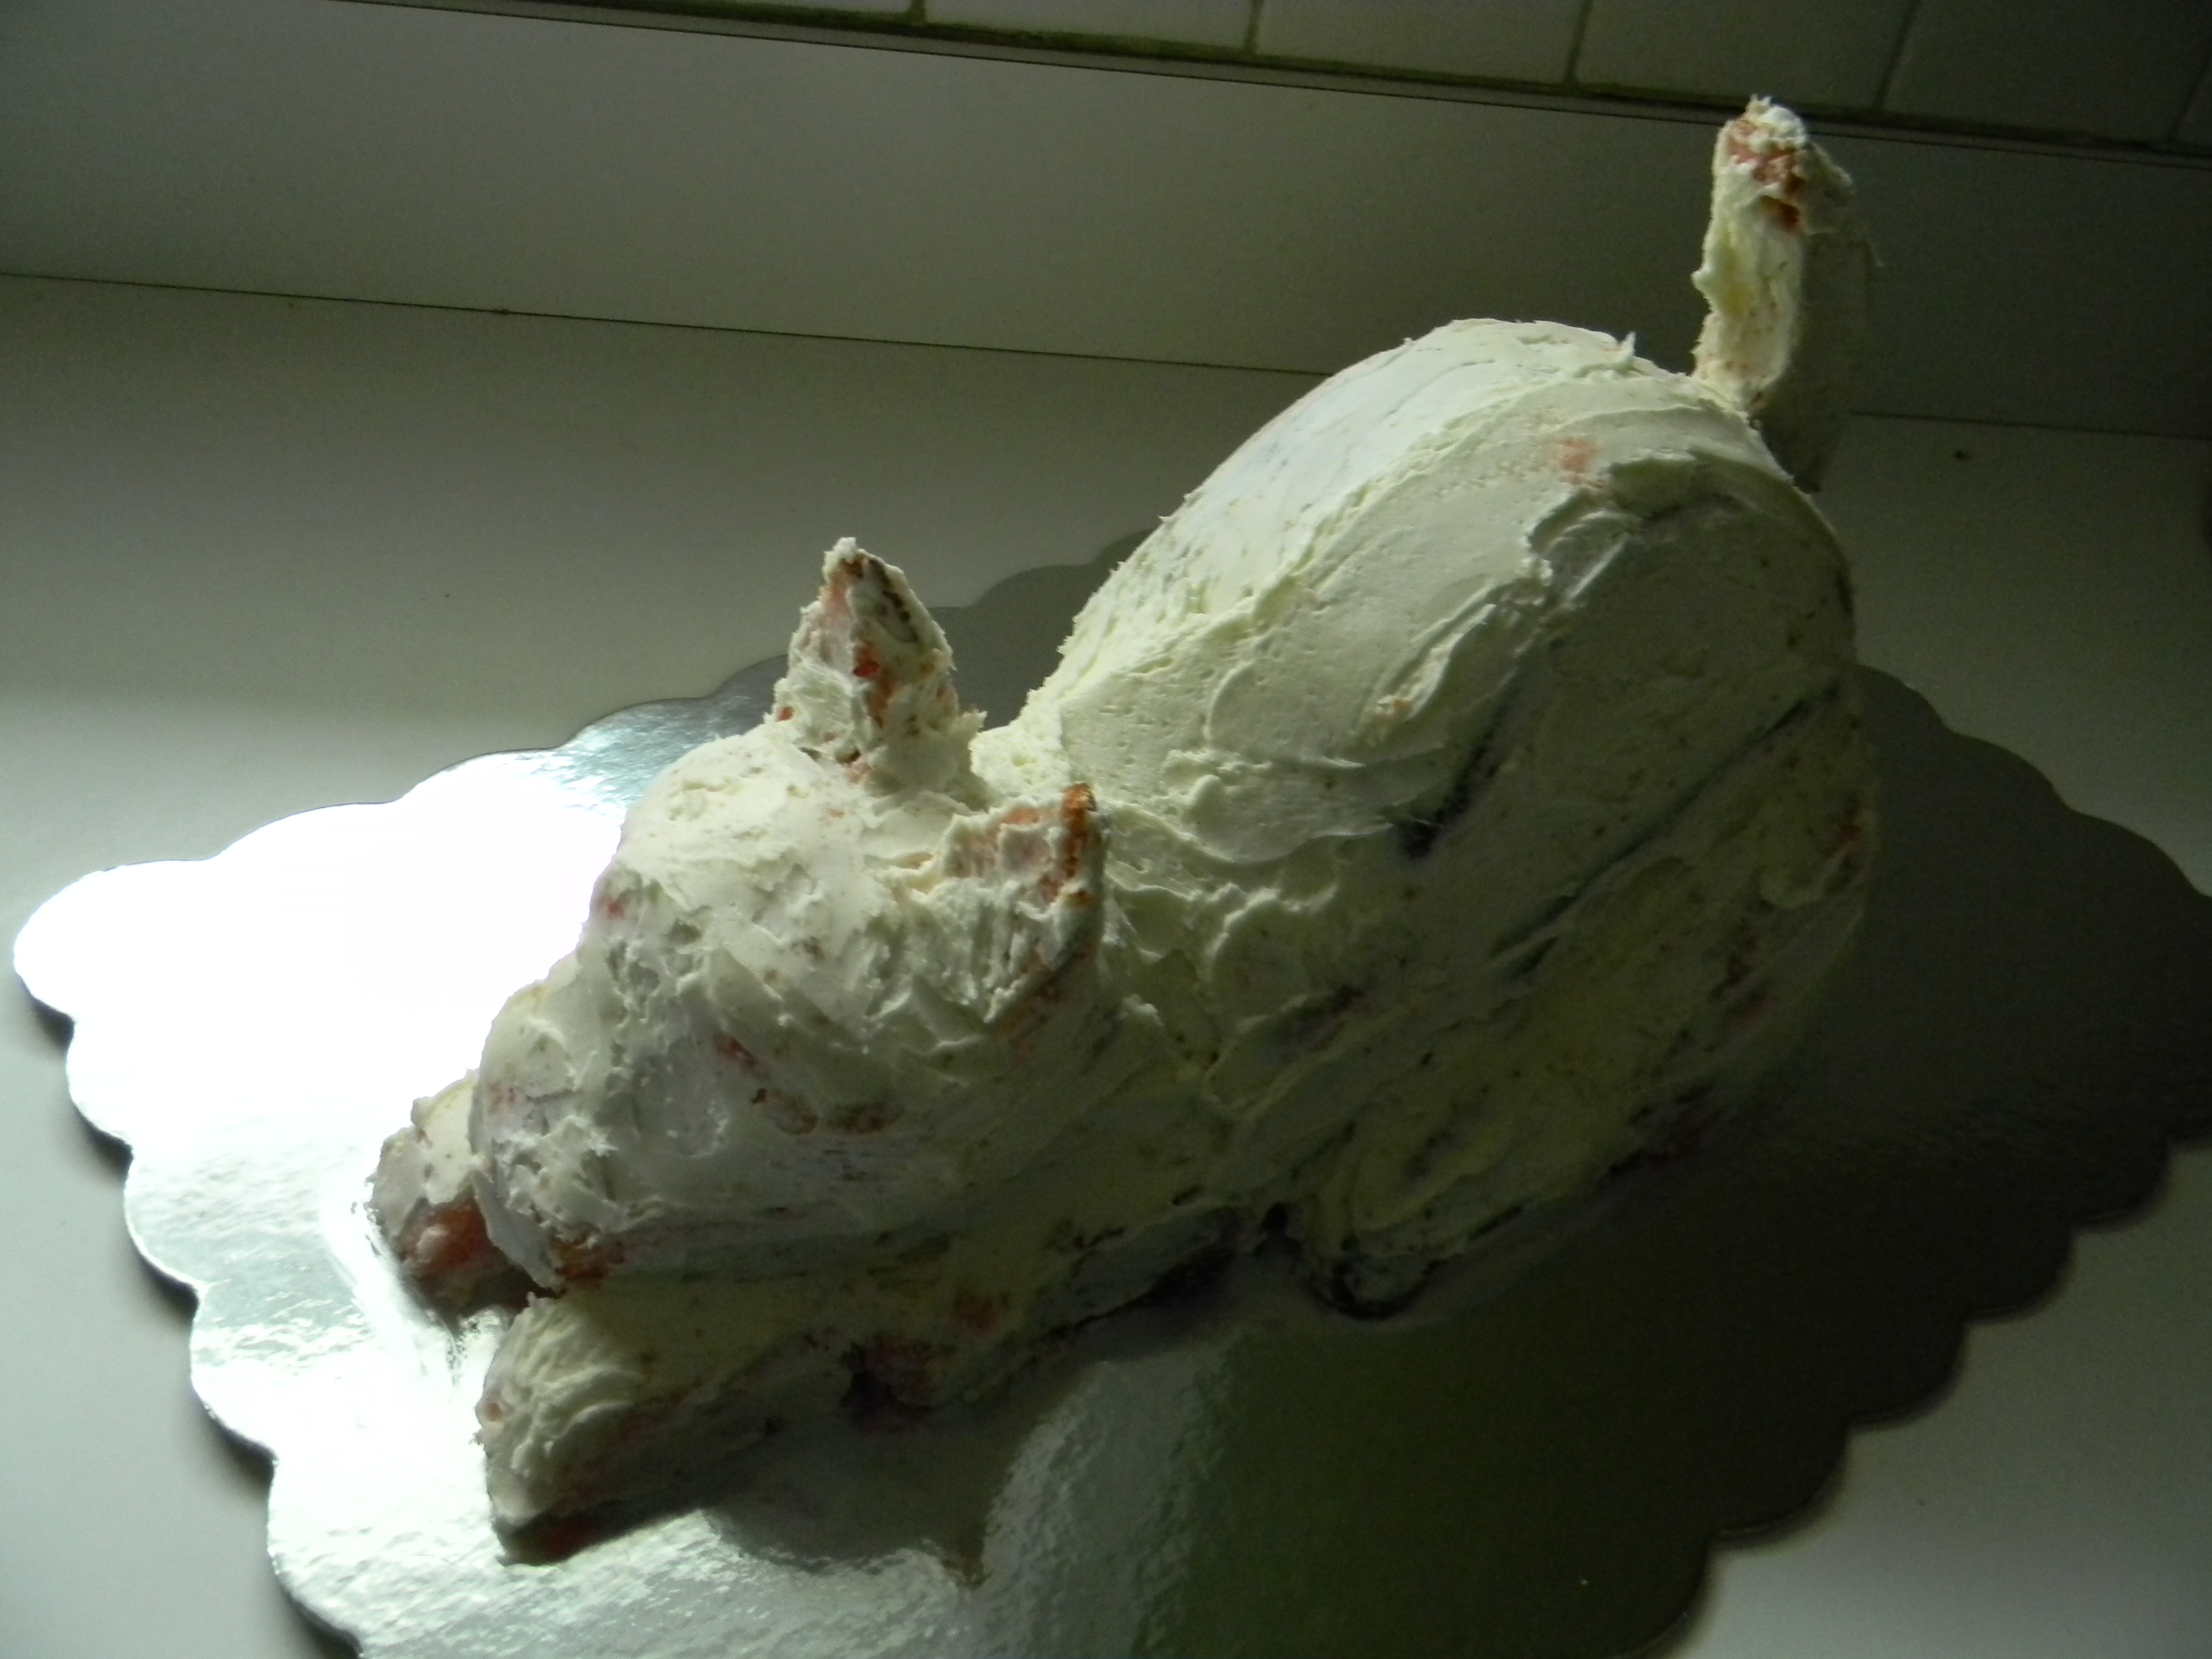
I added the tail with a 6″ skewer and the ears with a couple of toothpicks.  At this point it is looking very cat-like. Ryan quickly pointed this out to me and he was right.  I cut away a little more of the face below the eyes and added a bit more frosting to square off the face.  The cake is now coated with the “crumb” layer of frosting.  It’s time to start piping.

2016-03-05 13.12.24

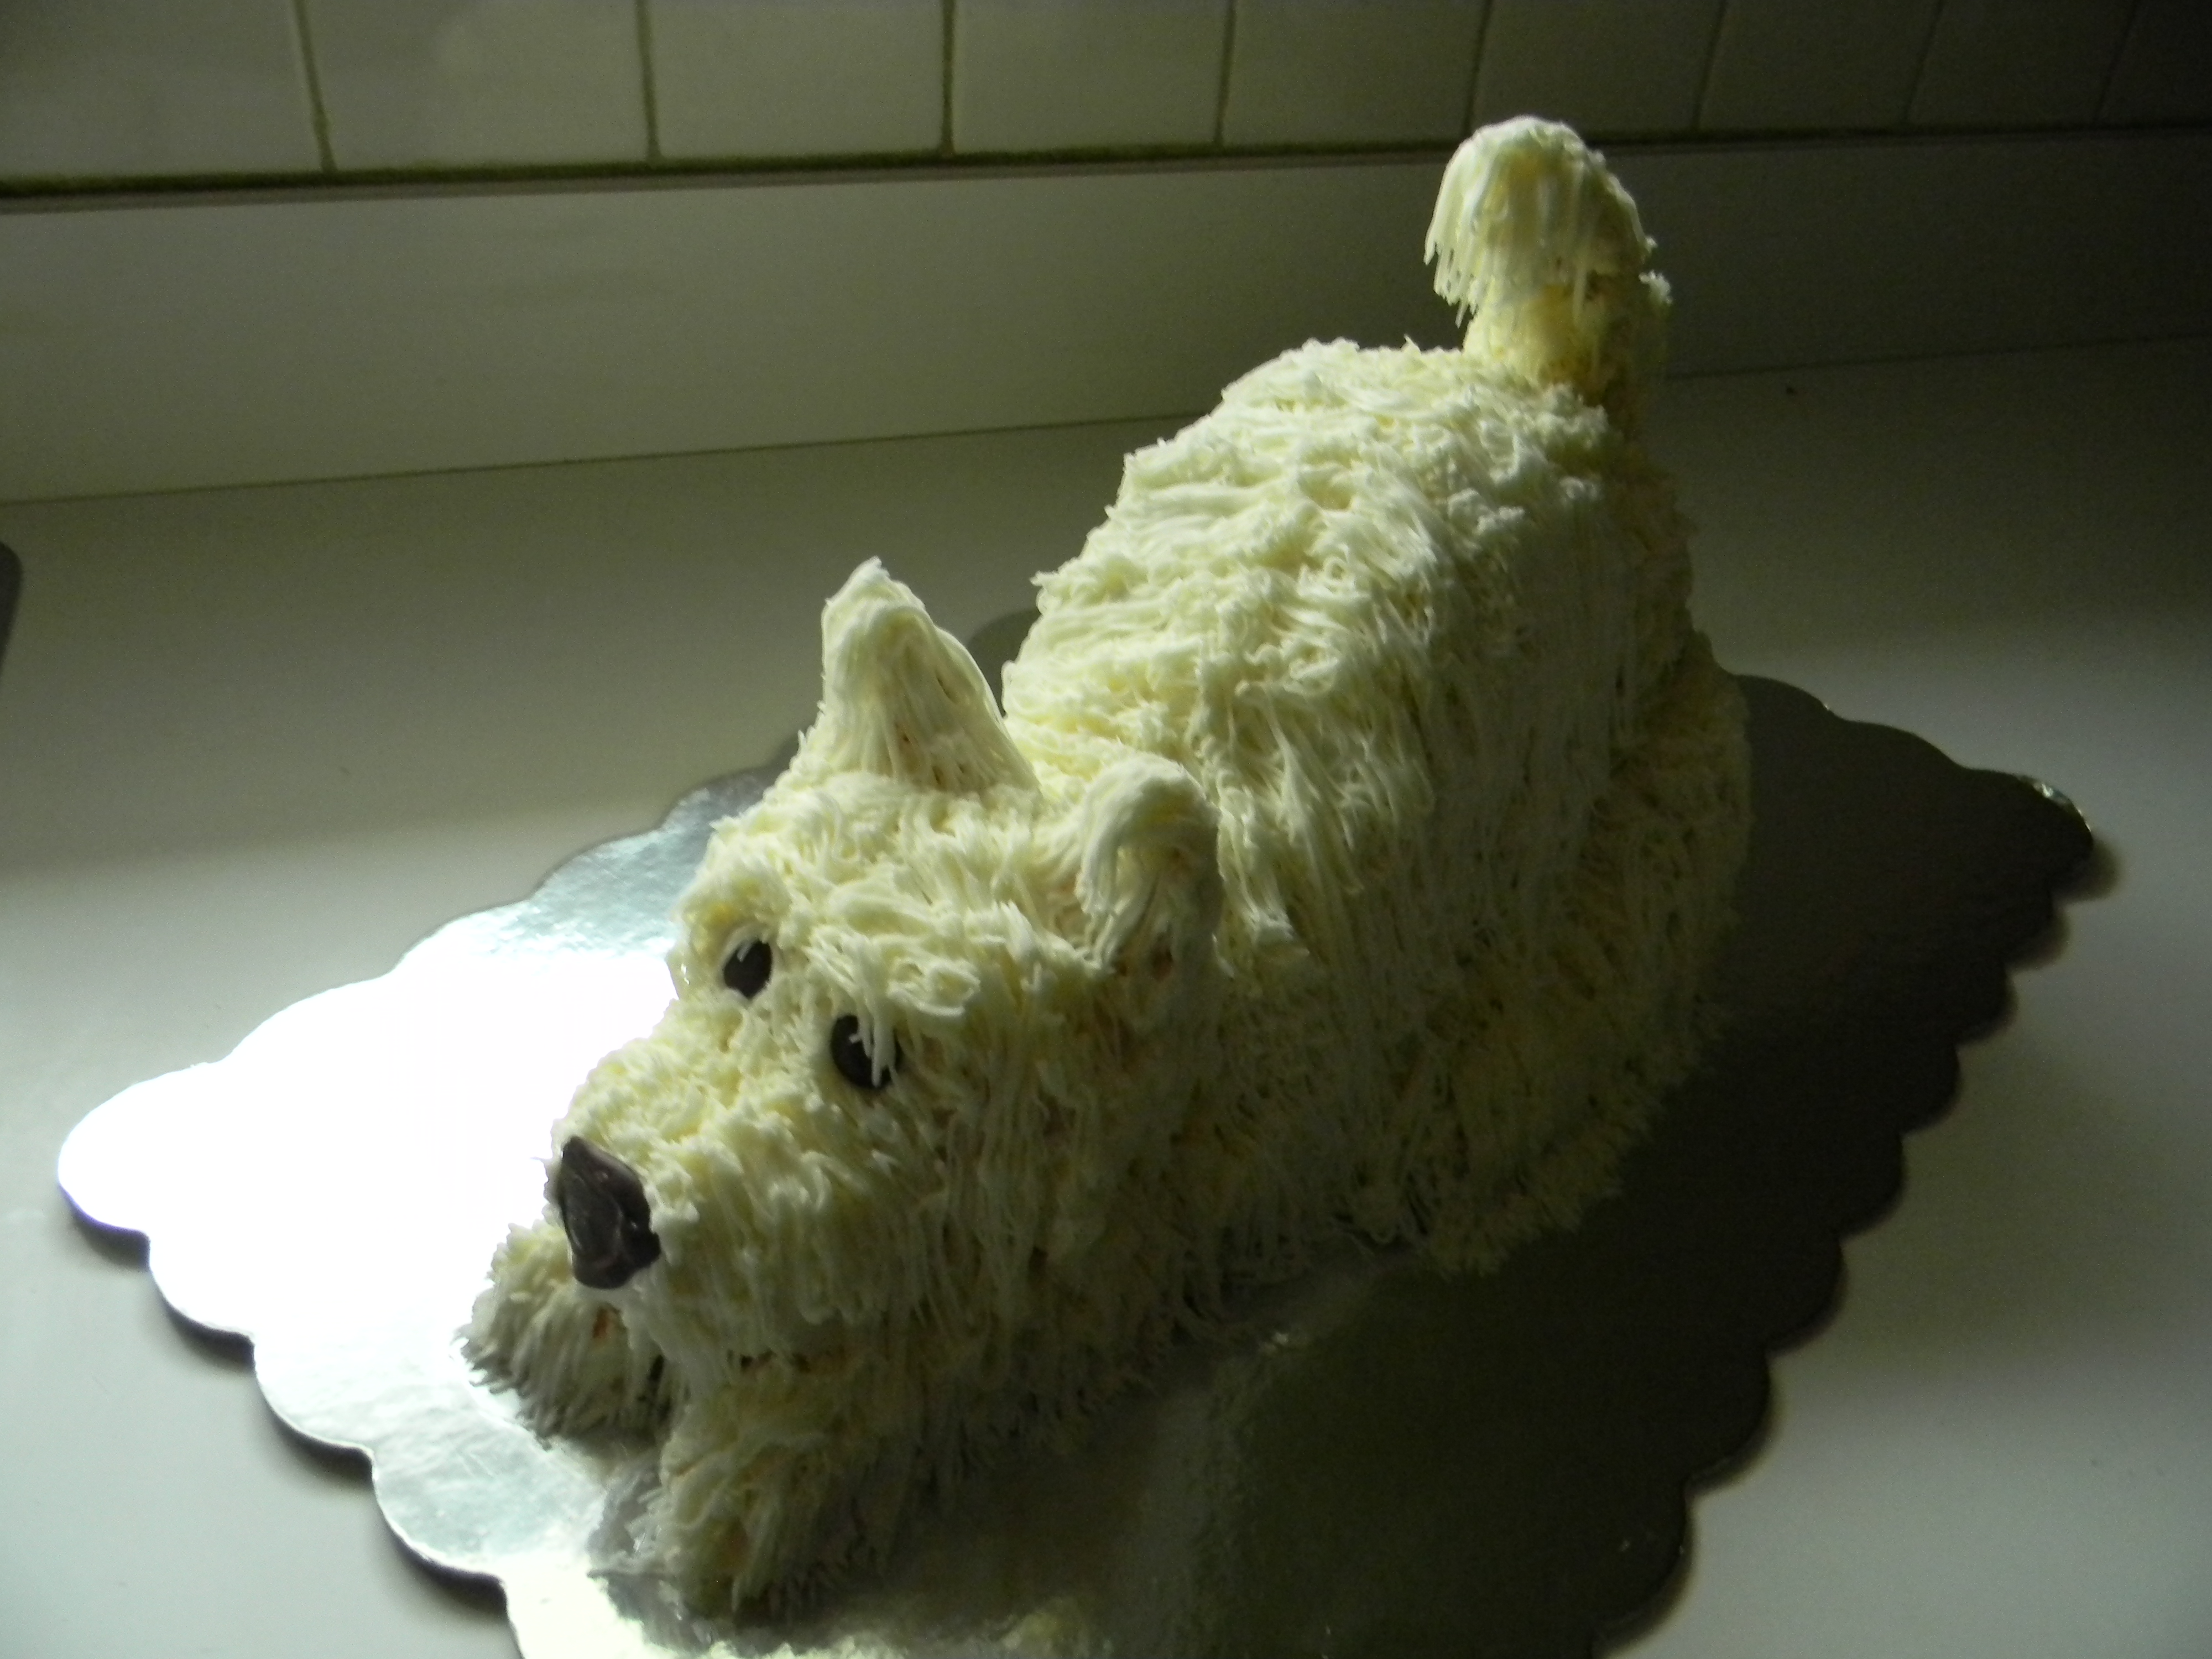
Begin at the very bottom of the cake and work your way up.  I got too involved to take pictures as I went!  I started with the front paws and piped around the perimeter of the whole cake.  I did the face, head and ears all at once.  I did the back up through the tail then I had to put him into the refrigerator to set up a bit.  I took her out after about 30 minutes and finished piping.

2016-03-06 12.56.53

I kept the cake refrigerated overnight and in the morning added the finishing touches.  The dog bowl with kibble, the dog bones, the bow and the paw prints.

At this point, the cake can set out at room temperature until serving.  Room temperature cake is always better than cold cake.

Happy  Birthday Maddie!  I am quite sure this is a cake that she will never forget!

Enjoy creating!

Angie

Raw Kale & Brussel Sprout Salad w/ Dijon Maple Dressing…

2016-03-10 15.38.28

Many people turn up their noses at kale, but when you take the time for this one quick step, it’s incredibly delicious! When using raw kale, the key is to give it a little TLC in the way of a  massage.  Wouldn’t that make you more agreeable too?

You simply drizzle with a little olive oil and add a pinch of salt and give it a good massage, scrunching it in your hands.  Don’t be gentle here…more like a deep tissue massage…. Once the kale is bright colored and fragrant, you’re ready to use any way you please.

I love this combination but change it up to make it any way you like.  You could use chopped dried apricots, white or dark raisins, chopped dried figs.  You could use toasted pecans, sunflower seeds or walnuts.

Raw Kale and Brussel Sprout Salad w/Dijon-Maple Dressing

1 bunch curly green kale
1/2 lb. brussel sprouts
2-3 T. sliced almonds, toasted
3 T. dried sweetened cranberries

Dijon Maple Dressing

2 T. white wine vinegar, cider vinegar will do
2 T. maple syrup or honey
1 T. dijon mustard
1 T. minced shallots or red onion
Pinch of pepper

1)  Tear the leaves from the thick fiberous stems and tear into small pieces.  Give a good washing and spin out the water and toss into a large bowl.  Drizzle the kale with a couple of teaspoons of olive oil and add a pinch of kosher or sea salt.  Now scrunch with both hands, massage well until the kale is bright green.  Have a small taste, it should be quite tender.  Don’t worry, you can’t over massage.
2)  Prep the brussel sprouts by washing and trimming the end of the stems and removing any discolored leaves.  Thinly slice them by hand or in a food processor with the slicing blade.  I much prefer the latter.  Add to the bowl with the kale.
3)  If you need to toast the almonds, you can do it in a skillet over medium heat, watch very closely and turn them often with a spatula.  Allow them to cool.
4)  Add the dried cranberries and cooled toasted almonds to the bowl.
5)  In a small bowl whisk all dressing ingredients together.  Pour over the salad and mix well.
6)  Now taste!  Add additional seasonings if needed.  Enjoy immediately.

I love this salad even a day or two later.

Enjoy!

Angie


Nitrate Free Bacon & Sausage…

Breakfast meats 028We all love bacon, and most people enjoy sausage.  We’ve known for some time that processed meats are not good for us, right?  They are now saying conclusively that processed meats cause cancer.  What?  A world without bacon?  Sausage?  I immediately thought of Whole Foods.  I know that they are very particular about what is sold in their stores.  They are environmentally conscious and they have a five step Animal Welfare Rating program that is followed to assure that animals are properly raised and treated.  Here they are:

  1.  No crates, cages or crowding.
  2.  Enriched environment.
  3.  Enhanced outdoor access.
  4. Pasture centered.
  5. Animal centered, all physical alterations prohibited, 5+ Entire life on the same farm.  No hormones or antibiotic enhancements.  Antibiotics are needed in crowded environments where they can easily become ill due to the conditions.  Hormones are given to bulk the animal up much quicker.

The ingredient list:
Breakfast meats 006Raw Pork Breakfast Sausage–made in house.
Pork, brown sugar, sea salt, red pepper, black pepper, parsley, sage, canola oil, lamb casing.

The best way to cook breakfast sausage is on the stovetop in a pan large enough to accommodate without crowding.

Breakfast meats 012You’ll want to cook it slow, over low heat with enough water to cover the bottom of the pan.  Cover with a lid and let it steam for about 4-5 minutes.

Breakfast meats 026Remove the lid and allow the water to evaporate, still over low heat.  Once you start to hear them sizzle, watch them closely, give them one turn when golden brown.

Black Forest Bacon, United States
Pork, raw sugar, malted barley, sea salt, yeast, extract, spices. No nitrates added except for those naturally occurring in ingredients such as celery, juice powder, parsley, cherry powder, beet powder, spinach, sea salt.

Breakfast meats 018

Bacon especially goes a long way in terms of flavor, especially THIS bacon!  I don’t think I have ever tasted a more delicious piece of bacon.  The bacon is coated with a dry rub which caramelizes when you cook it.  Great to crisp up and cut into small pieces as a condiment for salads or great to throw into scrambled eggs so you have great flavor without going overboard with portion size.  Try when making my pan roasted brussel sprouts.  Serving a crowd?  Cut the pieces in half before cooking as they are long, thick slices.

The best way to cook bacon is in the oven, you get beautifully cooked flat pieces.  Spread over a non-stick foil lined baking sheet with sides without crowding.

Breakfast meats 013

You can see here that I didn’t have enough bacon to fill the pan so I curled the edges of the foil up to prevent excess spattering in the oven.  Easy clean up, let it cool and fold it up and toss, or you could wipe it clean with a paper towel and recycle it.    A full sheet of bacon should take approximately 15-20 minutes.  My four pieces of bacon took about 16 minutes.

You may wonder about the cost.  Consider the importance to consume breakfast meats in moderation.  Even though they are nitrate free, this is still what I would consider a treat.  Two pieces of bacon or two pieces of sausage per serving.  That being said, you can ask the butcher to package exactly what is needed for your crowd.  When you buy the 1 lb. packages there are far more servings than needed.  Quality versus Quantity.  The bacon was $9.99/lb.  I bought 4 slices, it came out to $2.80 or  $.70/slice.  Oscar Mayer bacon is typically around $7/lb. and the slices are super thin and sometimes tricky to pull apart.

The sausage was $6.99/lb. and I bought 12 pieces, which came out to exactly $6.99.  The links are larger than say a Bob Evan’s sausage link, which I think are about one ounce links.

Thanks for reading, have a great, healthy day!

Angie

Roasted Delicata Squash/Great Thanksgiving Side Dish!

012

Recently I discovered that I’m in love with delicata squash.  My friend and excellent cook Barbara Westerman suggested I try it.  WOW,  she was right!   While in the squash family, it has a taste entirely of its own.  In addition to the taste, there are several reasons why I absolutely love it.  First, there is no peeling involved, the skin edible, it’s tender and delicious.  Secondly, it’s easy to cut in half, no power tools needed to break into it.  Thirdly,  preparation is incredibly simple.  Lastly, it’s beautiful on the plate, it would be a lovely side dish to serve with roasted turkey,  roasted pork, chicken or fish.

The squash I bought was about 7-9″ in length and 3″ across.  Like other squash, the larger and older it gets,  flavor is lost and it’s less tender, so buy this size or smaller.

006
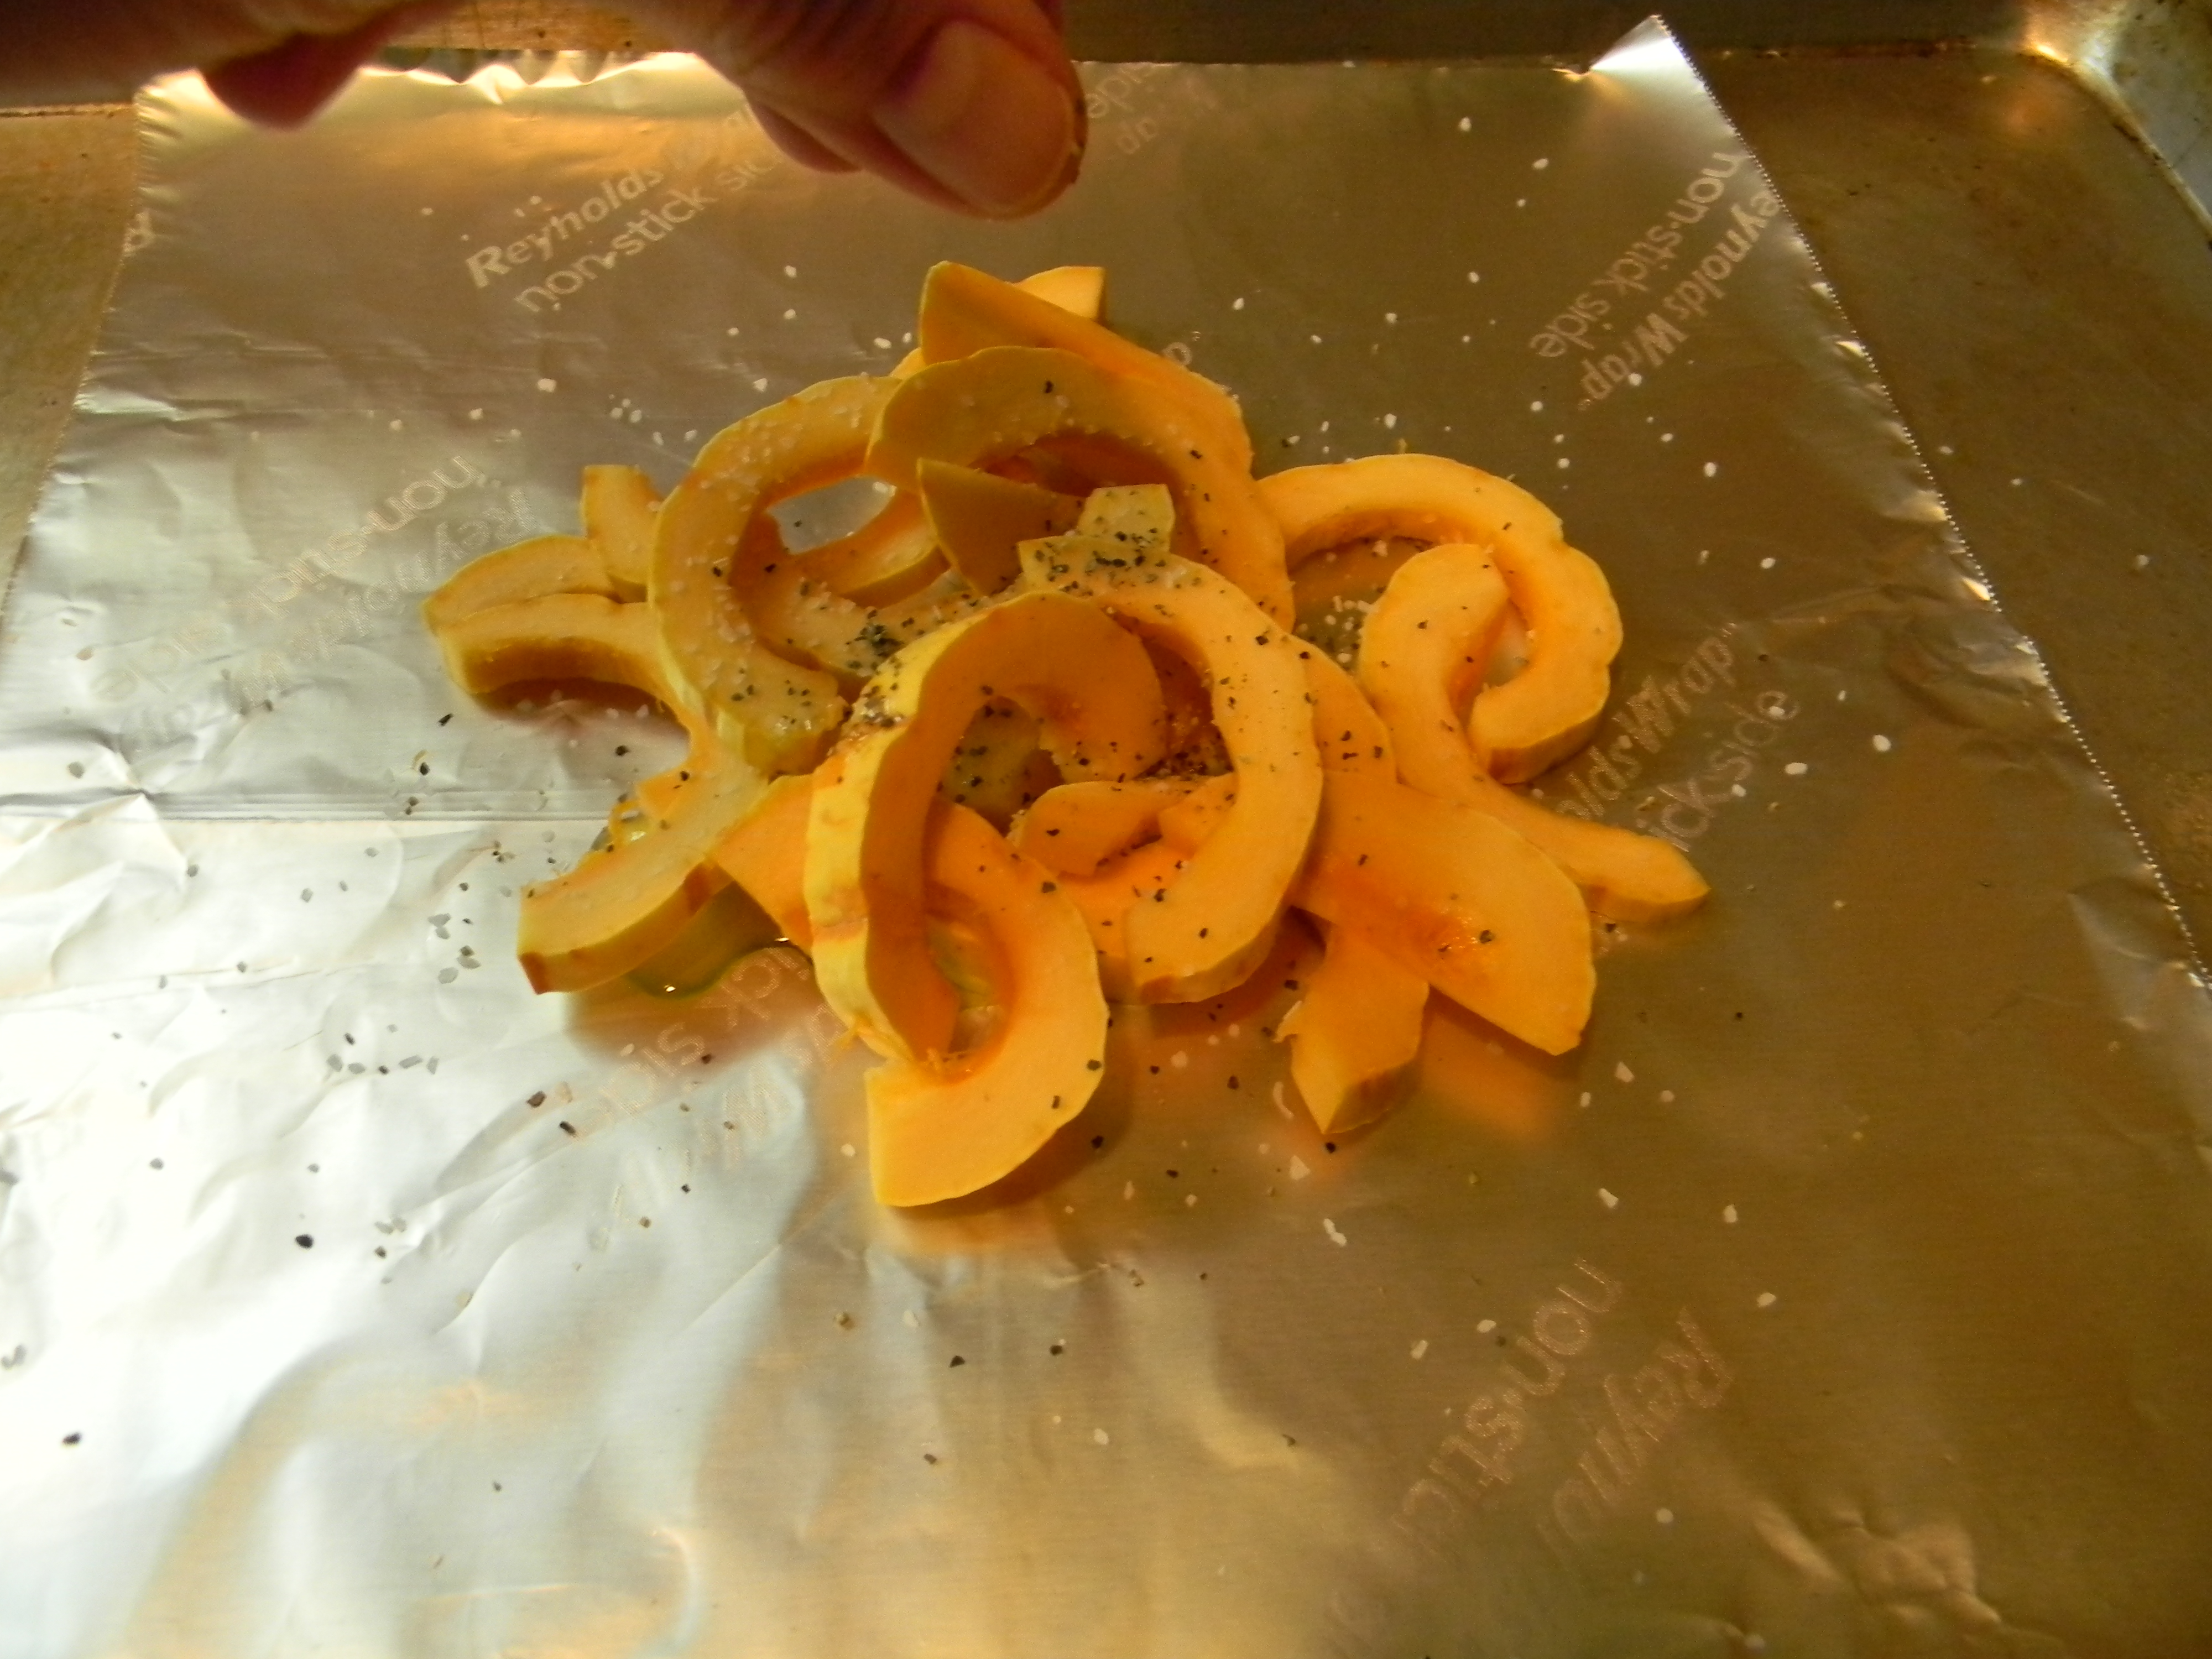
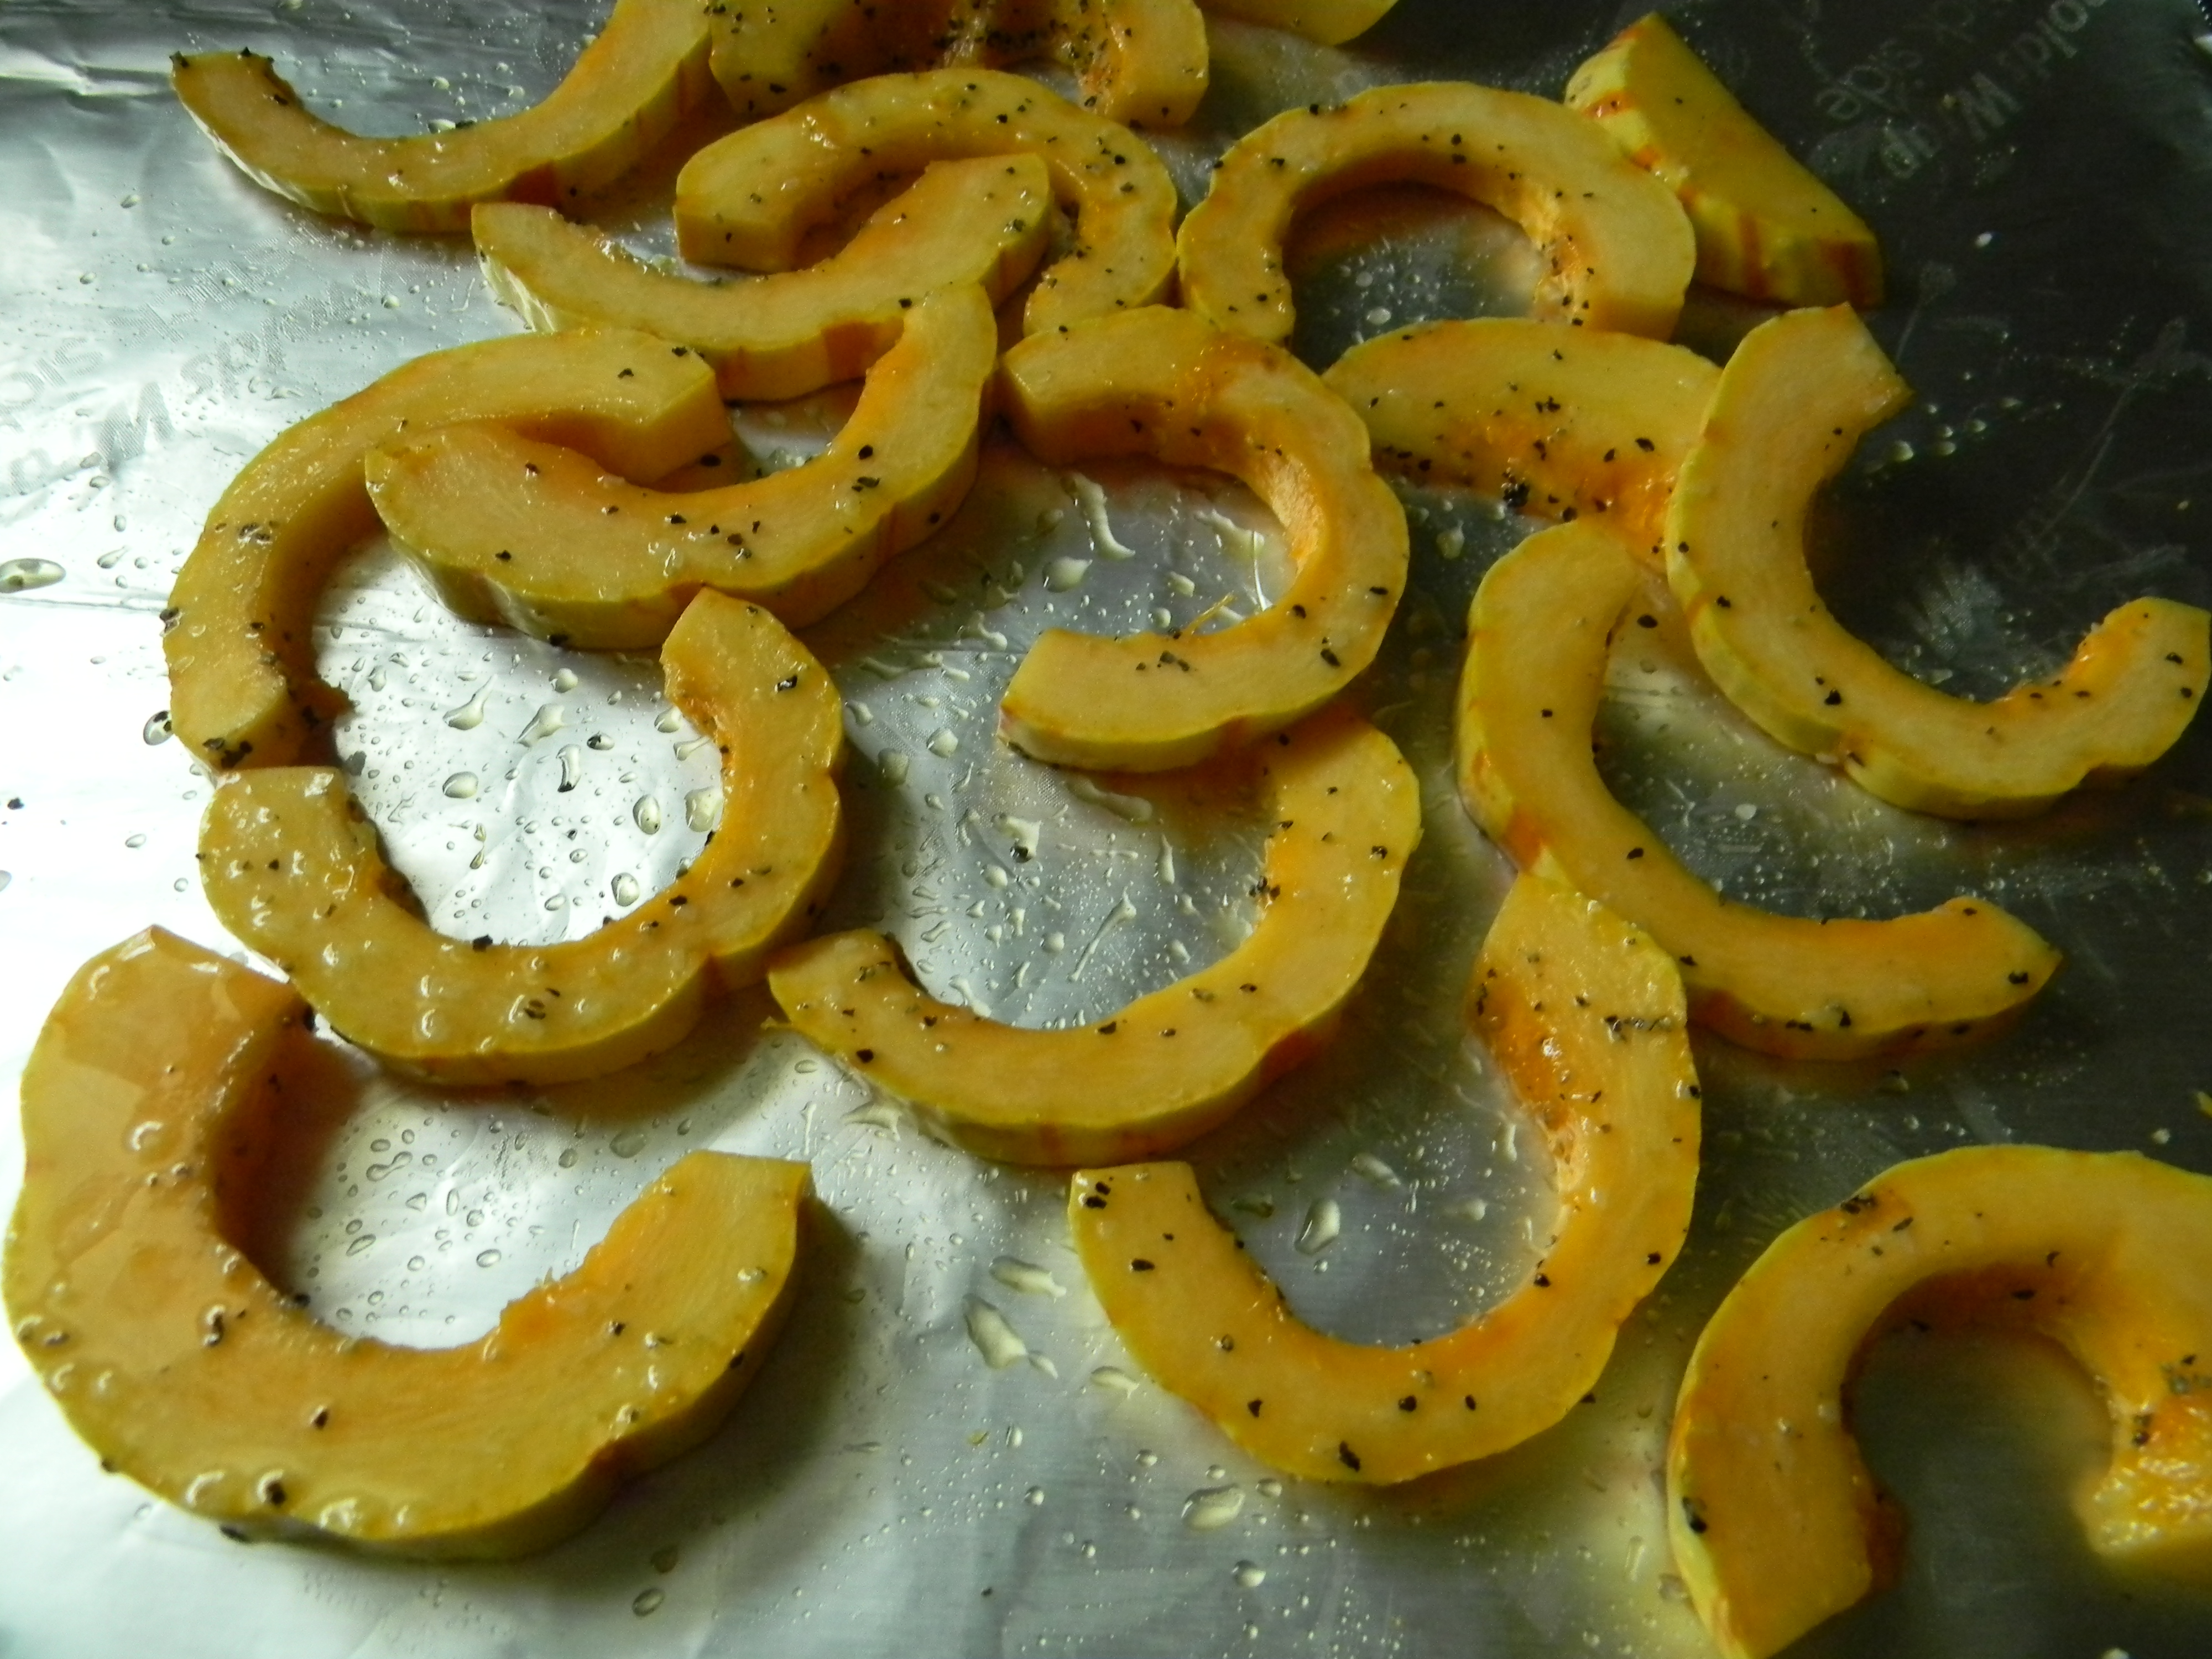
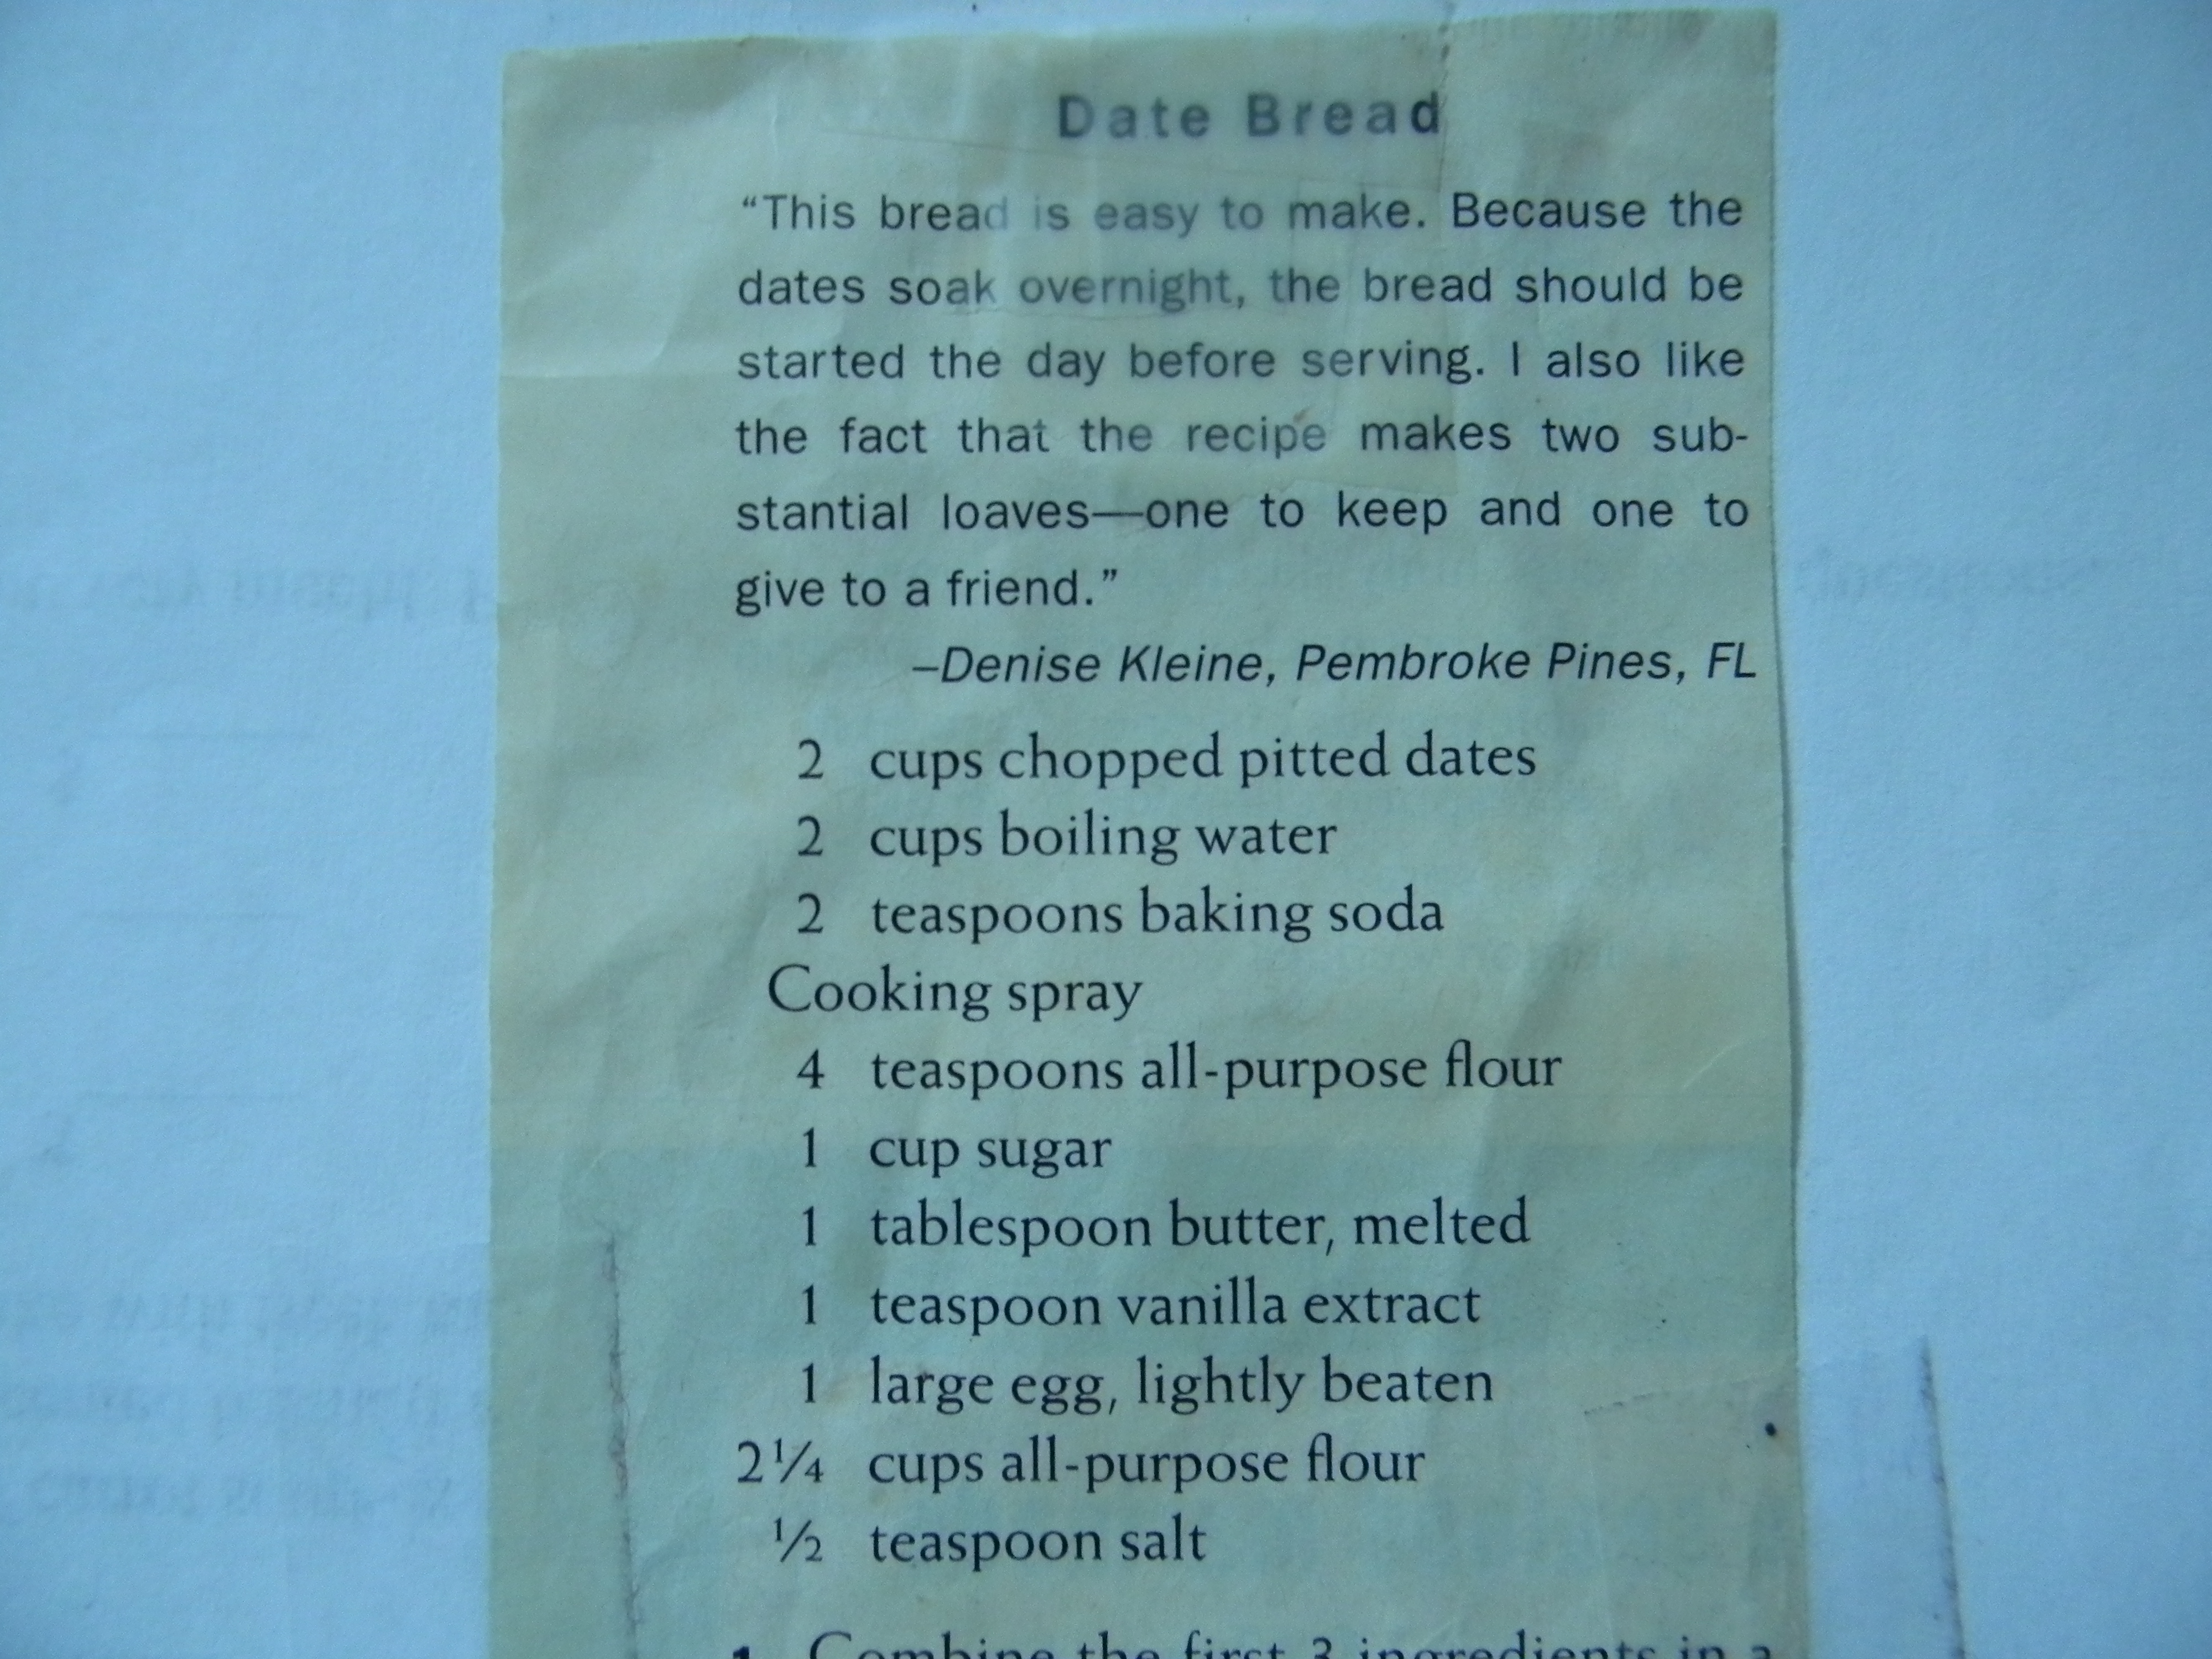
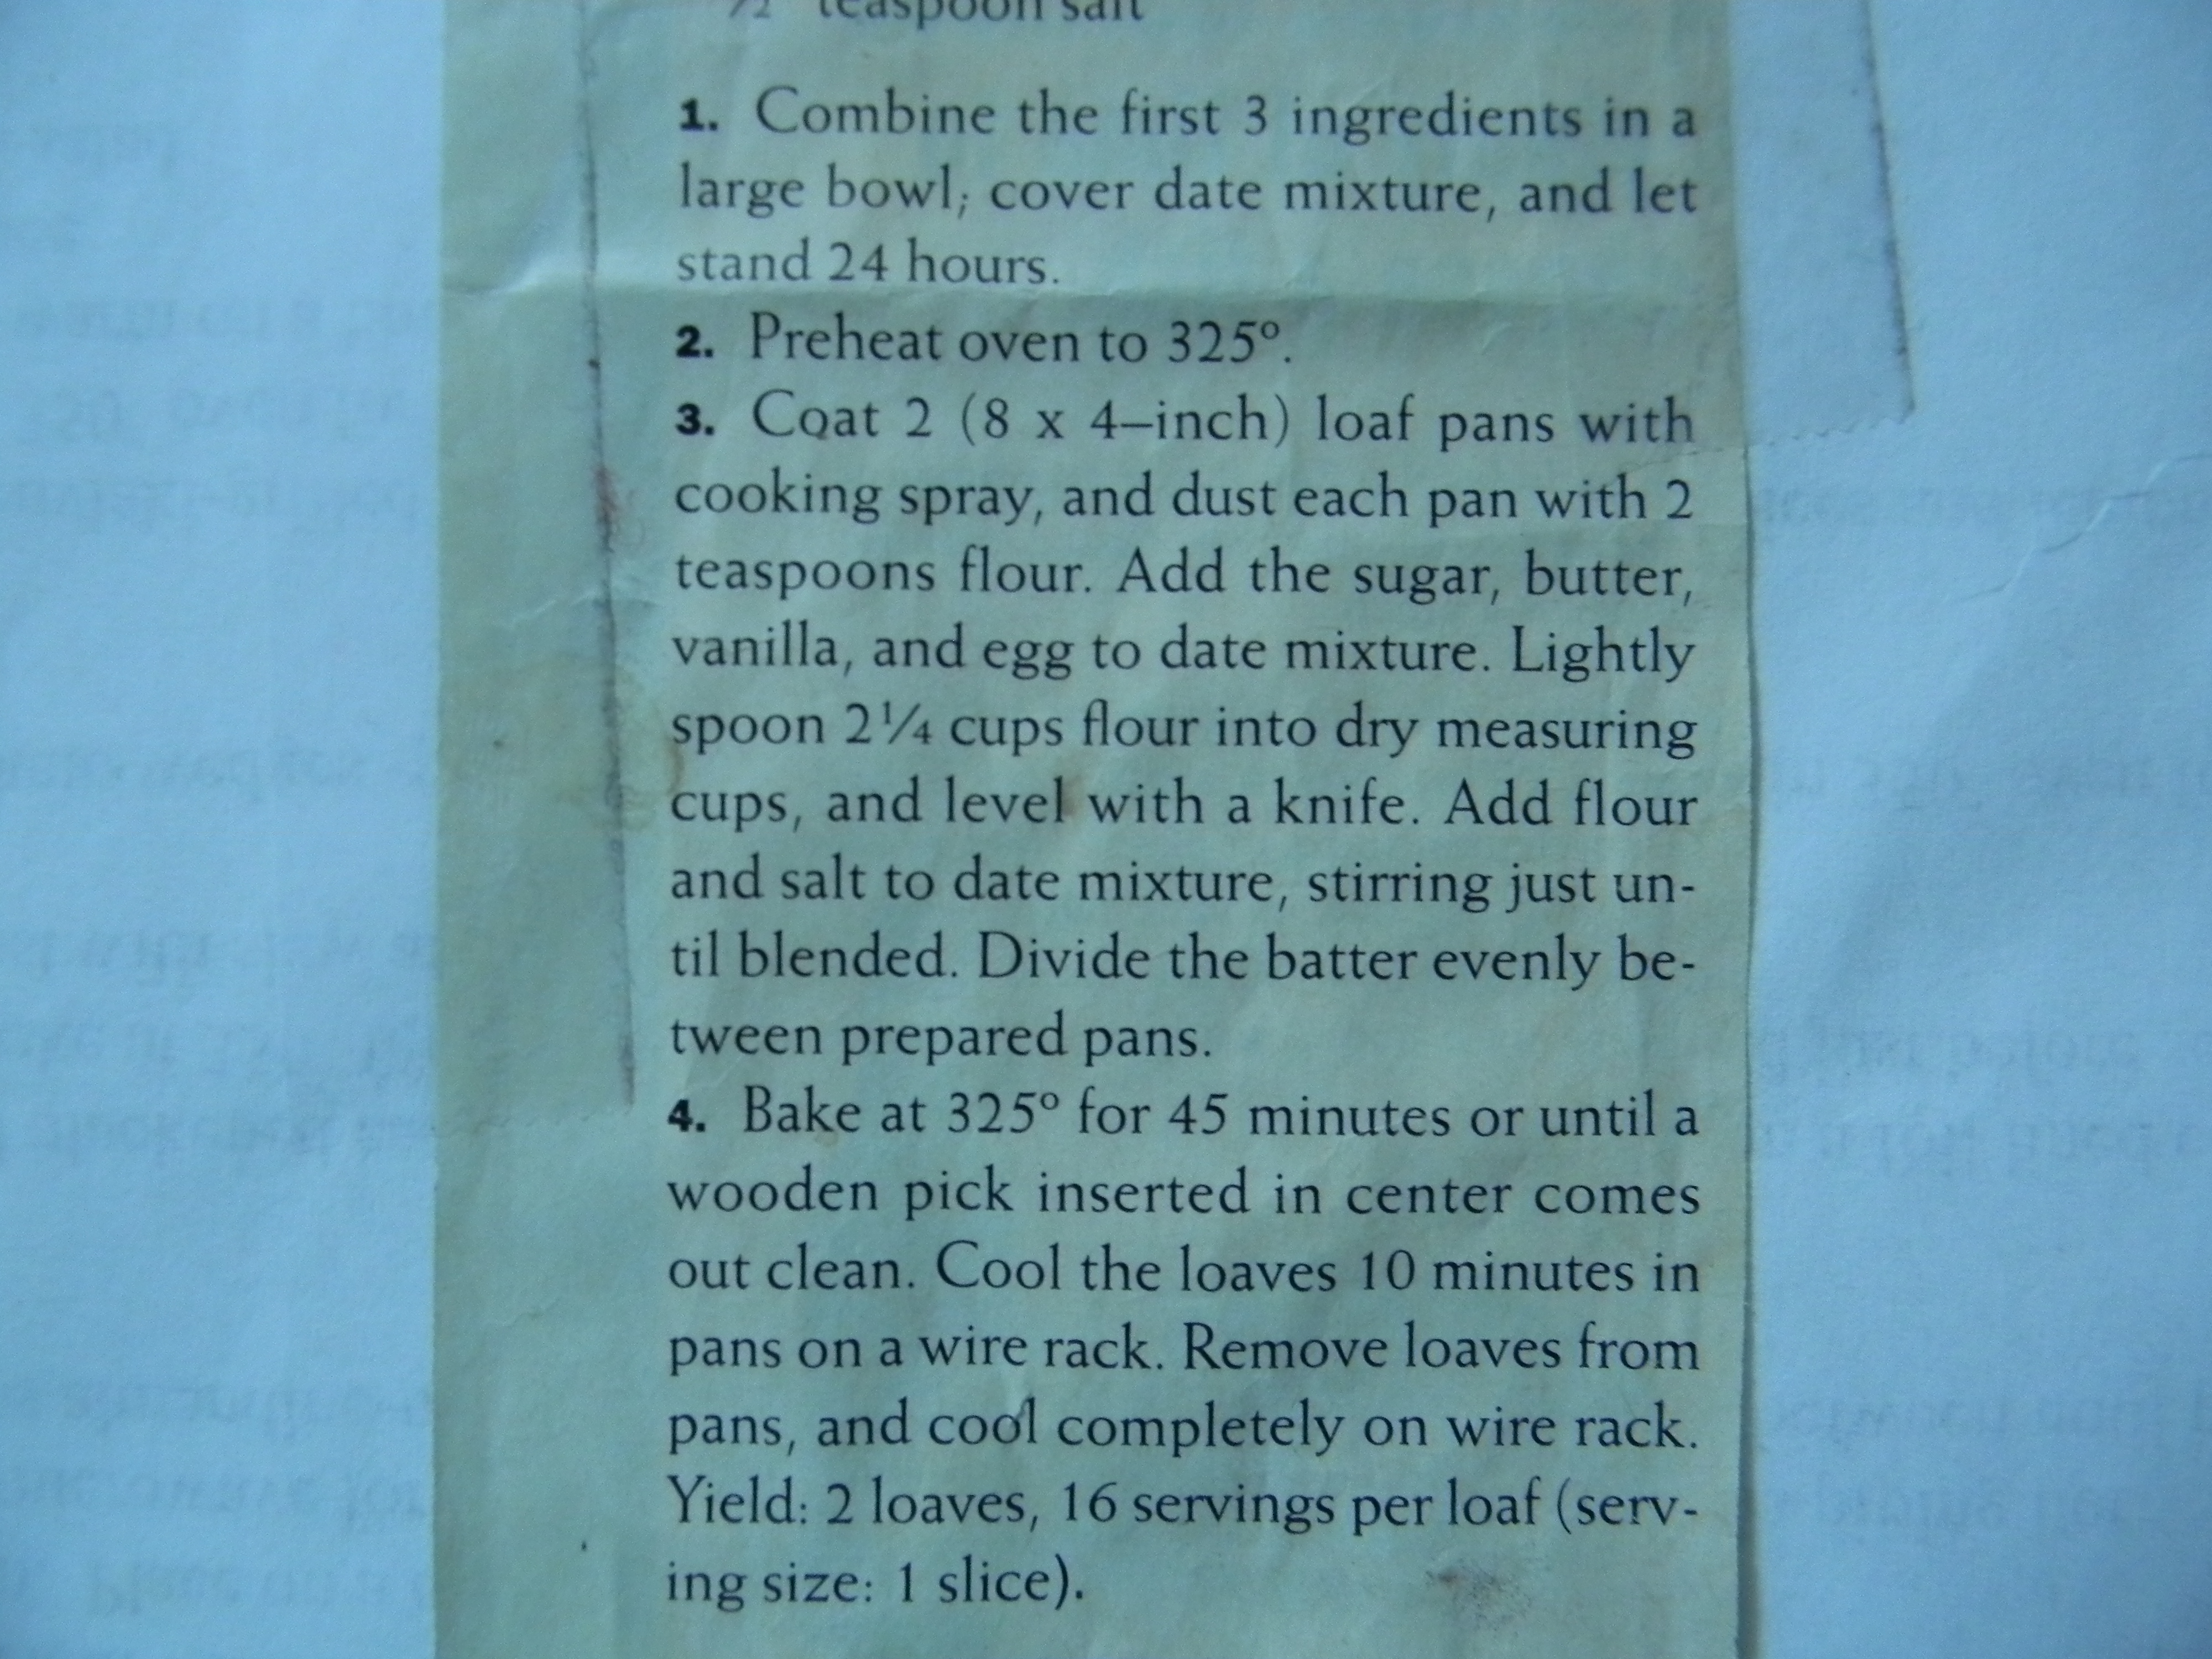
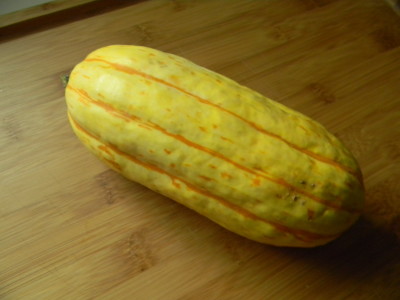
Look for firm skin with no blemishes.  The first step is the most critical.  Wash it thoroughly, rubbing the skin with your hands or with a vegetable brush under running water.  It grows on the ground and a little sand will ruin your whole experience.

007

Preheat the oven to 350′.  Cut the ends off, slice in half and remove the seeds.  Slice into 1/4″ slices.010Drizzle with olive oil and season with salt and pepper.  For a twist, you could season with chili powder or smoked paprika.

011Toss to coat evenly and spread over a foil lined cookie sheet.  I like Reynold’s non stick foil.  Roast for 15-20 minutes.

012Simple.  Delicious. Healthy.  Beautiful.

Enjoy!

Angie

PS-Can be made ahead and re-warmed.  Enjoy cold as a healthy and delicious snack!

Black & Whites…..

orng chx slm patDSCN2939_2619

It’s been quite some time since I’ve posted a recipe and I sure miss it!

Ever had one of these?  It is believed they originated from New York.  The original cookie calls for a thin layer of icing then half vanilla fondant and half chocolate fondant. I am not particularly fond of fondant so I simply ice the cookie with half vanilla and half chocolate icing.  I use my go to sugar cookie cut out recipe.

Icing this cookie takes a little practice.  I recommend making the vanilla icing first, icing half of the cookie, and letting it set up at room temperature, uncovered for at least an hour.  You then add Hershey’s Cocoa to the vanilla icing with a little more milk and ice the other half.  Be careful not to add too much liquid as the icing will ooze off the cookie.  Allow it to set up for 3 or more hours.  Then they’re good to go!  Iced cookies such as these do not freeze well.  If you want to freeze them I suggest freezing them un-iced, then icing them upon thawing.

This cookie recipe is large.  If you’re not up to making 6 dozen cookies, freeze half of the dough.  Wrap it tightly in plastic wrap, then into a freezer bag.  Label and date.  Use it within 3 months or so, the sooner the better.  Thaw in the refrigerator for 24-48 hours before using.

Best Roll Cut Out Sugar Cookie Recipe  (makes about 6 dozen large round  5″cookies)

2 cups sugar
4 sticks unsalted butter, one pound at room temperature
5 large eggs
1 tablespoon vanilla
7 ½ cups all-purpose flour
4 teaspoons baking powder
1 teaspoon salt

1) In a large mixing bowl, beat butter until fluffy and add one half of the sugar, beat, then add the rest. Add two eggs and beat. Scrape down the side of the bowl. Add the remaining three eggs and vanilla, beat until nicely incorporated.
2) Lightly measure out flour into a separate mixing bowl. Add baking powder and salt, whisk until blended.
3) Add half of the flour mixture to the egg/butter mixture and beat well. Add remaining flour and blend until all ingredients are incorporated.
4) Shape into a large ball and wrap in plastic wrap, then put into a large zip bag. Refrigerate for an hour or overnight.  It is easier to roll if you refrigerate it for the lesser amount of time.  If it’s chilled overnight, let it sit at room temperature for 45 minutes or so to warm up a bit.
5) Preheat your oven to 375’ and line cookie sheets with parchment paper. Have cooling racks ready to receive hot cookies.
6) Cut off a chunk and begin working with your hands to make it pliable enough to roll out on a floured surface. Roll to 3/8” to 1/4″ thickness. Cut into large circles and place on prepared sheets, leaving at least 1” of space between cookies. Bake for 10-12  minutes. Cool for five minutes before removing from cookie sheet onto a rack. Cool completely before icing.

Vanilla Icing (this will be enough for half of the recipe, if you bake the entire batch of dough, double the icing recipe)

3 cups powdered sugar
3 tablespoons milk, any kind
1 teaspoon vanilla extract

1)  Mix well, add more milk to make it spreadable but not so loose that it will run completely off the cookie.  Ice 1/2 of the cookie, starting at the center with an icing spatula and continue to the edge.  Again, this will take some practice.  (They will taste incredible even if the frosting isn’t perfect!) Allow the cookies to sit for an hour or so to set up before you start with the chocolate half.

2)  Add 2 tablespoons Hershey’s Cocoa to the bowl.  Begin to mix, you may notice that more milk is needed.  Add more milk a teaspoon at a time.  The cocoa will give it an even better texture than the plain vanilla.  Want it more chocolatey?  Add more cocoa, 1 tablespoon at a time.  Carefully ice the other half of the cookie, starting with the seam down the center then going to the outer edges.   Need more icing?  Add 1/2 cup powdered sugar to the bowl, a tablespoon cocoa and add enough milk to stir into a rich consistency again.  It is best to let them sit out overnight to completely set up.  Layer in a plastic container with parchment paper between layers.  Enjoy within 2-3 days if they last that long!

Enjoy!
Angie

Interesting Variations:

*Ice the whole cookie with chocolate and immediately add chocolate shavings.
*Ice the whole cookie with vanilla icing and immediately add confetti sprinkles.
*Add a little instant coffee to the chocolate icing and ice the whole cookie chocolate & top with chocolate covered coffee beans.
*If you like orange and chocolate add a tablespoon or two of fresh orange zest to the white icing, YUM!


Quinoa Stuffed Cabbage Rolls….

040
I found a version of this recipe in Eating Well Magazine.  They used brown rice and I thought it might be interesting to use quinoa instead.  I changed it around quite a bit.  I really liked the result.

I made a simple tomato sauce that compliments the quinoa mushroom mixture nicely.

Qunioa Stuffed Cabbage Rolls

2 cups cooked quinoa (1 part quinoa to 2 parts water and a little salt.  Bring to boil, cover and lower heat for about 15 minutes.  Cool)

3 tablespoons olive oil
1 medium onion, finely diced
1/2 lb. white button mushrooms, finely chopped
4 cloves garlic, finely minced or crushed
1/2 teaspoon dried sage
1/2 teaspoon dried rosemary, crushed with your fingers to release flavor
1/2 teaspoon salt
1/4 teaspoon coarsely ground pepper
1/2 cup red wine
1/4 cup dried currants
1/4 cup toasted pine nuts.  Toast in a skillet over low heat, shaking pan often, they burn easily, so watch them closely.  Should take about 5 minutes.

1 head savoy cabbage-slice off about 1″ of the bottom with the core, then carefully carve out the core.

Tomato Sauce

2 tablespoons olive oil
1 small onion, finely diced
2 cloves crushed garlic
1 teaspoon crushed dried oregano
1/2 teaspoon salt
2 pinches black pepper, or more to your taste
2 tablespoons tomato paste
1 64 ounce can of tomato sauce
1 tablespoon sugar, agave or honey
1/2 cup water

1)  Cook and cool quinoa.  Heat a large skillet over medium heat, add olive oil and onion, saute until the onion is soft.  Add mushrooms and cook until the moisture has completely evaporated.  Add garlic, sage, rosemary, salt, pepper and red wine. Simmer until the wine has reduced in half or so.  Cool.
2)  In a large pasta pot, bring water to a boil with 1 teaspoon salt.  Once the water is boiling, add the head of cored and trimmed cabbage.  allow it to cook for 5 minutes.   The leaves will soften, remove the outer leaves with a tongs.  Allow the cabbage to drain well and pat dry with paper towel.  Set aside.
3)  Prepare the sauce.  Saute the onion in the olive oil in a sauce pan, cook until soft.  Add garlic and cook one minute.  Add oregano, salt, pepper, tomato paste and sugar.  Stir often, allow the tomato paste to caramelize, 2-3 minutes.  Add tomato sauce and water.  Preheat the oven to 350′.
4)  Spread a little olive oil over your 9 x 13 baking dish.  Ladle about 1/2 cup of the sauce over the bottom.  It’s time to assemble the cabbage rolls.
5)  Select 8-10 of the largest and prettiest cabbage leaves.  Hold a cabbage leaf in the palm of your hand and fill with about 1/4 cup of the filling.  Carefully roll the cabbage around the filling and place seam side down in the prepared baking dish.   Ladle the remaining sauce over the rolls.
6)  Bake for 35-40 minutes.

Enjoy!

*This recipe can be made 3-4 days ahead and kept in the refrigerator.

Spinach, Artichoke and Parmesan Dip…..

Hello everyone-

I just had to share my latest creation with you!  I made this dip for a party last night and I/they loved it!  Everyone loves artichoke dip but the usual recipe is loaded with mayonnaise.  Delicious, but over the top in terms of fat and calories.

As usual, I’ve incorporated my old stand by Greek non-fat yogurt into my recipe.  It’s the best cheat ever!  You can also lighten it up even more if you’d like to by using low-fat cream cheese and low-fat mayonnaise.

Here’s the recipe…

Spinach, Artichoke and Parmesan Dip

1 1/2 cups greek non fat yogurt
1 8 ounce package softened cream cheese
1/2 cup mayonnaise
3 cloves roasted garlic in 2 tablespoons olive oil (in a very small sauce pan over the lowest possible heat, roast finely chopped garlic in the olive oil until slightly browned.  Cool.
1/2 cup parmesan cheese plus 2 tablespoons to sprinkle over the top before baking
dash worcestershire  sauce
dash hot sauce
1 lb. thawed and water squeezed out frozen chopped spinach
2 cans artichoke hearts, chopped into small pieces

Stacey’s Pita Chips or toasted garlic baguette

1)  Roast the garlic and cool, thaw the spinach and squeeze out water and drain and chop the artichokes.
2)  Preheat the oven to 350′.  Coat a 2 quart baking dish with cooking spray.
3)  In a large mixing bowl, beat the cream cheese until soft.  Add the yogurt and mayonnaise, beat well, scrape sides of bowl.
4)  Add cooled garlic and oil mixture, worcestershire, hot sauce and 1/2 cup parmesan cheese and beat.
5)  Add the spinach and artichokes and mix on low-speed until well incorporated.
6)  Spread into prepared baking dish and sprinkle with 2 tablespoons parmesan.
7)  Bake for 35-40 minutes.  Serve warm with pita chips or toasted baguette

Enjoy!

Angie

Date Bread…..

orng chx slm patDSCN3137_2817I am in love with old-fashioned recipes that remind me of my Grandmothers.   I got this recipe out of Cooking Light Magazine years ago and it’s my go-to Date Bread recipe.  Add walnuts or chocolate chips if you wish.   Stir them in with the dry ingredient to keep them suspended during baking.   Moist and delicious and love that it isn’t loaded with fat.  This bread freezes beautifully as well.

orng chx slm patDSCN3154_2834

orng chx slm patDSCN3155_2835

I baked my batter in small loaf pans.  I love doing this because the baking time is significantly shorter.  This recipe makes 4-5 small loaves (about a cup and a half of the batter)  and it takes about 30 minutes.  Check with a toothpick after 30 minutes and add time if necessary one to two minutes at a time.

I don’t know about you but I am SO ready for fall!  This 90′ weather has got to go.  Bring on the comfort foods!!

Have a nice day~

Angie

Angel Hair Pasta With Roasted Grape Tomatoes…..

orng chx slm patDSCN3125_2805

Ever buy beautiful grape tomatoes with great plans for an amazing salad and you come across them a week later when they are no longer at the peak of their beauty?  (At this point they are looking slightly wrinkled) This is the perfect plan for them!  It takes a little time to roast the tomatoes, but the rest of the dish is a snap.  You can  add whatever veggies you like.  I generally go through the refrigerator and forage for any little bits of vegetables that might be leftover from the week.  Would be delicious with asparagus, spinach, petite peas, shrimp, leftover chicken.  Your choice.  Let’s begin.

You will need garlic.  Lots of garlic.

orng chx slm patDSCN3118_2798

You’ll begin by going through the tomatoes, discarding any that are spoiled.  You should have about one cup total.  Give them a rinse.   Bathe them in the following:

4 tablespoons of olive oil
2 tablespoons minced garlic
1 teaspoon of dried or fresh rosemary
1/2 teaspoon of dried basil
1/4 teaspoon thyme
2 pinches kosher salt
1 pinch black pepper

Mix all ingredients to coat.  Place in a small foil or parchment lined baking dish to keep the goodies close together.  Roast in 225′ oven for one hour.

At this point you can save them in the refrigerator for a couple of days, serve over chicken, fish or rice.  Or you can make an amazing pasta dish!

Simple Summer Pasta with Roasted Grape Tomatoes

12 ounces cooked angel hair pasta or whatever pasta you prefer
1 small onion, chopped
1/2 cup white wine
1 cup reserved pasta water
tablespoons olive oil
Grated parmesan cheese

1)  Boil the pasta according to package instructions and reserve one cup of the pasta water.  Under cook the pasta by 2 minutes.  Drain.
2)  Warm a saute pan large enough to accommodate the cooked pasta and liquids over medium heat.  Add the olive oil and the chopped onion.  Cook about 7 minutes, stirring often.
3)  Add the roasted tomato mixture and all juices and herbs/garlic to the pan.  At this point you could add any other veggies or ingredient to the pan.  Add the wine and about half of the pasta water.  Simmer for a couple of minutes.
4)  Add the under cooked pasta to the pan.  Cook for about 2 minutes.  The pasta will absorb the flavor from the tomato juices & wine.  If it appears that most of the liquid has been absorbed, you can add a little more pasta water.  You’ll want some moisture in the pan.
5)  Top with grated cheese and chopped parsley.  You could also add fresh basil.

Enjoy!


Old Fashioned Potato Salad…..

orng chx slm patDSCN3099_2779

Good morning!  I am missing sharing recipes with you!  No time like the present.  I’m going to get right to it.

Recently I’ve tasted many commercial potato salads, hoping that I’d satisfy my taste for a delicious potato salad only to be disappointed. The potatoes have a weird texture and I can’t quite figure out what the dressing is made of.  Big surprise, right?  This inspired me to make my Mom’s Old Fashioned Potato salad.

If you’re like me, you just want a small spoonful of this type of salad.  No one wants to load up on fat laden mayonnaisey salad.  I have transformed the dressing into something very delicious and guilt free.  I very much prefer a combination of real mayonnaise, non fat greek yogurt, yellow mustard and a dollop of sour cream.  I think it’s always a good idea to add more crunchy fresh vegetables.

The beauty of  this salad is that you can add whatever ingredients you love.  Why not minced jalapeno or diced roasted red peppers, or blue cheese and crisp bacon?  Make it your own go to potato salad recipe.

My Mom’s had plenty of celery, onions and radishes. The perfect contrast to the cooked red potatoes with skins and the boiled eggs.  I just love that she added radishes, I think it’s brilliant!   I’ve added parsley too.  So good!

Garnishing is key as well.  Love sliced eggs, minced chives, radishes and a sprinkle of paprika.  Beautiful!

Mom’s Old Fashioned Potato Salad

2 lbs. small red potatoes, quartered, boiled in salted water and cooled completely
6 hard boiled eggs, cooled & chopped, reserve one to slice for the top of the salad
Click here for the recipe for perfectly boiled eggs
1/2 cup finely chopped parsley
1 cup finely chopped sweet onion
1 cup sliced radishes, reserving a couple for garnish
1 1/2 cups finely chopped celery
1/2 cup fresh chopped chives, reserve a tablespoon for garnish
Paprika to sprinkle over the top of the finished salad

For the dressing:

1 cup non fat greek yogurt
1/2 cup Hellman’s Real Mayonnaise
1/4 cup sour cream
1/3 cup yellow mustard
1/4 teaspoon ground celery seed
1 teaspoon kosher salt or 3/4 teaspoon table salt
3/4 teaspoon black pepper

1)  Put all potato salad ingredients into a large mixing bowl.

2)  Whisk all salad dressing ingredients together in a medium mixing bowl until well blended.  Taste.  Add additional seasonings here if you wish.  It may need a little more salt and pepper.

3)  Pour dressing over salad ingredients and gently fold until completely combined.

4)  Pour into a large serving bowl.  Top with boiled egg, sliced radishes, minced chives and a sprinkle of paprika.  Refrigerate.  Serve cold.  Refrigerate leftovers.  Serves 8-10.

Enjoy, Happy July 4th!!

Angie