Roasted Delicata Squash/Great Thanksgiving Side Dish!

012

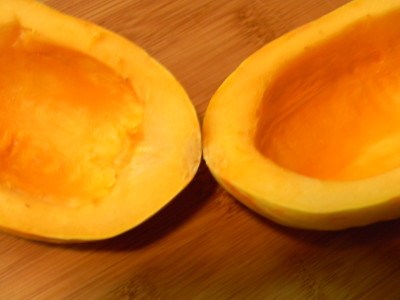
Recently I discovered that I’m in love with delicata squash.  My friend and excellent cook Barbara Westerman suggested I try it.  WOW,  she was right!   While in the squash family, it has a taste entirely of its own.  In addition to the taste, there are several reasons why I absolutely love it.  First, there is no peeling involved, the skin edible, it’s tender and delicious.  Secondly, it’s easy to cut in half, no power tools needed to break into it.  Thirdly,  preparation is incredibly simple.  Lastly, it’s beautiful on the plate, it would be a lovely side dish to serve with roasted turkey,  roasted pork, chicken or fish.

The squash I bought was about 7-9″ in length and 3″ across.  Like other squash, the larger and older it gets,  flavor is lost and it’s less tender, so buy this size or smaller.
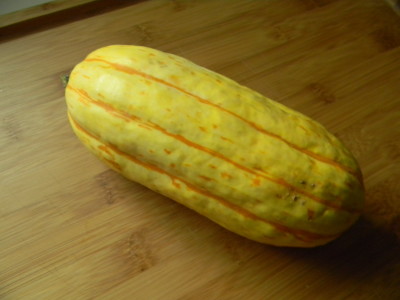
006Look for firm skin with no blemishes.  The first step is the most critical.  Wash it thoroughly, rubbing the skin with your hands or with a vegetable brush under running water.  It grows on the ground and a little sand will ruin your whole experience.

007

Preheat the oven to 350′.  Cut the ends off, slice in half and remove the seeds.  Slice into 1/4″ slices.010Drizzle with olive oil and season with salt and pepper.  For a twist, you could season with chili powder or smoked paprika.
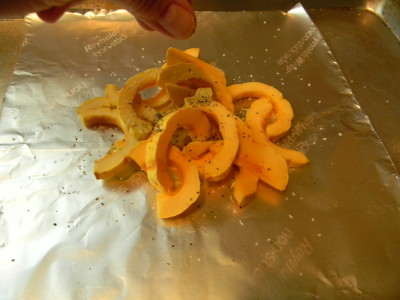
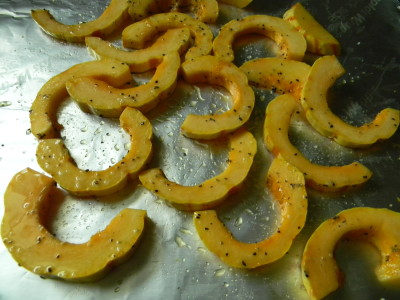
011Toss to coat evenly and spread over a foil lined cookie sheet.  I like Reynold’s non stick foil.  Roast for 15-20 minutes.
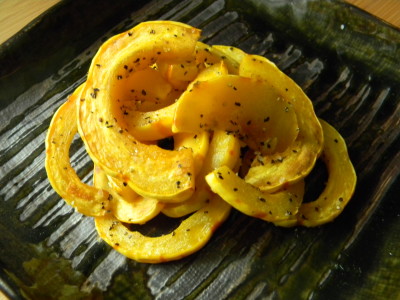
012Simple.  Delicious. Healthy.  Beautiful.

Enjoy!

Angie

PS-Can be made ahead and re-warmed.  Enjoy cold as a healthy and delicious snack!
Fried Green Tomatoes…..

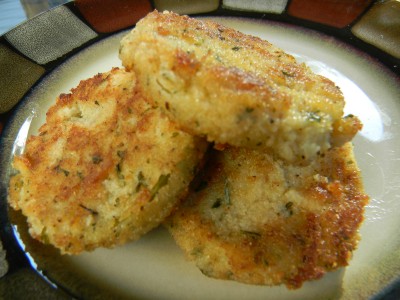
Most people love the movie, but haven’t actually tried them.  They’re absolutely delicious and very simple to make, be sure not to skimp on the salt and pepper.  Buttermilk adds a nice twist.  Serve with Crispy Oven Fried Chicken and a simple salad for an amazing dinner!

It is not always easy to find green tomatoes.  I happened upon a lovely vegetable stand when traveling to Michigan last weekend and they had big baskets of them for $2.00.  I LOVE Michigan!!!!

One more thing….while vacationing in Michigan last summer I had this wonderful Bacon, Lettuce and Fried Green Tomato Sandwich….OMG, wouldn’t that be a great weeknight dinner?

Fried Green Tomatoes

1-2 lbs. green tomatoes, core removed from the top and cut into 1/2″ slices
Salt & Pepper
1 cup buttermilk
2 eggs
dash of hot sauce
1/4 cup water
1 1/2 cups of flour
2 cups seasoned breadcrumbs
Olive oil

1)  Wash the tomatoes, remove the core from the top and slice into 1/2″ slices.  Season generously with salt and pepper
2)  You will need 3 dishes for coating the tomatoes.  Into one add the buttermilk, eggs, water and hot sauce.  Beat well until completely blended.  Into the second dish add the flour, and the third the bread crumbs.
3)  Dip the prepared tomatoes in this order:  first the flour, shake off excess, then into the egg/buttermilk mixture, drain off excess, then into the crumbs to thoroughly coat.  Place onto a wax paper lined cookie sheet.  Once all of the tomatoes are coated, heat a medium size non stick pan over medium-high heat with a couple of tablespoons of olive oil.  Once the oil is very hot, carefully add the tomatoes.  They should cook for 2-4 minutes per side, you’ll want them nicely browned.  Turn carefully and cook the other side.  You most likely will need to add additional oil for each batch.  Drain the cooked tomatoes on paper towel.  Top with a pinch of kosher salt.

DELISH!  If you’d like a dip, simply use a prepared ranch dressing with a dash of hot sauce.  YUM-O!

Have a great evening!

Angie

UFO Identified, Plantains & Fried Plantains….

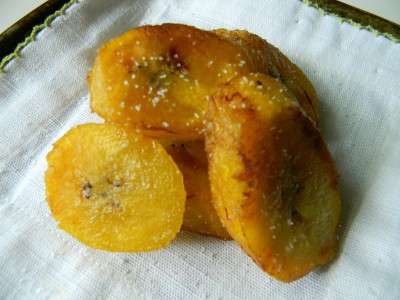
Thank you Chels for identifying this UFO!   Hard to believe that something so unattractive could turn out so beautiful.  The UFO in the previous post is a plantain.  This South American fruit couldn’t be easier to prepare.  It resembles a banana but has a different taste and texture than a regular banana.  For starters they have a much more starchy taste and unlike a regular banana can’t be just peeled and eaten.  They require a little love before you can enjoy.  Because of the amount of starch they fry beautifully.

I prefer a darker plantain as they are a bit sweeter and have a softer texture.  The peeling is not as pliable as a regular banana either.  Slice off the very top and bottom and run a sharp knife through the skin and peel.  Slice the plantain on a diagonal.

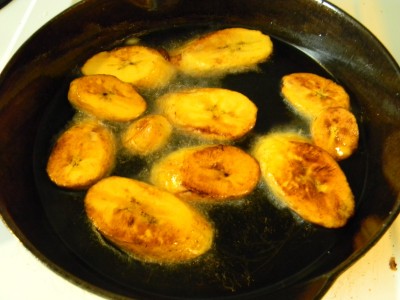
Next heat about 1/2″  of canola oil to about 325-350′.  I use a shallow cast iron skillet as it has excellent heat conduction.  They take only minutes on each side to brown.

Allow the fried plantains to drain on paper towel.  Season simply with kosher salt and you’re ready to serve.                      Serve as a delicious side dish alongside  Grilled Flank Steak with Chimichurri Sauce for an authenthic South American dinner.

Interesting and very delicious!

Have a great day!

Angie

Sauteed Cabbage….

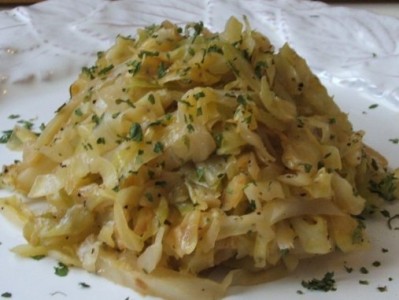
This is actually my favorite part of  St. Patty’s Day dinner.  When this vegetable is caramelized, it becomes sweet and so flavorful.  You must try this!  It takes a little time to cook as it takes about 40 minutes, but it will be well worth it.  You also must stir often as the sugars in the cabbage can burn.  It can be made ahead if you like.

If you have any leftovers, try tossing the caramelized cabbage with hot linguine and some fresh grated parmesan cheese for a fantastic vegetarian meal!

Sauteed Cabbage

Slice the cabbage into quarters and remove the core.  Thinly slice the entire head.    In a heavy large skillet over medium heat, melt 1 tablespoon of butter and add 2 tablespoons of olive oil.  Add the cabbage.  Season with kosher salt and pepper.  Cook for 40-50 minutes over medium-low heat, stirring often,  until the cabbage is caramelized.

YUM!

Have a great day!

Angie

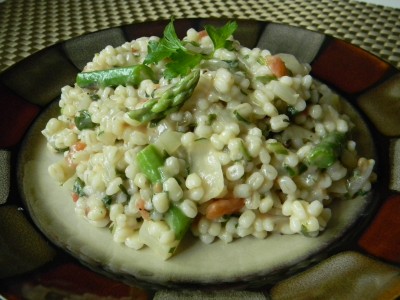
Toasted Barley Risotto With Fennel and Asparagus….

This dish is really, really good.  I totally LOVED it!   Although I am using barley in lieu of arborio rice, this grain has plenty of starch that will give you the same creamy result as the rice version.  Enjoy as a vegetarian main or as a delicious side.  Add any vegetable combination  you like.  I think it would be really good with re-hydrated porcini mushrooms and peas.  Toasting the barley gives the dish a nutty flavor and keeps it from getting mushy when cooking.  Unlike regular risotto, this rewarms beautifully.  If you want to make it ahead, I think it best not to add the blanched asparagus to the barley until you’re ready to serve.  Adding just before serving will keep it bright green and appetizing.

When cooking risotto, it is difficult to give an exact liquid measure.  You must watch it closely and stir if often.  When you notice that most of the cooking liquid has been absorbed, add more.  When you get close to 45 minutes of cooking time, taste it before adding more liquid.  It should be creamy and the barley should be tender yet  slightly firm to bite.  You may have to add additional liquid.

Another important note on risotto.  When adding liquid to the pot, you’ll want to add hot liquid.  You can have stock on the stove over low heat or zap in the microwave.  Adding cold liquid would prolong cooking time.

Toasted Barley Risotto with Fennel and Asparagus

1/2 lb. asparagus, trimmed and cut into 3/4″ pieces

1 cup barley
1 1/2 tablespoons butter
1/2 cup chopped onion
1 cup chopped fennel, the bulb portion (about 1 medium bulb)
2 large cloves garlic, minced
5 cups chicken or vegetable broth
1 14 oz. can petite diced tomatoes, with juice
1/2 cup freshly grated parmesan cheese
1 cup chopped arugula or spinach
1/4 cup fresh parsley
Salt and pepper to taste
1 tablespoon lemon juice, fresh or bottled

1)  Cook the asparagus in a pot of boiling, salted water for about 3 minutes.  Drain and immediately plunge the drained asparagus into ice water to stop the cooking.  Drain well.  Can be made 1 day ahead.  Cover and refrigerate.
2)  Put the stock into the microwave to heat or heat in a small pot on the stove.  In a large cooking pot over medium heat add the barley and heat until lightly toasted stirring often.  About 5-7 minutes.  Transfer barley to a bowl and return the pot to the stove.  Add the butter and melt.  Add the onion, fennel and garlic, cook until tender, about 5 minutes.  Add the barley to the pot, stir to coat.
3)  Add 2 cups of the stock to the pot and reduce the heat to low.  Simmer until most of the liquid is absorbed, stirring often, about 7 minutes.  Add the rest of the stock to the pot.  Continue to stir often.  When most of the liquid is absorbed, add the canned tomatoes with the juice.  Allow the tomato juices to be absorbed.  Taste to check the doneness of the barley.  It should be creamy and the barley should be tender but still be a little chewy.  If you feel it’s too chewy, add a little more liquid and allow this liquid to absorb and taste again.  Once it’s to the right texture, add the parmesan cheese,  arugula (or spinach) and parsley.  Stir until the arugula is wilted.  Taste.  Season with salt and pepper.    Stir in the asparagus and the lemon juice.  Serve with additional parmesan cheese.  Makes 4 servings.

Enjoy!

Angie

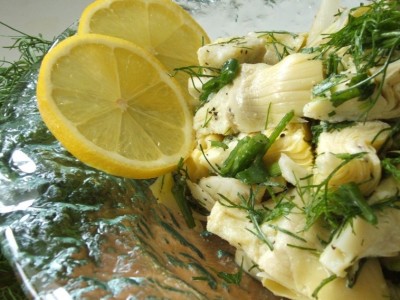
Frozen Artichoke Tip and Artichoke and Fennel Salad…..

I’ve fallen in love with Trader Joe’s frozen artichokes.  I love that you only pay for artichokes and not the packing liquid as you do with the canned.

The first time I used them I tossed them with olive oil, lemon juice, garlic and salt & pepper.  I roasted them (when my oven was working!) at 375′ for about 20 minutes.  Delish!  The key ingredient here in terms of the brightness of the artichoke was the addition of the lemon (or acid.)   You do not have this issue with the canned artichokes because they add citric acid to the canning liquid. 

This spring like artichoke and fennel salad is really good alongside any fish or chicken dish.   Of course, I used the frozen artichokes in my salad.  When I steamed them in water and a little salt, they came out very gray.  Interestingly, I tossed them with the lemon dressing and poof, they returned to a more appetizing state.   Clearly acid is required in the cooking process which I found interesting that directions on the package did not mention this.

Steamed Frozen Artichokes

Rinse and drain a 12 ounce package of frozen artichokes.  Put into a pot with 1 tablespoon lemon juice and 3 tablespoons of water.  Steam covered over low heat until most of the water has evaporated, about 6-8 minutes.  Drain well and cool if you’re using in the above salad.   Great in any salad or pasta.  Roast with chicken or add to soups.   The possiblities are endless!

Artichoke and Fennel Salad with Lemon Dressing

2 fresh fennel bulbs with fronds
2 cans quartered artichokes, drained or two packages frozen, steamed, rinsed and cooled
3 tablespoons parsley, washed and chopped
3 green onions, rinsed and thinly sliced
3 tablespoons olive oil
2 tablespoons fresh or bottled lemon juice
2 cloves fresh garlic, crushed
½ teaspoon salt
¼ teaspoon pepper

1) Rinse thoroughly.  Trim off the bottom of the bulb and leave about 1″ of the fronds, slice thinly, place in a large bowl. Remove the tender frawns, the deep green portion, and chop coarsely. (Do not use the celery looking stalks, they are very tough, they would be great in soup.) Add parsley and green onions.
2) In a small bowl, whisk the olive oil through the pepper. Pour over vegetables and toss gently. Taste, add additional salt and pepper if necessary.

Have a great day!

Angie

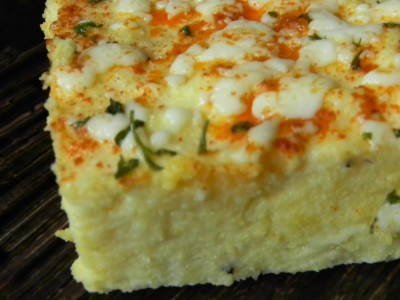
Polenta Squares With Fontina Cheese…..

Polenta is an amazing neutral grain that you can easily tailor to your own taste.  I love it because it’s naturally creamy and sets up perfectly when refrigerated.  It can be cut into squares, triangles, or circles.  It can be pan fried, deep fried, grilled or baked.  (I feel like Bubba in the movie Forest Gump talking about all the things you can do with shrimp!)  I added fontina cheese to the hot polenta and topped it with additional cheese.  For a little color, I did a light sprinkling of sweet paprika and dried parsley.  You could add any cheese you like.  I think it would be amazing with a sharp bleu cheese and of course, reggiano parmigiano.

It can be served a couple of different ways.  You can serve it in its creamy state, right out of the pot.  You could put a spoonful right onto your plate or into a large soup bowl and top it with a thick marinara or meat tomato sauce.  Top with additional cheese and you have dinner.  I prefer it chilled in a 9×13″ pan, then baked and cut into squares.  This method is great for entertaining because all you have to do is pop it in the oven for 35 minutes or so and serve.

Enjoy as a vegetarian main dish with an arugula salad with a tangy vinaigrette.  Serve with most any rich, braised meat, grilled chicken or fish.    I served it with braciole.  The rich tomato and garlic sauce paired beautifully with the creamy polenta.

Polenta Squares

8 cups water
1 teaspoon salt
2 cups cornmeal
1/4 cup half and half
2 tablespoons butter
1 1/2 cup cheese
1/2 teaspoon sweet paprika
1 tablespoon dried parsley

1)  Butter or coat a 9 x 13″ baking dish with cooking spray.
2)  In a large pot bring the water and salt to a boil.  Lower the heat so that it’s just simmering.
3)  With a whisk, slowly add the cornmeal to the pot, whisking quickly (and carefully)  to avoid lumps.  Once you get all of the cornmeal into the pot, you will notice it’s extremely thick.  Remove it from the heat immediately as the bubbling liquid can bubble right out of the pot and burn you!
4)  Immediately add the half and half and butter.  Whisk to combine.
5)  Add 1 cup of the cheese, stir gently to blend.  Pour into prepared pan.  Top with the remaining 1/2 cup of cheese.
Refrigerate until firm.
6)  Preheat the oven to 350′.  Bake for 30-40 minutes or until completely heated through.  Sprinkle with the paprika and dried parsley.  Cut into squares.  Makes 12 3″ squares.  Serve 2 per person.  Serves 6 total.

Enjoy!

Angie

*For grilling or pan frying,  skip topping the cooked polenta with the extra 1/2 cup of cheese until after grilling.   Cut it into squares while it’s chilled and grill or pan fry.  Grilling can be tricky because it softens up again after heating.  The grill needs to be extremely hot and you’d want to coat it lightly with vegetable oil.  For pan frying, be sure the pan and oil are extremely hot so that it browns the polenta.  Flip very carefully.

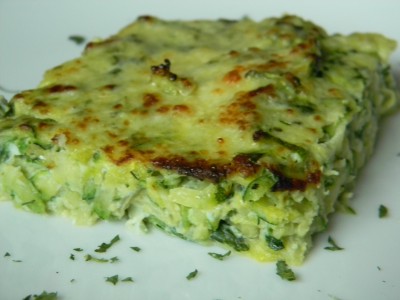
Zucchini Bake…..

I get bored with vegetables at this time of year.  It can be challenging to come up with different things to do with vegetables that don’t involve a lot of added fat.

I love this dish.  It is actually better the next day.  Make a good amount of it so you can enjoy for lunches during the week.  Serve with simply roasted chicken or fish.

Zucchini Bake

2 lbs. zucchini trimmed and grated by hand or with a food processor
1/2 teaspoon kosher salt plus additional to taste
1 tablespoon olive oil
1 large onion, finely chopped
2 large cloves garlic, minced
2 tablespoons chopped fresh parsley or 1 tablespoon dried
1 teaspoon dried basil
1/2 teaspoon black pepper
2 eggs, beaten
1/3 cup grated parmesan cheese

1)   Grate the zucchini and place int a colander.  Sprinkle with 1/2 teaspoon salt and allow to drain for 10 minutes.  Squeeze any excess moisture out of the zucchini.
2)  Coat a 9 x 13″ baking dish with cooking spray.   Preheat the oven to 350′.
3)   Add the olive oil to a large skillet and place over medium-high heat.  Once the pan is hot, add chopped onion.  Cook for 7-8 minutes or until onions are translucent.  Add the garlic and cook another minute.  Add the drained zucchini.  Cook for 4-5 minutes.  Add the parsley, basil and pepper.  Taste the mixture.  Add additional salt to your taste if necessary.
4)  Pour the zucchini mixture into the prepared baking dish.  Pour the beaten eggs over the zucchini.  Mix well and smooth out the top.  Sprinkle the top with parmesan cheese.  Bake for 25-30 minutes.  Serve hot or cold.  Cut into squares.  Makes about 12- 3″ squares.  Serves 6.

Enjoy!

Angie

Cornbread Stuffing Tip…..

Good morning!

I just read an interesting way to make cornbread stuffing (Food and Wine Magazine).  Use 1/3 sourdough cubes and 2/3 dried cornbread cubes.  This would give the stuffing nice texture with the chewy sourdough bread.

YUMMY!

Angie

Sausage And Sage Stuffing….

This is soooo delicious!  I use Jimmy Dean’s Sage Sausage, it’s perfect for this stuffing.  Make this stuffing to your own liking.  Use any kind of bread you like.  Cornbread is a delicious option with the sausage as well.  If using cornbread, dry it out the same way you would other breads.  (instructions below)  I save the bread crust ends and toast them for stuffing.  Remember, cold stuffing into cold bird.  This is hugely important when it comes to food safety. 

Sage and Sausage Stuffing

1 lb. bulk sage pork sausage
1 tablespoon butter
5 stalks of celery, cut into small pieces
1 large onion, finely diced
1 teaspoon dried rubbed sage
1 cup fresh parsley, chopped
10 cups dried bread cubes, *homemade or store bought
3-4 cups cold chicken stock or water

1)  Dump the dried bread cubes into a large mixing bowl, set aside.  In a large skillet, cook the sausage until browned.  Drain off any excess fat.  Dump sausage into the bread bowl.
2)  Add the butter to the skillet and add the celery and onion.  Cook 6-7 minutes or until veggies are soft.  Add the sage and parsley.  Mix well.  Add to the bread bowl.  Pour half of the chicken stock over the goodies in the bowl.  Gently fold stuffing ingredients.  Keep adding the stock until all of the bread is moistened.  Cool completely and refrigerate in a large zip bag.  Stuff the cold bird with the cold stuffing right before going into the oven.

*To make your own dried bread cubes cut leftover bread into 1/2″ cubes.  Spread over a cookie sheet, do not crowd.  Bake in 300′ oven for 15-20 minutes or until the bread is totally dried out.  Turn the bread cubes every 5 minutes.  Cool completely.  Store in a zip bag if you’re not using right away.

**If you’d like to bake the stuffing in a casserole dish, butter a 2 quart dish generously with butter.  Add the stuffing and pack in.  Add a couple of pats of butter to the top.  Bake at 350′ for 30-35 minutes.  Makes about eight 1/2 cup servings.

Gobble Gobble!

Angie