Quinoa Stuffed Cabbage Rolls….

040
I found a version of this recipe in Eating Well Magazine.  They used brown rice and I thought it might be interesting to use quinoa instead.  I changed it around quite a bit.  I really liked the result.

I made a simple tomato sauce that compliments the quinoa mushroom mixture nicely.

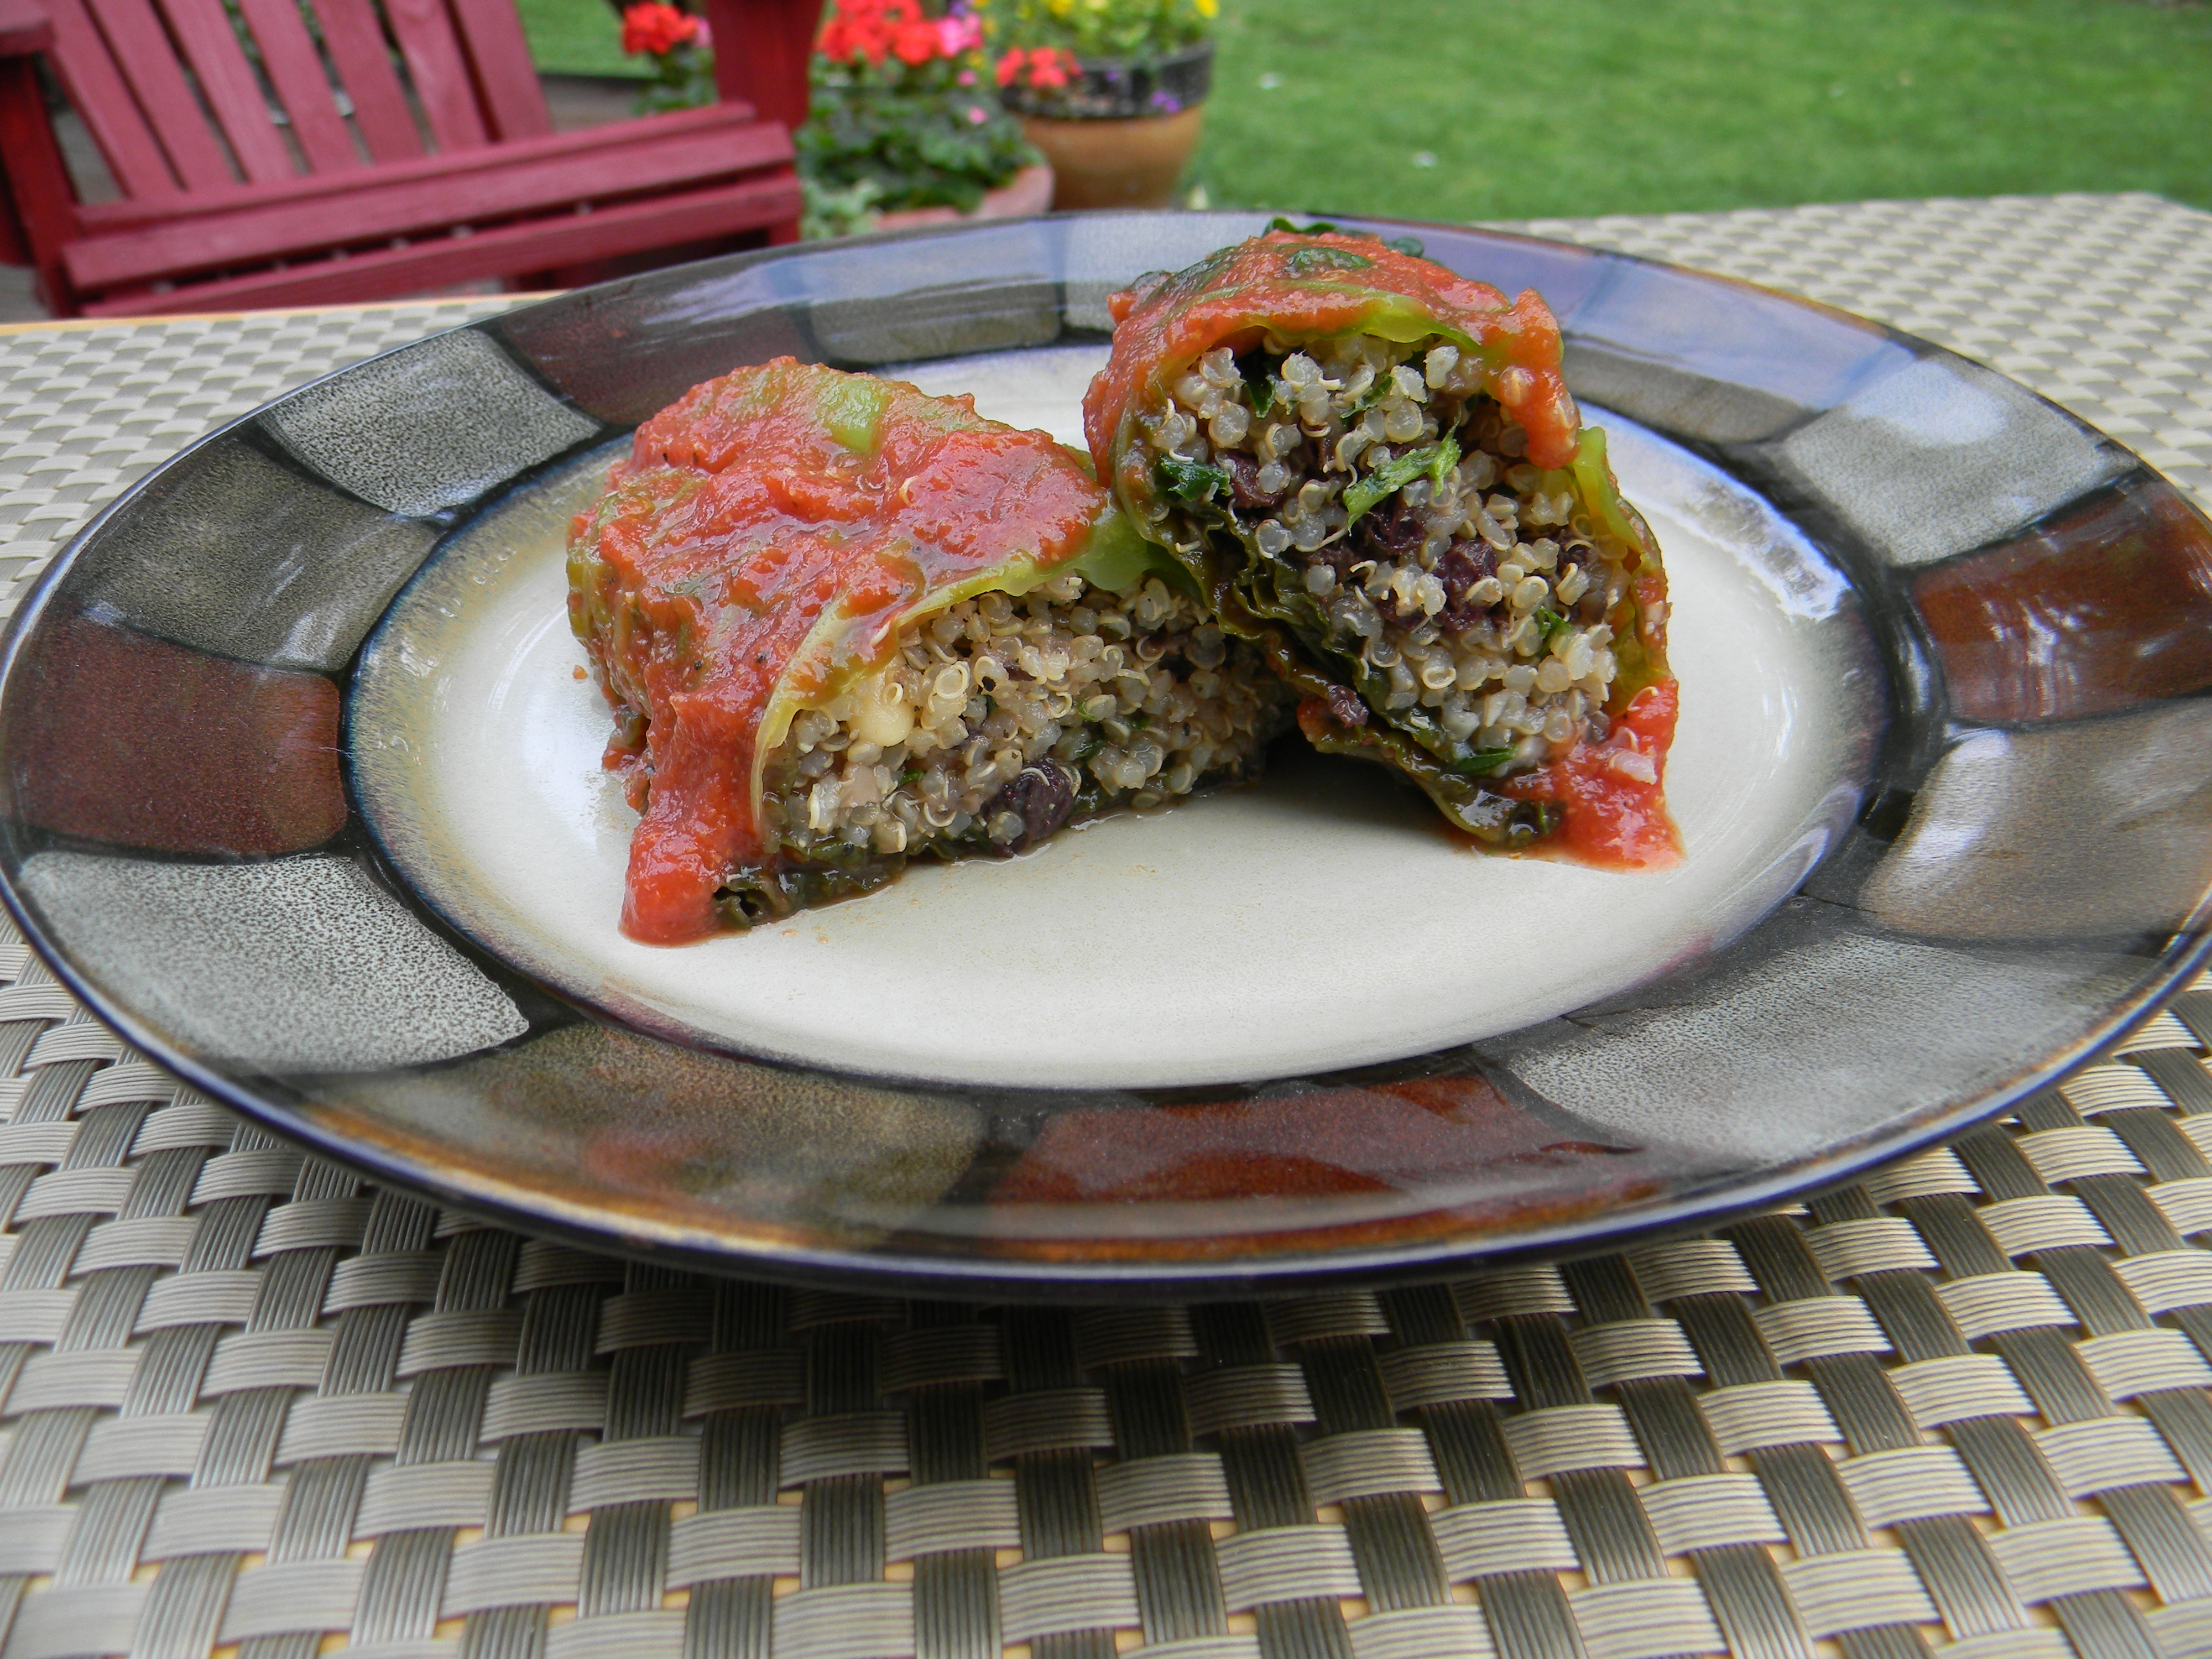
Qunioa Stuffed Cabbage Rolls

2 cups cooked quinoa (1 part quinoa to 2 parts water and a little salt.  Bring to boil, cover and lower heat for about 15 minutes.  Cool)

3 tablespoons olive oil
1 medium onion, finely diced
1/2 lb. white button mushrooms, finely chopped
4 cloves garlic, finely minced or crushed
1/2 teaspoon dried sage
1/2 teaspoon dried rosemary, crushed with your fingers to release flavor
1/2 teaspoon salt
1/4 teaspoon coarsely ground pepper
1/2 cup red wine
1/4 cup dried currants
1/4 cup toasted pine nuts.  Toast in a skillet over low heat, shaking pan often, they burn easily, so watch them closely.  Should take about 5 minutes.

1 head savoy cabbage-slice off about 1″ of the bottom with the core, then carefully carve out the core.

Tomato Sauce

2 tablespoons olive oil
1 small onion, finely diced
2 cloves crushed garlic
1 teaspoon crushed dried oregano
1/2 teaspoon salt
2 pinches black pepper, or more to your taste
2 tablespoons tomato paste
1 64 ounce can of tomato sauce
1 tablespoon sugar, agave or honey
1/2 cup water

1)  Cook and cool quinoa.  Heat a large skillet over medium heat, add olive oil and onion, saute until the onion is soft.  Add mushrooms and cook until the moisture has completely evaporated.  Add garlic, sage, rosemary, salt, pepper and red wine. Simmer until the wine has reduced in half or so.  Cool.
2)  In a large pasta pot, bring water to a boil with 1 teaspoon salt.  Once the water is boiling, add the head of cored and trimmed cabbage.  allow it to cook for 5 minutes.   The leaves will soften, remove the outer leaves with a tongs.  Allow the cabbage to drain well and pat dry with paper towel.  Set aside.
3)  Prepare the sauce.  Saute the onion in the olive oil in a sauce pan, cook until soft.  Add garlic and cook one minute.  Add oregano, salt, pepper, tomato paste and sugar.  Stir often, allow the tomato paste to caramelize, 2-3 minutes.  Add tomato sauce and water.  Preheat the oven to 350′.
4)  Spread a little olive oil over your 9 x 13 baking dish.  Ladle about 1/2 cup of the sauce over the bottom.  It’s time to assemble the cabbage rolls.
5)  Select 8-10 of the largest and prettiest cabbage leaves.  Hold a cabbage leaf in the palm of your hand and fill with about 1/4 cup of the filling.  Carefully roll the cabbage around the filling and place seam side down in the prepared baking dish.   Ladle the remaining sauce over the rolls.
6)  Bake for 35-40 minutes.

Enjoy!

*This recipe can be made 3-4 days ahead and kept in the refrigerator.

Cream Of Carrot Soup….

I would not have tried this soup had it not been for my friend Amy.  She so kindly brought us a batch when Joe got out of the hospital from his recent hip surgery.

Let me tell you, it was fantastic!  When I first tasted it I thought it had to be loaded with cream as it was so rich and delicious.  As it turns out it’s quite healthy!  It would made an awesome afternoon snack as it will only cost you 2 Weight Watcher’s points and would count as one vegetable!  Serve with grilled cheese for a simple and light supper.

If you’ve read any of my previous posts, you know that I encourage you to “tweek” my recipes and make them your own. After eating this amazing soup, of course, I started thinking of different variations.  How about half carrots and half parsnips?  How about sweet potatoes?  The possibilities are endless!

The ingredient list is very simple.  You will need to blend the soup in a blender for the best smooth consistency.  Only fill your blender 3/4 full before blending as you can have a “hot” mess in your kitchen if you fill it too high.  I would also recommend holding a clean kitchen towel over the top of the blender while the blender is on.

Cream of Carrot Soup

2 lbs. peeled carrots, cut into 3/4″ pieces *about 6 cups)
4 tablespoons butter
1/2 lb.  chopped yellow onions, about 1 3/4 cups
4 cups chicken broth or vegetable broth
2 cups 2% milk
1/4 teaspoon cayenne pepper

1)  Peel and cut carrots into 3/4″ pieces.
2)  Melt butter over medium heat in a large soup pot and add onions.  Cook until soft, about 7-8 minutes, stir often.
3)  Add carrots, broth and salt to taste.  I added about 1 teaspoon of kosher salt.  Turn up the heat and bring to a boil.  Once it’s boiling, reduce heat to medium again and simmer until the carrots are soft, about 20-30 minutes.  Remove from heat and add milk and cayenne.
4)  Process in blender ins small batches.  Serve hot or very cold.

*Refrigerate left overs.  Makes about 12 one cup servings.  Freezes beautifully.

Have a wonderful day!

Angie

Toasted Barley Risotto With Fennel and Asparagus….

This dish is really, really good.  I totally LOVED it!   Although I am using barley in lieu of arborio rice, this grain has plenty of starch that will give you the same creamy result as the rice version.  Enjoy as a vegetarian main or as a delicious side.  Add any vegetable combination  you like.  I think it would be really good with re-hydrated porcini mushrooms and peas.  Toasting the barley gives the dish a nutty flavor and keeps it from getting mushy when cooking.  Unlike regular risotto, this rewarms beautifully.  If you want to make it ahead, I think it best not to add the blanched asparagus to the barley until you’re ready to serve.  Adding just before serving will keep it bright green and appetizing.

When cooking risotto, it is difficult to give an exact liquid measure.  You must watch it closely and stir if often.  When you notice that most of the cooking liquid has been absorbed, add more.  When you get close to 45 minutes of cooking time, taste it before adding more liquid.  It should be creamy and the barley should be tender yet  slightly firm to bite.  You may have to add additional liquid.

Another important note on risotto.  When adding liquid to the pot, you’ll want to add hot liquid.  You can have stock on the stove over low heat or zap in the microwave.  Adding cold liquid would prolong cooking time.

Toasted Barley Risotto with Fennel and Asparagus

1/2 lb. asparagus, trimmed and cut into 3/4″ pieces

1 cup barley
1 1/2 tablespoons butter
1/2 cup chopped onion
1 cup chopped fennel, the bulb portion (about 1 medium bulb)
2 large cloves garlic, minced
5 cups chicken or vegetable broth
1 14 oz. can petite diced tomatoes, with juice
1/2 cup freshly grated parmesan cheese
1 cup chopped arugula or spinach
1/4 cup fresh parsley
Salt and pepper to taste
1 tablespoon lemon juice, fresh or bottled

1)  Cook the asparagus in a pot of boiling, salted water for about 3 minutes.  Drain and immediately plunge the drained asparagus into ice water to stop the cooking.  Drain well.  Can be made 1 day ahead.  Cover and refrigerate.
2)  Put the stock into the microwave to heat or heat in a small pot on the stove.  In a large cooking pot over medium heat add the barley and heat until lightly toasted stirring often.  About 5-7 minutes.  Transfer barley to a bowl and return the pot to the stove.  Add the butter and melt.  Add the onion, fennel and garlic, cook until tender, about 5 minutes.  Add the barley to the pot, stir to coat.
3)  Add 2 cups of the stock to the pot and reduce the heat to low.  Simmer until most of the liquid is absorbed, stirring often, about 7 minutes.  Add the rest of the stock to the pot.  Continue to stir often.  When most of the liquid is absorbed, add the canned tomatoes with the juice.  Allow the tomato juices to be absorbed.  Taste to check the doneness of the barley.  It should be creamy and the barley should be tender but still be a little chewy.  If you feel it’s too chewy, add a little more liquid and allow this liquid to absorb and taste again.  Once it’s to the right texture, add the parmesan cheese,  arugula (or spinach) and parsley.  Stir until the arugula is wilted.  Taste.  Season with salt and pepper.    Stir in the asparagus and the lemon juice.  Serve with additional parmesan cheese.  Makes 4 servings.

Enjoy!

Angie

Veggie Grilled Cheese or Panini…..

Here’s a quick and really tasty way to use up your zucchini bake.  Warm a slice of zucchini bake large enough to cover a slice of sourdough bread and warm it in the microwave until very hot.  Heat a skillet over medium heat.  Brush the two pieces of sourdough bread lightly with olive oil.  Make a sandwich using your favorite cheese, I used gruyere swiss, then the warmed zucchini bake.  Toast until the bread is nicely browned.  Walla, a quick and easy lunch or dinner.  Enjoy with Tomato Basil Soup, delish!

I think some roasted red pepper would be a pretty fabulous addition to this sandwich as well.  It’s the perfect opportunity to get creative.  That’s why I love to cook, the possibilities are endless!

Have a great evening!

Angie

Zucchini Bake…..

I get bored with vegetables at this time of year.  It can be challenging to come up with different things to do with vegetables that don’t involve a lot of added fat.

I love this dish.  It is actually better the next day.  Make a good amount of it so you can enjoy for lunches during the week.  Serve with simply roasted chicken or fish.

Zucchini Bake

2 lbs. zucchini trimmed and grated by hand or with a food processor
1/2 teaspoon kosher salt plus additional to taste
1 tablespoon olive oil
1 large onion, finely chopped
2 large cloves garlic, minced
2 tablespoons chopped fresh parsley or 1 tablespoon dried
1 teaspoon dried basil
1/2 teaspoon black pepper
2 eggs, beaten
1/3 cup grated parmesan cheese

1)   Grate the zucchini and place int a colander.  Sprinkle with 1/2 teaspoon salt and allow to drain for 10 minutes.  Squeeze any excess moisture out of the zucchini.
2)  Coat a 9 x 13″ baking dish with cooking spray.   Preheat the oven to 350′.
3)   Add the olive oil to a large skillet and place over medium-high heat.  Once the pan is hot, add chopped onion.  Cook for 7-8 minutes or until onions are translucent.  Add the garlic and cook another minute.  Add the drained zucchini.  Cook for 4-5 minutes.  Add the parsley, basil and pepper.  Taste the mixture.  Add additional salt to your taste if necessary.
4)  Pour the zucchini mixture into the prepared baking dish.  Pour the beaten eggs over the zucchini.  Mix well and smooth out the top.  Sprinkle the top with parmesan cheese.  Bake for 25-30 minutes.  Serve hot or cold.  Cut into squares.  Makes about 12- 3″ squares.  Serves 6.

Enjoy!

Angie

Baked Falafel Sliders with Yogurt Tahini Sauce…..

I now completely understand why these luscious cakes are fried.  Most often, I’ve had them fried until very dark brown.  I can only asssume that after working with my falafel mixture, it is needed to keep its shape.  That being said, I had to take an extra step in my preparation.  I found that when I only baked them, as I would most of my “oven fried” recipes, they were very soft and would not keep their shape very well.  I baked, allowed them to cool, then I pan fried them in a little olive oil.  This had a more favorable result.    Lightly crispy on the outside and tender and flavorful on the inside.  I loved them!

Here we go…

I used my food processor to blend the canned chick peas.  I’ve read recipes where you’re instructed to mash them with a spoon, seems difficult to me.   After you’ve processed the chick peas, add the rest of the falafel ingredients.  Process until well blended.  Refrigerate for at least an hour.

Non stick foil line a cookie sheet.  Pour about a tablespoon of olive oil over the sheet and spread with your hand to coat the whole sheet.  Preheat the oven to 375′.

For uniform cakes, I use a large ice cream or a cookie scoop. 

Scoop into your hand and shape into a small patty. 

Carefully dredge in bread crumbs.

Place on prepared cookie sheet.

Drizzle the tops with a small amount of olive oil.  (you can see that I made a huge recipe here, this recipe only makes 8)  Bake for 30 minutes.  Allow the cakes to cool for easier handeling.  Heat a skillet over medium heat and add a couple of tablespoons of olive oil.  Once the oil is very hot, add the cakes, be careful not to crowd, and brown on both sides. (3-4 minutes per side)  Serve inside a quartered pita bread with fresh cucumber, thinly sliced sweet onion, and tahini sauce.  Serve with a yummy tabbouleh salad.  Healthy and soooooo delicious!

Yogurt Tahini Sauce

½ cup tahini
2 cloves garlic, crushed
2 tablespoons lemon juice
2 tablespoons yogurt
¼ teaspoon salt
½ cup water

Falafel

1 can chick peas, drained
1/2 large onion, coarsely chopped
2 tablespoons flat leaf parsley
1/2 teaspoon kosher salt
3 large cloves fresh garlic, coarsely chopped
1 teaspoon cumin
1/2 teaspoon coriander
1 teaspoon baking power
2 tablespoons flour
1 tablespoon water
1 tablespoon lemon juice
1/2 cup unseasoned bread crumbs.
Olive oil for frying and to coat the cookie sheet

Pita bread, cut into quarters
1 medium cucumber, thinly sliced
1 small sweet onion, thinly sliced

1)  Whisk all yogurt tahini sauce ingredients together until well blended.  Refrigerate until you’re ready to serve.
2)  Place the chick peas into the food processor and process until smooth.  Add the rest of the ingredients and process until well blended.  Refrigerate for at least an hour.
3)  Preheat oven to 375′.  Non stick foil line a cookie sheet and add a couple of tablespoons of olive oil, spread over sheet to coat.
4)  Scoop out the dough using a 2 tablespoon cookie scoop.  Carefully shape into a small patty and coat with bread crumbs.  Place on the cookie sheet.  Drizzle with a small amount of olive oil.
5)  Bake for 30 minutes.  Remove from oven and allow to cool for about 20 minutes.
6)  Heat skillet over medium heat, add olive oil to coat the bottom of the pan, about 2 tablespoons.  When very hot, fry each falafel until nicely browned.  Allow to drain on a paper towel lined plate.  Serve with pita bread, tahini sauce, fresh sliced sweet onion, and fresh cucumber.  Makes 8 falafel.  Serves 4.

*for an interesting appetizer, use a small cookie scoop and make them bite size.  Serve with the yogurt tahini sauce for dipping.

Tabbouleh Salad…..(Only 3 points plus per serving!)

This is my favorite salad to date.  For a quick and satisfying lunch serve over a bed of nutrient rich red cabbage and garnish with fresh diced plum tomatoes.   Great with grilled fish or chicken.  Simple to prepare and it will keep for 5-7 days in the refrigerator.  I especially like to make a big tub of it and eat it for lunches or side dishes throughout the week.

The base of this salad is bulgur wheat.   I love the texture of this healthy grain.  One half cup serving contains 5 grams of protein and 7 grams of fiber.    One half cup cooked equals 3 Weight Watcher’s points plus.  As you may already know, whole grains such as bulgur digest slowly, keeping you full longer.

You can soak it in water for an hour and drain off excess water, but I think the best way to prepare it is to cook it.  It only takes 12-15 minutes to cook and I like the texture much better when it’s cooked as opposed to soaking.

Tabbouleh Salad

1 cup bulgur wheat, cooked and cooled
2 large bunches (or more) fresh flat leaf parsley, finely chopped
1/4 cup fresh mint, finely chopped
2 tablespoons olive oil
3 tablespoons fresh or bottled lemon juice
2-3 large cloves fresh garlic, crushed
1 cup sweet onion, finely chopped
2 medium plum tomatoes, seeded and finely chopped
1 large cucumber, seeded and finely chopped
2 pinches of kosher salt (or to taste)
2 pinches of black pepper (or to taste)

1)  Prepare bulgur according to package directions, allow to cool completely.  I use Bob’s Red Mill bulgur.  Add 1 cup bulgur to 2 cups of water, bring to a boil, reduce heat and cover.   Allow to simmer for 12-15 minutes.  Dump the cooked bulgur into a large bowl to promote quick cooling.  Stir often to release the heat.
2)  You can use a food processor to blend the parsley, mint, garlic, lemon juice, and olive oil.  It is not necessary, but it’s a lot easier than chopping the parsley and mint by hand.  Either way, it’s all good.
3)  Add all salad ingredients to the bulgur.  Mix well to blend.  Refrigerate the leftovers immediately.  Enjoy!

*makes about 8- 1/2 cup servings
**1/2 cup serving=3 Weight Watcher’s Points!

Oven Roasted Cauliflower…..

I think this is the most delicious way to enjoy cauliflower.  As you can see, roasting gives the otherwise bland looking vegetable nice color or caramelization.  Use only 5 ingredients…cauliflower, olive oil, salt, pepper and a little water.  Foil line your cookie sheet for easy clean up.  Enjoy hot or cold.

Oven Roasted Cauliflower

1 head of cauliflower, cut into bite size pieces
1 tablespoon olive oil
3 pinches salt
2 pinches pepper
1 tablespoon water

1)  Preheat oven to 375′.  Foil line a cookie sheet.

2)  Cut cauliflower and place in a large bowl.  Drizzle with olive oil and season with salt and pepper.  Toss to evenly coat.  Spread over cookie sheet and drizzle with the water.

3)  Roast for 25 minutes, give a turn and roast another 15-20 minutes.

Enjoy!

Angie

Marinara Sauce…..

Everyone should have a “go to” marinara recipe.  Here you go.  Love this over pasta with fresh grated parmesan cheese.  Add a simple salad and you have dinner.   If you’d like to kick it up a notch, serve it with my homemade garlic bread.  (you’ll find the recipe in breads category)  Why not double the recipe and keep a stash in your freezer for later, always a great idea!  Also makes an excellent meatless lasagna…will share that with you soon.

Here we go….

We  begin with a large heavy pot over medium heat and some nice olive oil.

And lots of onions…two cups.  Cook for about 5 minutes.

We’ll add some seasonings now.  The olive oil will absorb the flavors.  We have crushed red pepper flakes, oregano, thyme, salt, and pepper.

Add the seasonings all at once….

And garlic, we need lots of garlic:-)  Cook for a couple of minutes.

Of course, we need tomatoes.  I like using crushed tomatoes for a little texture, tomato sauce, and tomato paste.  Sugar is added to reduce the acidity.

Add the tomato paste.  Cook this in the pan for a few minutes, the tomato paste will start to caramelize and all of the flavors will come together.

Add the crushed tomatoes, the tomato sauce, and a little water.

Finally, the sugar.  Simmer the sauce for about 20 minutes.  Quick and easy!

Marinara Sauce
(no meat)

 2 tablespoons olive oil
2 cups chopped onion
¼ cup fresh garlic, minced (about 5 large cloves)
1 tablespoon dried oregano
1 teaspoon dried thyme
1 ½ teaspoons kosher salt or 1 teaspoon table salt
½ teaspoon pepper
1/8 teaspoon red pepper flakes
1 6 ounce can tomato paste
1 28 ounce can crushed tomatoes
1 28 ounce can tomato sauce + ½ can water
1 ½ tablespoons sugar

 1)  Heat olive oil in a large heavy pot over medium heat.  Add onions and cook for about 5 minutes.  Add the garlic, oregano, thyme, salt, pepper, and pepper flakes, cook another couple of minutes.

2)  Add tomato paste and cook 3-4 minutes, stirring often.  Add crushed tomatoes, tomato sauce, water, and sugar.  Simmer for about 20 minutes. 

*add additional water if you’d like a thinner sauce.

Kalamata Olive Vinaigrette…..

I

I love the flavors in this vinaigrette.  Of course, the most prominent would be the kalamata olives.  I decided to mince them into the vinaigrette to more evenly distribute the olive flavor throughout the salad rather than a strong bite here and there.  The recipe below makes about 1 1/2 cups of dressing.  It will keep in the refrigerator for up to 3 weeks.  Homemade and delicious!

Kalamata Olive Vinaigrette

 2 tablespoons each water, lemon juice, and red wine vinegar
2 tablespoons parmesan cheese
2 tablespoons chopped fresh parsley
2 teaspoons Dijon mustard
1 large clove garlic, chopped
½ teaspoon kosher salt
¼ teaspoon black pepper
1 cup olive oil
10 pitted kalamata olives, minced

 Romaine lettuce leaves
Red onion, thinly sliced

 1)  Place all ingredients up to black pepper into a blender.  Blend on low, while the blender is on, add the olive oil in a drizzle until all is incorporated.  Pour into a bowl and add the minced olives.

2)  Place lettuce leaves on a plate with some sliced red onion.  Drizzle with salad dressing.  Makes about 1 ½ cups of dressing.  Keep refrigerated for up to 3 weeks.

Enjoy!

Angie