Red Velvet Cake With Cream Cheese Frosting…..

orng chx slm patDSCN3016_2696

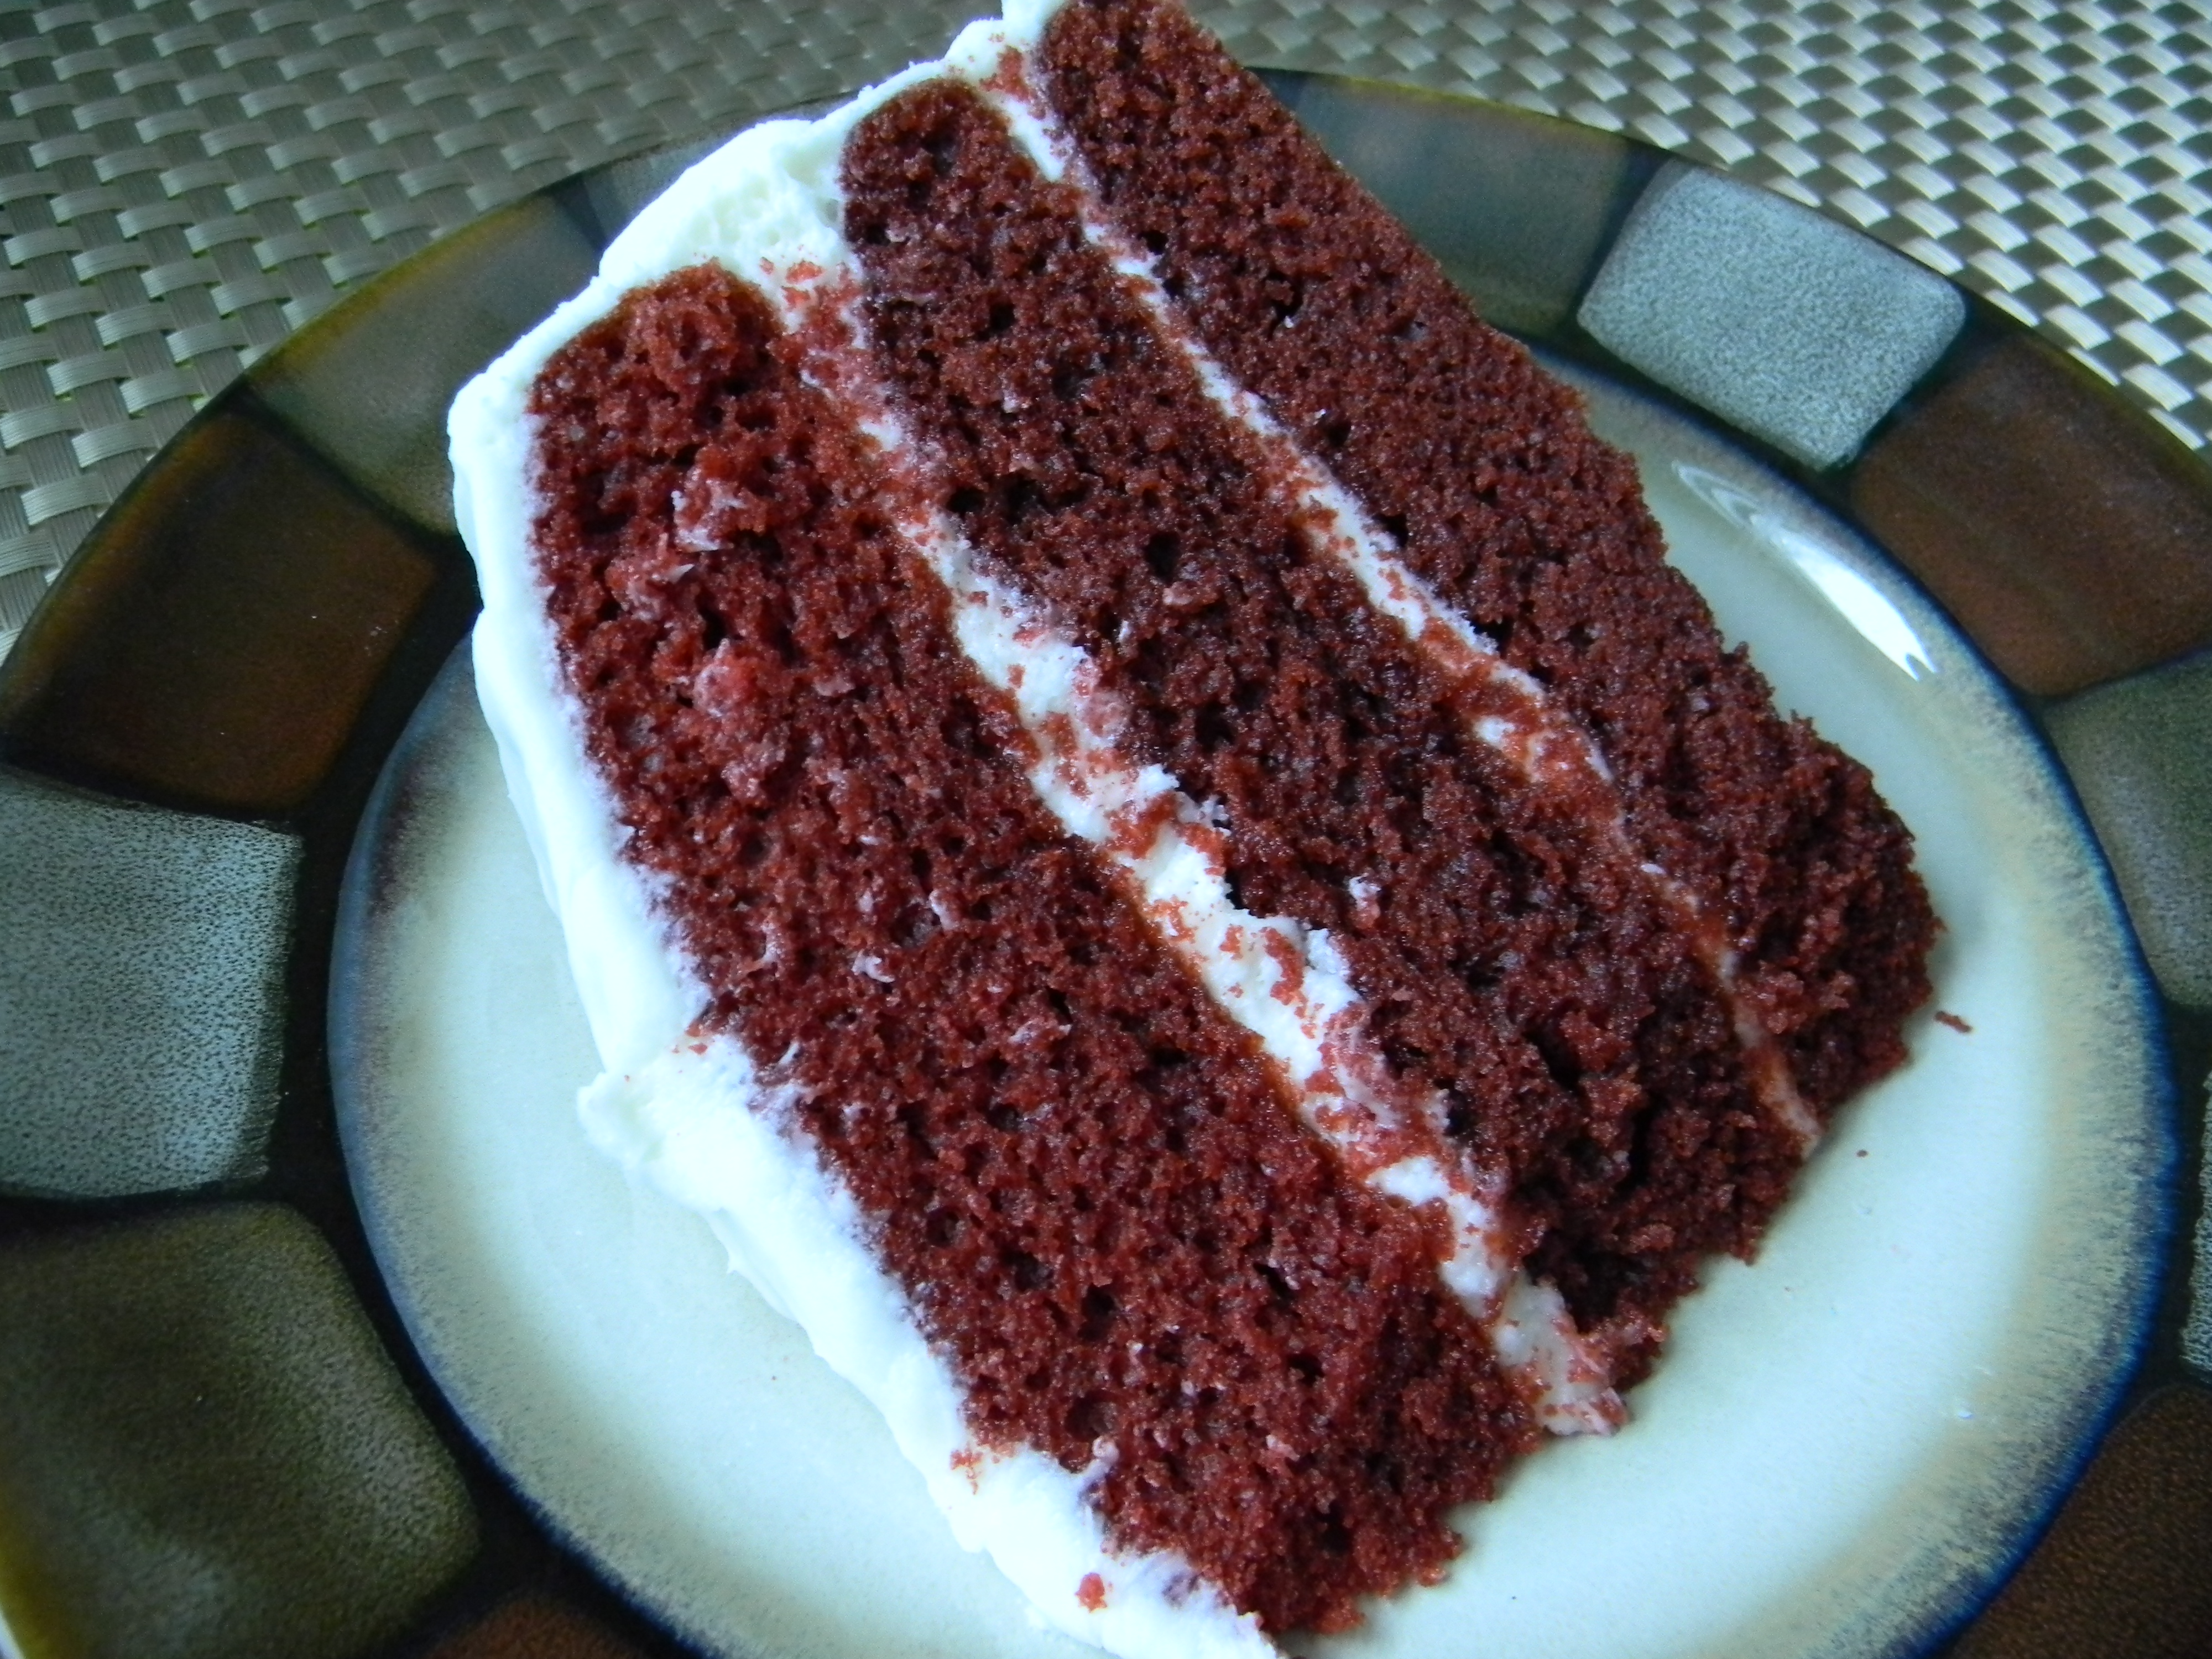
This recipe is a one bowl recipe, my favorite.  It is very, very moist and especially delicious with the cream cheese frosting.  Refrigerate after you frost it and pull it out of the refrigerator 30 minutes before serving.  Cover and refrigerate any leftover cake.

I’ve changed the recipe a little bit.  The original recipe called for only 1 teaspoon of cocoa…what?!  I wanted the cake to have a little more “chocolate” taste.   Use three 9″ pans and you’ll have a nice high cake.  Baking times may vary according to your oven.  See my post on baking and frosting tips.

There is a great deal of food coloring in this recipe.  I strongly suggest you use what’s required.  I tried it with less and it didn’t have the same dramatic affect.

Red Velvet Cake

3 3/4 cups all-purpose flour
2 1/4 cups sugar
1 1/2 teaspoons baking soda
1 1/2 teaspoons fine or table salt
4 tablespoons cocoa (it’s a good idea to sift the cocoa if you don’t plan on sifting the rest of the ingredients)
2 1/4 cups vegetable oil
3 large eggs
1 1/2 cups buttermilk at room temperature
3 tablespoons red food coloring (use the liquid or gel not the paste)
1 1/2 teaspoons white or cider vinegar
1 1/2 teaspoons vanilla extract
Cream cheese frosting, recipe below

1) Preheat the oven to 350′.  Generously coat 3 9″ pans with cooking spray and dust evenly with flour.

2)  In a large mixing bowl, sift the flour, sugar, baking soda, salt and cocoa powder.  In another large bowl, whisk together the oil, buttermilk, eggs, food coloring, vinegar and vanilla.

3)  Using a stand mixer or hand mixer, mix the dry ingredients into the wet ingredients until just combined and a smooth batter is formed.

4)  Divide the cake batter evenly among the prepared cake pans.  Place the pans in the oven evenly spaced apart.  Bake 25-30 minutes.  Set the timer for 25 and check the cake.  (see my cake tips post below this one)

5)  When done, remove the cakes from the oven and run aknife around the edges to loosen them from the sides of the pans.  Cool 10 minutes then invert onto a plate, then reinvert onto a cooling rack.  (Now the bottom of the cake is resting on the rack, rounded sides up)  Cool completely.

Cream Cheese Frosting

1 lb. cream cheese, softened
2 sticks softened butter (1 cup)
6 cups sifted confectioners’ sugar
1 teaspoon vanilla extract
milk as needed

1)  In a stand mixer with a paddle attachment or an electric mixer in a large bowl, beat the butter and cream cheese until well blended and creamy.  Add the sugar 2 cups at a time and mix on low speed.  Scrape down the sides of the bowl occasionally.  When you add the last 2 cups of sugar, you may need to add milk to get the perfect consistency.  Add one teaspoon at a time.  Once all of the powdered sugar is incorporated, add the vanilla and beat briefly until fluffy.  You’re ready to frost the cake.

2)  When assembling a two or three layer cake, you’ll want the cakes to be relatively flat.  If your cake has a dome like top, use a long serrated knife to level it off.  (It  is critical here to go ahead and taste the cake.  You know, for quality control purposes)  Place the cut side down either on the plate or on the top of the bottom layer.  It is far easier to frost the bottom part of the cake (the part that was in the pan as opposed to the cut side)  Hope that makes sense!

3)  Use lots of frosting.  Joking aside, it’s quite nice to not worry about crumbs on your finished cake.  You first do a “crumb” layer.  Refrigerate the cake for at least 30 minutes before proceeding to the final layer.

4)  Put a splotch of frosting on the plate to hold the cake in place.  Put your first cake, cut side down if necessary and ice the top of it.  Proceed to layer two and layer three.  Using lots of frosting, ice the sides filling in any gaps between the layers.  Finally, frost the top.

5)  Frost the chilled cake with the final layer of room temperature frosting.  If you prefer a very smooth surface on your cake, you can dip your spatula into water and smooth out the seams on your cake.

Enjoy!

Angie

Cake Baking & Frosting Tips…..

Hello everyone-

I was about to post a recipe for a lovely Red Velvet Cake and thought about many tips I’d like to share before I post the recipe. Don’t worry, I’ll post the recipe next!  Tape these tips to the inside of one of your cupboards for easy reference.

CAKE BAKING & FROSTING TIPS:

1)  Be sure to preheat the oven.  An oven thermometer is a very good idea.  Most ovens are off 25-50 degrees!  Adjust the temperature until you get the temperature required for your recipe.

2)  Prepare your pans before you begin mixing the ingredients for the cake.  For layered cakes, always coat generously with cooking spray and then flour.  Nothing like baking a beautiful cake and you can’t get it out of the pan!  The Pam for baking (with flour) works great too.

3)  Never open the oven until the cakes have been in at least 10 minutes.  This is when the structure of the cake is building.  It’s critical to follow this rule.  In fact, I wouldn’t open it until it’s been baking at least 20-25 minutes.

4)  Do not attempt to move the cakes around in the oven after you’ve put them in, they will most likely fall.  Not good.

5)  Testing for doneness.  When you have lots of practice, you will be able to tell the doneness of a cake by touching the top.  When it springs back, it’s done.  Otherwise, the old toothpick trick is great.  When it comes out clean, it’s done.  It is virtually impossible for a recipe to tell you exactly to the minute baking times.  This is why the recipe will often say 20-25 minutes.  Set your timer for 20, check the cake at that time.  It may be done or you may have to bake it an additional 5 or more minutes.

6)  When the cakes come out of the oven, immediately run a knife around the edges.  Allow the cake to cool for at least 10 minutes before you invert onto a plate, then re-invert onto a cooling rack.  Cool completely before frosting.

7)  When assembling a two or three layer cake, you’ll want the cakes to be relatively flat.  If your cake has a dome like top, use a long serrated knife to level it off.  (It  is critical here to go ahead and taste the cake.  You know, for quality control purposes)  Place the cut side down either on the plate or on the top of the bottom layer.  It is far easier to frost the bottom part of the cake (the part that was in the pan as opposed to the cut side)  Hope that makes sense!

8)  Use lots of frosting.  Joking aside, it’s quite nice to not worry about crumbs in your finished cake.  You first do a “crumb” layer.  Refrigerate the cake for at least 30 minutes before proceeding to the final layer.

9)  Put a splotch of frosting on the plate to hold the cake in place.  Put your first cake, cut side down if necessary and ice the top of it.  Proceed to layer two and layer three.  Using lots of frosting, ice the sides filling in any gaps between the layers.  Finally, frost the top.

10)  Frost the chilled cake with the final layer of room temperature frosting.  If you prefer a very smooth surface on your cake, you can dip your spatula into water and smooth out the seams on your cake.

11)  Add decorations or fresh edible flowers to your cake if you like.  If you’d like to learn basic decorating techniques, I highly recommend signing up for a Wilton Cake Decorating class.  It’s really fun and you learn lots of different boarders and frosting techniques.

Happy cake baking!

Angie

Basketball Cookies…..

orng chx slm patDSCN3015_2695

Sports cookies!  I can’t stop myself!

I have this awesome bakery supply source.  They offer sanding sugars, gel food coloring, baking pans and tons of other baking supplies.  LOVE IT!  I received my first order yesterday, it felt like Christmas!

Have a great weekend!

Angie

Valentine Cookies…..

orng chx slm patDSCN3010_2690

I just love Valentine’s Day!  It’s any chocolate lovers dream!  Try my recipe for a basic cut out sugar cookie.  (recipe below)  It is key to refrigerate the dough before rolling out and cutting them out.

orng chx slm patDSCN2985_2665

Ice the cool cookies and then coat well with colored sugar while the icing is wet.

orng chx slm patDSCN2979_2659

For chocolate chip cookies, press colored M&M’s into the tops for a festive looking cookie.

Best Roll Cut Out Sugar Cookie Recipe

2 cups sugar
4 sticks unsalted butter, one pound at room temperature
5 large eggs
1 tablespoon vanilla
7 ½ cups all purpose flour
4 teaspoons baking powder
1 teaspoon salt

Icing (recipe below)

1) In a large mixing bowl, beat butter until fluffy and add one half of the sugar, beat, then add the rest. Add two eggs and beat. Scrape down the side of the bowl. Add the remaining three eggs and vanilla, beat until nicely incorporated.
2) Lightly measure out flour into a separate mixing bowl. Add baking powder and salt, whisk until blended.
3) Add half of the flour mixture to the egg/butter mixture and beat well. Add remaining flour and blend until all ingredients are incorporated.
4) Shape into a large ball and wrap in plastic wrap, then put into a large zip bag. Refrigerate for a couple of hours or overnight.
5) When ready to bake, allow to sit at room temperature for 30 minutes. Preheat your oven to 375’ and line cookie sheets with parchment paper. Have cooling racks ready to receive hot cookies.
6) Cut off a chunk and begin working with your hands to make it pliable enough to roll out on a floured surface. Roll to 1/8” thickness. Cut out with your favorite shapes and place on prepared sheets, leaving at least 1” of space between cookies. Bake for 7-8 minutes. Cool for five minutes before removing from cookie sheet onto a rack. Cool completely before icing.

For the icing:

3 cups powdered sugar
milk or water
1/2 teaspoon clear vanilla
gel food coloring, available at craft stores such as Michael’s

Put the powdered sugar into a medium size bowl.  Add liquid small amounts at a time and stir.  You will want the consistency to be thick enough that it will not run off the cookie but loose enough to easily spread.  Don’t worry, if it isn’t perfect on the first cookie you can either add more liquid or more sugar to get the right consistency.

While the icing is wet, coat with colored sanding sugar.  Allow them to set up for several hours uncovered.

Enjoy!

Angie

Tilapia With Kalamata Olives & Grape Tomatoes…..

orng chx slm patDSCN2920_2600

Tis the season to lighten things up!  I don’t know about you but I’ve gotten into quite a nibbling habit over the past few weeks.

Tilapia is  a favorite of mine.  It’s mild and thaws beautifully.  My kids really love it plain without fuss.  I kept their portions plain and I decided to liven up the rest for Joe and me.  I put a mediterranean twist on a brothy sauce I served with the fish.  Loved it when it pooled  into the rice pilaf.  No heavy, cheesy, creamy indulgent sauce.  Just delicious.

You will notice that I do not add salt to the sauce as the kalamata olives are quite salty.  Taste the sauce at the very end, (with an olive) before adding more seasoning.

Tilapia with Kalamata Oives & Grape Tomatoes

4 tilapia fillets, thawed
salt & Pepper
1/3 cup cornstarch
Olive oil

For the sauce:

2 tablespoons olive oil
2 teaspoons (or more) minced garlic
1/2 cup sliced kalamata olives, halved
1/2 cup ripe grape tomatoes, halved
1/2 cup white wine
1/2 cup chicken broth
1 tablespoon lemon juice
2 tablespoons fresh parsley

For the fish:

1)  Preheat the oven to 350′.  Line a cookie sheet with foil and coat with cooking spray.
2)  Heat a non stick or cast iron skillet over medium heat, add olive oil to coat the bottom of the pan.
3)  Put cornstarch into a medium size bowl.  Season the fish with salt and pepper.  Dredge into the cornstarch shaking off excess.  Carefully add the fish to the hot pan with the olive oil.  Resist the temptation to move things around in the pan.  You want the fish to get nicely brown without falling apart.  About 5 minutes per side.
4)  Place the fish on the prepared cookie sheet.  Bake for 20 minutes.

For the sauce:

1)  Add 2 tablespoons of olive oil to a medium sauce pan over medium heat.  Once hot, add the garlic, cook for about one minute.
2)  Add the olives and tomatoes, allow to cook for about two minutes.
3)  Add the wine, chicken broth and lemon juice.  Lower the heat and simmer for about 5 minutes.  Season to your own taste.  Spoon the sauce over the fish.  Serve with rice pilaf and steamed or oven roasted green beans.

Enjoy!

Angie

My Favorite Appetizers!

lima salad and brie 005

Who doesn’t love an extremely delicious appetizer?  It’s so great to taste something that you want to keep eating, but so much fun to move on to the next tasty tid bit.  I enjoy my guests anticipating what might be coming out next!  When entertaining guests at an appetizer party, I recommend that you focus on hot appetizers.  In my experience they’re  the most popular.    Pictured above is my caramelized onion and brie flat bread.  It’s a flat bread topped with gooey melted brie cheese, sweet caramelized onions, crunchy toasted walnuts and a light drizzle of honey.  It’s an amazing combination and so so simple to make.  Pine nuts could easily be switched out with the walnuts.  YUM!


bufffalo wings 002Spicy Buffalo chicken wings are an absolute crowd favorite!   I totally love this recipe as the wings are oven fried until they’re nice and crispy then tossed with a very authentic buffalo sauce.  No guilt and no crazy oil mess to clean up!  Serve with my light blue cheese dip.

orng chx slm patDSCN2201_2057_50This is one cold appetizer I enjoy serving.  They are prosciutto wrapped bread sticks with boursin cheese and arugula.  They’re pretty, easy to serve and delicious!
orng chx slm patDSCN0772_706_50

Who doesn’t love a good baked potato skin with sour cream, cheddar cheese and bacon?  I seldom deep fry anything if I don’t have to.    These are DELISH!

I hope you have a safe and Happy New Year!!

Angie

Christmas Cookie Baking At Home…..

Hello everyone-

I’ve been completely MIA!  What a fantastic month so far, I couldn’t be happier.  I catered several parties and now I’m in total baking mode.

Tonight, I bake for my family.  In my kitchen with snow on the way!   I’ll be making people cookies, aka gingerbread.  It’s just not the same to bring them home from my kitchen already done.  It’s been a family tradition since the beginning with Jack and Chris, Ryan too.  While the house smells of fresh baked cookies, they help me with the decorating.  The biggest challenge was keeping them from licking their fingers.  Seems like yesterday.

I’ll be making plenty of kringle and many different kinds of cookies for Christmas Eve, and pies for Christmas day.  My favorite kringle flavor?  Blueberry.  I am making a fresh filling with the blueberries we picked in Michigan last August.  YUM!

My favorite pie?  Toasted coconut cream.  Hello!  Here’s what Esther and I discussed while waiting for our boys to come out of school today….for the crust,  mini chocolate chips, coconut and graham crackers?  I do not believe I’ve ever seen or heard of such a crust for pie.  Of course, I will use fresh REAL whipped cream and I’ll make homemade pastry cream.  It’ll be topped with toasted coconut. Yowza!

I hope you enjoy your time in the kitchen making your treasured family recipes!

Enjoy these few days before Christmas, I know I will!

Angie

Thanksgiving Pie Pictures…..

Traditional Pumpkin Pie.  Butter crust.  Pie crust pumpkin cut out.

Chocolate Silk Pie. Made with real stabilized whipped cream.  Topped with chocolate shavings.

Lemon Cream Pie.  Made with fresh lemon juice and zest.  Topped with stabilized whipped cream.

Pecan Pie.  Made with 1/2 pound pecans.  Great with real whipped cream.

Apple Crumb Pie.  The most popular pie, made with 2 lbs. cinnamon apples per pie.  Topped with butter crumb topping.

Beautiful pie boxes I found on-line.  They were perfect!

I hope you had a wonderful Thanksgiving!

Angie

Individual Key Lime Tarts…..

I love individual desserts.  They are the perfect portion and the presentation is pretty from the first time your guests see them until they’re served.  Sometimes desserts are lovely until they’re cut and served.

I lined cupcake pans with paper.  This makes it easy for guests to simply pick up and enjoy.

If you use real whipped cream in the can, be sure to top the little minis right before serving as the real whipped cream will totally deflate.  I used real whipped cream and I’ve added plain gelatin to stabilize.  Do this and your whipped cream will be picture perfect for days.   Timing can be a bit tricky.  Do not let the gelatin get too cool as it will set up too much to use in your whipping cream.  Be sure to have everything ready to go before you start on the gelatin. The gelatin should be slightly warm when you start to beat the cream.

Individual Key Lime Tarts

Crust:

1 cup graham cracker crumbs
2 tablespoons sugar
3 tablespoons melted butter

Filling:

5 egg yolks, beaten
1/2 cup key lime juice
1 14 oz can sweetened condensed milk

Cupcake liners

Whipped cream or whipped topping
Fresh lime zest

1)  Preheat the oven to 325′.  Line a cupcake pan with 9 paper liners.
2)  Mix the graham crackers, sugar and melted butter until well blended.  Divide evenly among the 9 papers.  Press into the bottom.  Bake for 4 minutes, remove from oven.
3)  Whisk the egg yolks, lime juice and sweetened condensed milk until well blended.  Divide among the 9 paper lined pan.
4)  Bake for 12-15 minutes or until the mini tarts are set. (no wiggly centers)
5)  Cool completely and refrigerate.  Once chilled top with whipped cream and fresh zest.  Serves 9.

Enjoy!

Angie


Pumpkin Rice Soup With Ginger And Lemon Grass…..

This soup is my adaptation of Jamie Oliver’s Pumpkin Rice Laska Soup.  I am not crazy about 5 spice powder so I omitted it.  I added a little more of this and a little less of that and made it my own.  He recommends giving a squeeze of fresh lime juice just before serving, so good!  I didn’t happen to have fresh limes at the time.  I think that if you topped this soup with a couple of pan seared spicy shrimp it would be over the top!

I had leftover spanish rice & whipped butternut squash in my freezer.  I also had the pieces of fresh pumpkin that we cut out of our jack-o-lantern’s.  I simply cut off the hard rind and cut it into cubes and coated it with olive oil, salt and pepper and roasted it until nicely brown and tender.  I would highly recommend running the soup through a blender before adding the rice and cilantro as the ginger and lemon grass can be a bit fibrous.

This is what I LOVE about soups.  No rules.  You can do whatever you like.  Save  those little bits of rice, pasta, roasted chicken, meat and veggies.  Throw them in the freezer and use later for soup.  So green, no waste!

Pumpkin Rice Soup with Ginger & Lemon Grass

2  lbs. pumpkin or butternut squash, peeled, halved and seeded
1 jalapeno chili, seeded, halved and minced
2 large cloves garlic, minced
3 tablespoons fresh ginger, peeled and minced
2-3 sticks of lemon grass, two outer layers removed
1 large bunch cilantro, triple washed and drained, stems removed and reserved
1 teaspoon cumin
2 tablespoons olive oil
1 large sweet onion, diced
3 cups chicken or vegetable stock
2 cups cooked rice-any kind
2-14 oz. cans light coconut milk
Salt and Pepper to taste

1)  Chop the squash/pumpkin into 2″ pieces.  If you’d like chunks of roasted squash in your soup, chop off a hunk of squash and cut into 1/2″ pieces. (about 2 cups cubed squash) Toss with olive oil and lightly season with salt and pepper.  Roast in a 350′ oven for 20-25 minutes or until nicely brown and tender.  Set aside.  After you clean the cilantro, remove the large stems and coarsely chop.
2)  In a large soup pot add a couple of tablespoons of olive oil, jalapeno, garlic, ginger, large cilantro stems and lemon grass.  Saute for about 10 minutes over medium heat stirring often.  Add the cumin and a pinch or two of salt and pepper.
3)  Add the squash and the stock to the pan, lower the heat to low, cover and simmer for 15-20 minutes or until the squash is fork tender.  Run the soup through the blender.  Be careful not to fill the blender past 2/3 full, hold a towel over the top before you turn the blender on.  Once blended add the soup back to the pot.
4)  Add the cooked rice and coconut milk.  Taste and season with salt and pepper to your taste.  Stir in cilantro.  Serve immediately.

Enjoy!

Angie