Snickerdoodles….

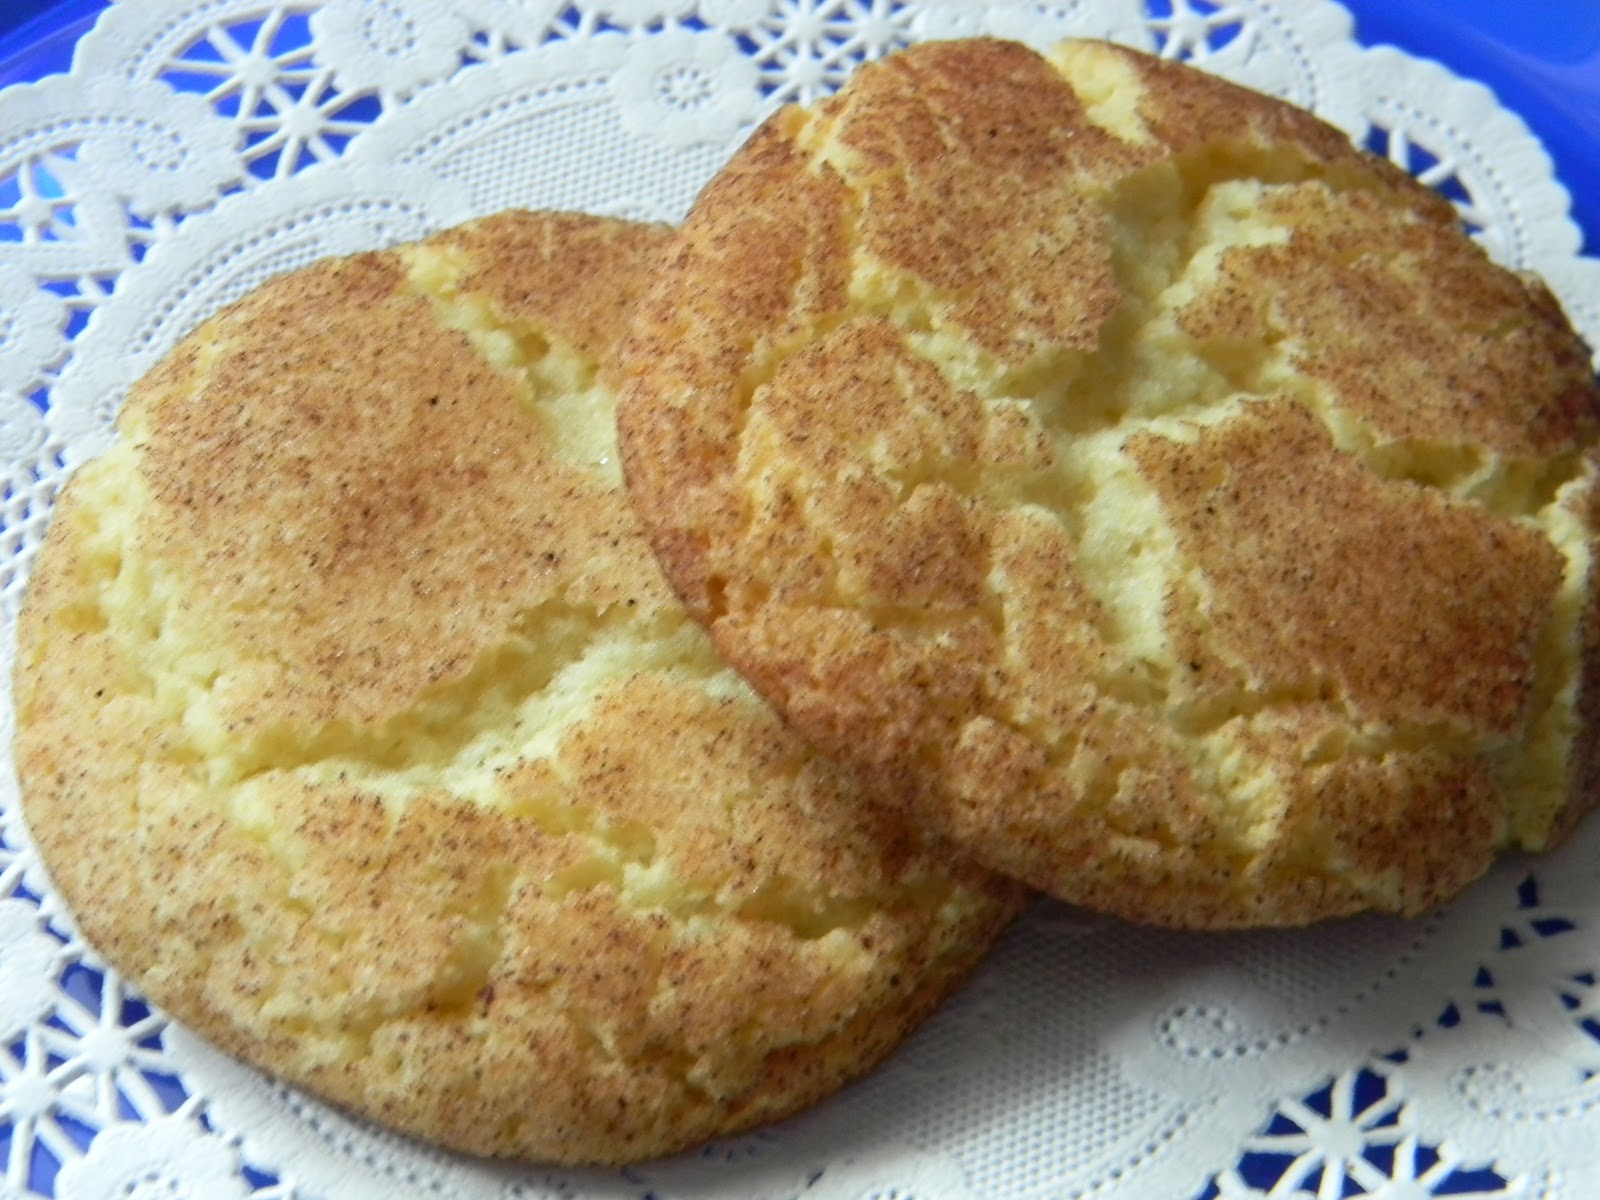
Make this cookie if for nothing else, the smell in your house!  This delightful chewy cookie is made with real ingredients, butter, flour, sugar, eggs…no preservatives, and no long crazy ingredient list.  Make them with your kids!  The recipe is really simple and they’ll really enjoy coating the dough balls with the cinnamon/sugar.

Be prepared for the kiddies to line up to taste!

Snickerdoodles

1 stick + 7 tablespoons softened unsalted butter
1 ½ cups sugar
2 large eggs
2 2/3 cups all-purpose flour
2 teaspoons cream of tarter
1 teaspoon baking soda
½ teaspoons salt
2 tablespoons sugar mixed with 2 teaspoons cinnamon

1) Preheat oven to 375’. Line a cookie sheet with parchment paper, set aside.
2) In a large mixing bowl, with an electric mixer, beat butter until creamy and add sugar, beat until fluffy. Add eggs and beat until well combined.
3) Combine the flour through the salt in a small mixing bowl.
4) Add half of the flour to the butter mixture and beat until mixed. Add the rest and mix until well combined.
5)Mix the sugar and cinnamon in a small mixing bowl until well combined.
6) Roll into 1” balls and coat evenly with the cinnamon sugar. Place on cookie sheet 1 ½” inches apart.
7) Bake for 10-12 minutes. Slide the parchment off the hot sheet right on to the cooling rack. Cool completely. Makes about 30 cookies.

Enjoy!
Angie

Beet, Barley, and Toasted Walnut Salad with Honey Balsamic Dressing…

Calling all overworked, exhausted, over scheduled, and busy Moms and Dads.  Do you ever make something special for your lunch???  I’ll bet not!  I make many, many salads that would be absolutely perfect to make for yourself to enjoy for lunch throughout the week.  Loaded with fiber, protein, and most of all, flavor, this salad fits the bill.  You get the chewy texture of the barley, crunchy walnuts, sweetness from the beets, a tang from the feta, and to pull all of the flavors together, a honey balsamic dressing….YUMMERS!  I do not use the quick cooking barley, feel free to do so if you like.  There is quite a difference in cooking time.
Here we go….

First ingredient, the star of the show…pearled barley…

Regular barley is quite starchy so it’ll need a good rinse…

Rinse the barley for several minutes under running water.  This will remove the excess starch and prevent the cooked barley from becoming gummy.
Add the water and salt to the pan.  Bring to a bubble over medium-high heat, then lower heat to medium-low.  Simmer uncovered for 45 minutes.  While the barley is cooking prep the rest of the salad ingredients.

You will need chopped onions, chopped parsley, crumbled feta cheese and toasted walnuts.

To toast the walnuts, spread onto a cookie sheet and bake in a 300′ oven for 12 minutes. 
Finely chop the walnuts, set aside.
For the dressing, whisk the olive oil, balsamic vinegar, honey, salt, pepper, and granulated garlic powder.
Add the seasonings to the liquid ingredients….

Whisk until well blended.

Into a large mixing bowl, add cooled barley, parsley, feta, chopped walnuts, chopped onions, and rinsed and drained beets.  Pour the dressing over the salad and gently mix until well blended.  Refrigerate unused salad. 

Beet and Barley Salad with Balsamic Dressing and Toasted Walnuts

For the barley:
1 cup barley, rinsed and drained
2 ½ cups water
¼ teaspoon salt

For the salad:
½ cup parsley
½ cup toasted walnuts (300’ for 10 minutes, then finely chop)
½ cup crumbled feta cheese
½ cup onion, finely chopped
1 can sliced beets, drained and rinsed

For the dressing:
2 tablespoons each balsamic vinegar, honey, and olive oil
¼ teaspoon salt
¼ teaspoon granulated garlic powder
1/8 teaspoon pepper

1) Rinse barley under running water for a few minutes. Place in medium pot and add water and salt. Bring to a simmer over medium-high heat. Lower heat to medium-low and cook uncovered for 45 minutes. Barley should be chewy. Cool in a large mixing bowl.
2) While the barley is cooking, toast and chop the walnuts, chop the onion and parsley, and crumble the feta.  Whisk the dressing ingredients together in a small bowl, set aside.  Drain and rinse the beets in a strainer.
3) Once the barley is cool, add parsley, walnuts, feta, onion, and beets to the barley bowl. Add dressing to the bowl and gently mix until well blended. Makes about six half cup servings.

Enjoy!

Have a healthy weekend!
Angie


Sweet Potato and Parsnip Latkes….

I am elated that one of my recipes was featured on The Pioneer Woman.  Ree Drummond’s site is a treat to visit!  Click on Tasty Kitchen to view thousands of recipes!  Speaking of recipes, I adore this one!

Sweet Potato and Parsnip Latkes.  What is a latke?  It’s a potato pancake.  I gave it a little twist by using sweet potatoes and parsnips in lieu of white potatoes.  In addition to being incredibly delicious, they’re also good for you!  At this time of year I feel the need to change up recipes in the starch rotation. I especially love serving them with a nice piece of grilled or baked fish, alternatively, they would be excellent with roasted chicken.  Traditional latkes are fried in quite a bit of oil.   I bake them on high heat with a little oil, resulting in a lighter, yet crispy result.

I recommend using a food processor to shred the vegetables, they’re done in minutes.  If you do not have a food processor, you can grate the vegetables on a box grater.  You may want to get out the head and wrist bands, it’s quite a work out!

Sweet Potato and Parsnip Latkes

2 tablespoons olive oil
2 medium size sweet potatoes, peeled and shredded
2 large parsnips, peeled and shredded
1 small onion, peeled and shredded
½ cup chopped parsley
1/3 cup flour
¼ teaspoon baking powder
½ teaspoon kosher salt
¼ teaspoon pepper
2 eggs
Sour cream
Green onions, thinly sliced

1) Preheat oven to 375’. Non stick foil line a cookie sheet and drizzle with 2 tablespoons of olive oil, spread with your hand to coat pan well. Set aside.
2) Shred the sweet potato, parsnips, and onion in a food processor or on a box grater. Place into a large mixing bowl. Add parsley.
3) Sprinkle all dry ingredients over sweet potato mixture. Add eggs and mix all ingredients together well combined.
4) Shape into 12 three inch patties and place on prepared cookie sheet. Pat the tops flat with a spatula. Bake for 25 minutes, carefully flip and bake an additional 10 minutes. Serves 6, two patties per person.  Serve with a dollop of sour cream and a sprinkle of green onions.

*To lighten sour cream, measure equal parts sour cream and non fat Greek yogurt, whisk to blend.   Ever read the ingredient list on light sour cream compared to regular??

DE-LISH!

Angie

Simplest Garlic and Cheese Pasta…..

This is sooooo simple!  I use a small cheat on this one.  I use Better Than Bouillon for the chicken stock.  I add it to pasta water to make the simple, flavorful sauce.   I always keep this on hand, I just love using it in quick dishes such as this.  This pasta is one of my boy’s fav’s.  I serve it with roasted pork, chicken, or grilled sausage.

Add shrimp, peas, broccoli, frozen spinach…whatever you like!  Top with fresh grated parmesan or romano cheese.

To start, choose a pasta…any kind you like….

Any of these would be excellent.  It’s a bit more fun when you use a cheese filled tortellini or mini ravioli…this time I used whole wheat spaghetti.
Pasta, olive oil, fresh garlic, dried oregano, bouillon, and fresh grated parmesan cheese….that’s it!  Put a large pot of salted water on medium high heat and cook the pasta according to package directions less two minutes.  Cook time for my spaghetti was 10 minutes, so I set the timer for eight.
When the timer goes off, carefully remove about 1 1/2 cups of water from the pot.  Drain the pasta, I let it sit in the sink until I’m ready for it. 
Into the hot pan, add olive oil, crushed garlic, and dried oregano.  Cook over heat for one minute.  (If you’d like to add raw shrimp, add the oil and cook the shrimp until pink, then add the garlic and oregano and cook an additional minute, remove cooked shrimp from the pan and cover with foil, set aside)   Red pepper flakes would be great here too:-)
Add the reserved pasta water to the pan, bring to a bubble over heat.
Add 2 teaspoons of the bouillon to the pot, stir until dissolved.  Pan should still be over heat.  (add thawed frozen peas, broccoli, or spinach here)


Add the pasta back to the pot.  Cook for 2 minutes.  The under cooked pasta will absorb the flavors in the broth…(add the cooked shrimp to the pot here)
Add the cheese to the hot pasta, mix well.  Enjoy!
Simplest Garlic and Cheese Pasta

½ lb. pasta, any kind, cooked according to package directions less 2 minutes. Reserve 1 ½ cups reserved pasta water before draining pasta.
2 tablespoons olive oil
2 large cloves fresh garlic, crushed
1 tablespoon dried oregano
2 teaspoons Better Than Bouillon
¼ cup fresh grated parmesan cheese

1) Cook pasta and reserve 1 ½ cups pasta water. Set aside.
2) Add olive oil, crushed garlic, and dried oregano to the hot pasta pot. Cook for one minute.
3) Add pasta water to pan. Add bouillon, continue to simmer. Add pasta to pot and cook for 2 minutes.
4) Remove from heat and add grated cheese and mix well. Makes about four one cup servings.

YUM!  Enjoy!
Angie

White Bean Soup with Ham Bone….

My Grandma Inez always made white bean soup. It was the best tasting soup I can remember.  She used ham bones or ham hocks.  She was an amazing, old fashioned cook.  I loved her and I miss her so much.  This is a lovely way to keep her memory alive, isn’t it?  I always think of her when I make it.  This is my version of her white bean soup.

Don’t you love a dish you can just throw together in one pot?   When using dried beans, they need to be soaked overnight, rinsed, and drained before cooking.   I use a ham bone or you can use a ham hock for flavor, just like Grandma.   If you don’t don’t care to use a ham bone or a hock, use chicken stock instead of water for the liquid.  Make enough to freeze and enjoy later.

Here we go…

First sort the beans to remove any unwanted debris.  Soak overnight.  Simple put the beans in the pot you’ll be cooking them in and cover with about 3 inches of water.  You can see how much they’ve increased in size through re hydrating.  This will greatly decrease cooking time.  Drain and rinse.

My beans are ready….
Add the onions, celery, carrots, garlic and ham bone….
Add rosemary…..
And finally, add the water.  Bring to a simmer and cook for an hour or until the beans are soft.
Once the beans are fully cooked, remove the bone from the soup.  Cool until you can handle the bone and remove any bits of meat from the bone.  Add the meat to the soup and discard the bone.  Enjoy with Fresh Sage Cornbread. 

White Bean Soup with Ham Bone and Rosemary

1 pound of great northern beans, sorted, rinsed, and soaked covered with water over night
1 ½ cups celery and leaves, finely chopped
1 ½ cups onions, finely chopped
1 ½ cups carrots, finely chopped
1 ham bone or smoked ham hock
3 large cloves garlic, minced
1 tablespoon dried rosemary
8 cups water
½ cup chopped parsley
Salt and pepper to taste

1) Add all ingredients to the beans in the soup pot. Over medium heat, bring soup to a simmer. Cook for an hour, stirring occasionally, or until the beans are soft (this will require a taste). Remove the ham bone and pick off any meat and put into the soup, discard the bone. Add parsley. Taste before you season with salt and pepper.   Makes eight servings.

*note-sometimes dried beans you buy have been on the shelf for awhile.  This makes for a much longer cooking time.  Be patient.  Add additional water and keep cooking until the beans are tender. 
**this soup freezes well.

Enjoy!

Angie

Homemade Chicken Stock….

Simple.  Pure.  Without msg or ingredients one cannot pronounce.  Anything you make with this stock will be SO much better!  Use in sauces and gravies.  For this use, save the stock in 1-2 cup containers, or- freeze in ice cube trays and when they’re fully frozen, empty them into a large zip freezer bag, take out what you need, even the smallest amount.  For all Moms and Dads out there, I give this to my guys when they have stomach issues associated with the stomach flu.  I believe it is very medicinal.
 
For the chicken stock, you will need chicken bones.  If you on occasion enjoy a rotisserie chicken, save the carcass.  Simply put into a freezer bag, label and date for future use.  I have a stock pile of miscellaneous chicken parts.  I seldom through chicken bones in the garbage.  (only after stock do they go in the garbage)  Save small amounts of chicken you do not use, they make great chicken noodle soup.
If your chicken carcass is frozen, no worries, just plop it in the pot.  (note-the more bones the more flavorful your stock will be)  Cover with water and add a whole cut up carrot, a celery stalk cut into pieces, and 1/4 of an onion.  Use a nice bunch of fresh parsley if yo have it.  That’s it.  No need to salt, season when you use in your recipe. 
I realize this doesn’t look very glamourous, just wait:-)  Put the pot over low heat, uncovered.  Do not allow this to come to a boil as it will result in cloudy stock.  Simmer over low heat for 3-4 hours.  I hope this doesn’t seem daunting, you don’t have to do much with it.  Add water when you see that it’s cooked down an inch or so.

That’s it.  We’re done.

Using a slotted spoon, remove as much of the bones and vegetables as possible.  Place a fine strainer over a bowl and carefully pour or ladel the stock into the bowl through the strainer. 

There you have it.  This batch made about 16 cups of stock, or 4 quarts.  This will make a very nice base for a couple of homemade soups.   Use now or freeze for a later date.   Remember to label and date!
More to come!
Have a great day!
Angie

Light Egg Salad…..

This is the best egg salad I’ve ever made.  You will be a little surprised at the ingredients.  I love that it isn’t loaded with mayonnaise.  The perfect egg salad must start with the perfect boiled egg.  (Recipe below) I made the bread that is in the background, egg salad, soup stock, and chocolate chip cookies last weekend, Joe and Ryan were sick so we were stuck in the house.  Oh well, at least we had some good eats!
                          
You’ll start with 6 perfectly boiled eggs.  Be sure to chop them fine.  If you have a Pampered Chef food chopper, use it here.  Otherwise, just chop with your chef knife until they’re finely chopped.
In a medium size bowl, add 1/3 cup finely chopped sweet onion, 1/2 cup finely chopped celery tops with leaves, and chopped boiled eggs.
In a small bowl, blend 3 tablespoons plain non fat yogurt (greek is best), 3 tablespoons vanilla non fat yogurt, two tablespoons mayonnaise, 3 tablespoons yellow mustard, 1/2 teaspoon ground celery seed, two pinches salt and one pinch of pepper, whisk to blend…
Add the dressing…..
Mix gently until well blended…
Enjoy open faced on a slice of your favorite toasted bread….DE-LISH!
Egg Salad

6 large eggs, hard boiled
½ cup finely chopped celery with leaves
1/3 cup finely chopped sweet onion
3 tablespoons plain non fat yogurt
3 tablespoons vanilla non fat yogurt
3 tablespoons yellow mustard
2 tablespoons mayonnaise
½ teaspoon ground celery seed
2 pinches salt
1 pinch pepper

1)  While the eggs are cooking (instructions below), add finely chopped onion and celery with leaves to a medium size mixing bowl.  In a small mixing bowl, add the plain and vanilla yogurt, mayonnaise, mustard, celery seed, salt, and pepper. Mix well.
2) When the timer goes off, bring the pan to the sink and run cold water over the eggs until cool enough to handle and remove shells. Finely chop the eggs. If you have a Pampered Chef food chopper, use it here! Place chopped eggs into the bowl with the celery and onion. Pour dressing into bowl and gently mix all ingredients until well combined. Immediately refrigerate unused salad. Makes about four ½ cup servings.

*Serve open faced over toast.

Corn Muffins with Ceddar Cheese and Chives…..

Boy, look at the background in this picture!  I took this last summer….I can’t wait to take my pictures on the deck again!  I love that you can see Ryan’s ball in the back of the yard.  I’m so easily distracted!!!

This muffin is outstanding with most any soup creation you come up with.  They go together in about 10 minutes and bake for only about 17.  These round out your soup into a hearty,  pleasing supper.

Corn Muffins with Cheddar Cheese and Chives

1 ¼ cups flour
¾ cup yellow corn meal
1/2  cup sugar
2 teaspoons baking powder
1 teaspoon salt
½ cup shredded cheddar cheese
3 tablespoons minced chives
3/4 cup milk
¼ cup sour cream or plain non fat yogurt
¼ cup vegetable oil
1 beaten egg

1) Preheat oven to 350’. Line a twelve count muffin pan with paper liners and coat with cooking spray. Set aside.
2) In a large bowl, add flour through chives, mix to blend.
3) Into a 2 cup measure, measure milk, oil, and add egg. Beat slightly.  Add sour cream or yogurt and give a quick mix.
4) Make a well in the dry ingredients and add liquid all at once. Mix until just blended. Divide evenly among 12 muffin cups. Bake for 15-17 minutes. Serve immediately. Makes 12 muffins.
*if you don’t have sour cream or plain yogurt, simply substitute ¼ cup of milk.

Enjoy!
Angie

Vegetarian Curried Lentel Soup….

After all the blustering about homemade stocks this one calls for water.  I love the simplicity of this soup.  Ready in only about 60 minutes.  Vegetarian, delicious, simple, flavorful.  Add any miscellaneous veggies you have hanging around in the refrigerator.  Feel free to add leftover rice or barley. 

Here we go…

First and foremost, you have to sort through the dried lentils.  You will find a few not so pretty ones but also be looking for small debris like stones.  Rinse well.

Next finely chop 1/2 cup each celery, carrots, and onion.  Add to your heavy soup pot over medium heat with a couple of tablespoons of olive oil.  Saute for about 10 minutes.

Add 4 large cloves of minced garlic and cook another minute.

Veggies should look like this….

Add the water, salt, and pepper, and begin to simmer over medium heat.  The lentils should cook in about 30-40 minutes.  Once the lentils are soft, put the chick peas, lemon juice, water, and parsley into a food processor and process until smooth.
Add to the soup….

Enjoy with crusty french bread or corn muffins (recipe below).  YUMMY!

Curried Lentil Soup

2 tablespoons olive oil
½ cup diced celery
½ cup diced carrot
½ cup diced onion
4 large cloves garlic, minced
9 cups water
1 tablespoon curry powder
2 cups lentils, sorted and rinsed
1 15 ounce can chick peas, drained and rinsed
2 tablespoons lemon juice
¼ cup water
¼ cup parsley
1 teaspoon salt, or to taste
½ teaspoon pepper

1) Heat a heavy and large soup pot over medium heat. Add olive oil. Add celery, carrot, and onion. Sauté for about 10 minutes or until vegetables are soft. Add garlic and cook another minute.
2) Add water, curry powder, and rinsed lentils. Simmer for 35-45 minutes or until lentils are soft. If the water is getting low, add a cup at a time. You want it to be more stew-like. Taste the lentils after about 30 minutes of cooking for doneness.
3) Put the chick peas, lemon juice, ¼ cup water, and parsley into food processor. Process until smooth. Add to the soup when the lentils are done. Serves 8.
*If you do not have a food processor, add a cup of prepared hummus.
*If you don’t care for curry, simply omit. 

Soups!

Gee, anyone sick of being cold?  In addition to the cold, sick of being sick?  It seems that every time I turn around, someone in the house is sick.  The perfect remedy?  Soup.  The ultimate comfort food when you’re sick or healthy.  Piping hot and loaded with goodness.  With or without meat, you choose.  In the next couple of weeks I’ll be sharing some of my favorite soup recipes.  In addition, what’s soup without a yummy bread side.  How about cheddar corn muffins?  Or an old fashioned buttermilk biscuit?

Have you been saving your chicken bones/carcasses?  There is absolutely NOTHING like making your own chicken soup base.  All you need is a carrot, a stalk of celery, a half an onion, and water. (and chicken bones, of course)  The longer you simmer the better.  If the water gets low, simply add more.  I simmer this concoction for about 4 hours.  Remove the large bones with a slotted spoon.  I strain stock through a sieve to insure that there are no bones or skin left in the stock.

Vegetable stock is equally as simple.  Stash all those asparagus ends you don’t use, broccoli stems, or any fresh vegetables you can’t use in a timely manner in the freezer.  Dump it all in a pot and cover with water.  Again, add some onion, celery, and carrot.  Simmer for a minimum of 2 hours, do not allow to boil.

If you enjoy rotisserie chicken on occasion, save that carcass.  As always, label and date what you put into the freezer.  If you’ve got a few pieces of chicken leftover from a dinner, freeze them, they’ll work too.

Get ready, we’re makin’ soup! (and bread:-)

Have a great day!
Angie