Cutest Dog Birthday Cake!

2016-03-06 12.58.27

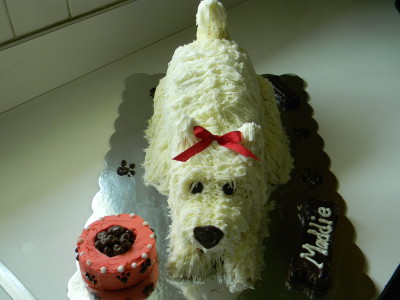
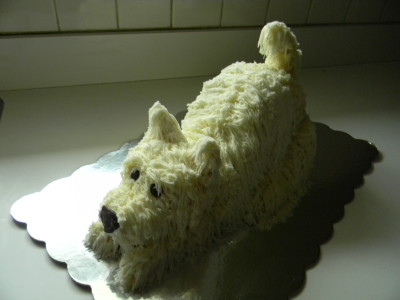
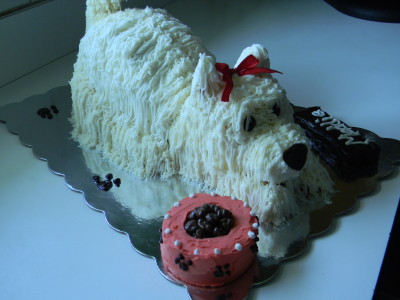
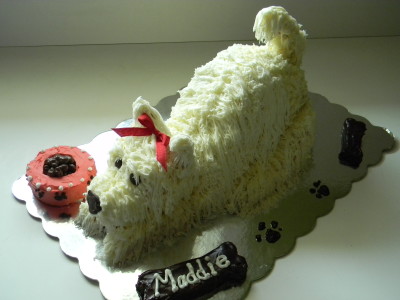
Yes, this is a cake.  Isn’t she sweet?  I made it for my dear friend’s daughter Maddie as you can see.  I used a special tip, it’s got tiny holes in it and was actually quite hard to squeeze the frosting out.  It was called a fur and grass tip, I found it on Etsy quite easily.  As always, I ONLY make real butter cream so I had to add a little more milk to make it come out of the tip more easily.  Unlike frosting made with shortening, butter cream frosting gets very soft by the warmth of your hands on the piping bag.  I piped the cake in sections, putting it into the refrigerator to allow the butter cream to set up.  I left the piping bag on the counter, if you were to refrigerate it, it would be impossible to squeeze the frosting out.  Best to use a heavy duty piping bag, the heat transfer is far less than using a plastic or disposable one.

2016-03-06 12.57.55

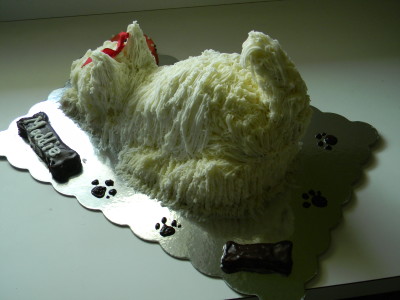
I added an edible dog bowl filled with raisinettes, chocolate dog foot prints and a couple of gnash covered pieces of cake cut into dog bones.  If I were to make another cake like this I would trace around the bones with white icing to better define them.  Next time.  The eyes and nose are melted semi sweet chocolate chips.  I piped them onto a piece of wax paper and refrigerated them until they were set.  You can’t really handle them until you’re 100% sure you’re ready to set them into the face.

2016-03-06 12.59.14

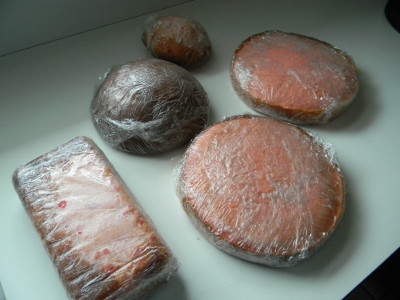
I wanted you to see all angles…I absolutely LOVED making this cake!  I’m going to now show you what I did to create her.  I baked a double recipe of yellow cake.  The guest of honor wanted a cherry cake so  I added rinsed, drained and minced maraschino cherries.  You can use your favorite recipe or even a box recipe.  Bake plenty of cake, you’ll need it.  Most importantly, make your cake ahead of time, wrap with Saran wrap well and freeze. Working with partially frozen cake is a total must!   Fresh room temperature cake is too soft and crumbly and would be way too hard to work with.

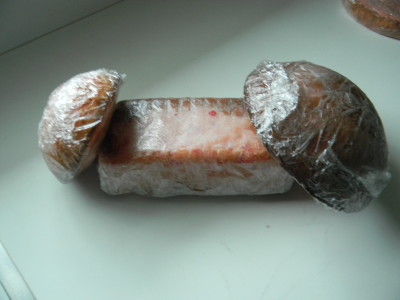
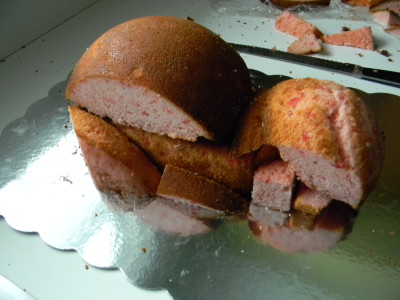
I used a couple of dome-shaped pans, one for the head and one for the little bottom that sticks up in the back.  I used a regular loaf pan for the body and thought I could use two 9″ cakes for the legs, tail and ears.  There was a good amount of one cake left, I put it back in the freezer to make a dessert trifle later.  Or there may be family members available to help with those pesky left over delicious pieces of cake!

2016-03-05 10.01.36

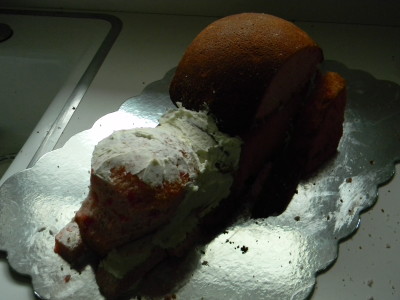
It is time to make a big batch of butter cream frosting or, the glue you will need to sculpt your cake.  You’ll also want to apply a “crumb” layer of frosting to the entire cake once you’ve got it into the shape you like.

2016-03-05 10.02.50

I started playing with the pieces, like a puzzle.  Time to unwrap the cakes and start sculpting.  The cool thing here is you can add or cut away pieces as you to shape the cake.

2016-03-05 10.41.29

At first I thought to place the cake on another cake base, no way!  Would’ve been way too hard to keep the bottom layer clean.  I thought to assemble the cake on another pan but the transfer would’ve been disastrous!  This was the best bet.  I could easily rid the board of crumbs or unwanted frosting.  You can get nice cake boards at Michael’s Craft Store.

2016-03-05 10.55.30

Here I began the gluing process.  You want all cake components to be solid.  Might be a bit messy at this point, it’s fine!  Plenty of time to clean up the board using a moist paper towel.

2016-03-05 11.17.26

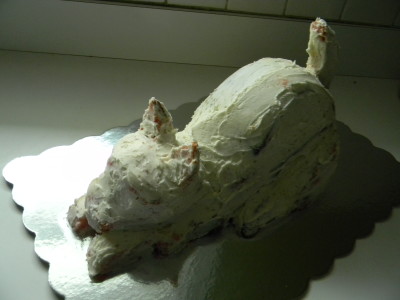
I added the tail with a 6″ skewer and the ears with a couple of toothpicks.  At this point it is looking very cat-like. Ryan quickly pointed this out to me and he was right.  I cut away a little more of the face below the eyes and added a bit more frosting to square off the face.  The cake is now coated with the “crumb” layer of frosting.  It’s time to start piping.

2016-03-05 13.12.24

Begin at the very bottom of the cake and work your way up.  I got too involved to take pictures as I went!  I started with the front paws and piped around the perimeter of the whole cake.  I did the face, head and ears all at once.  I did the back up through the tail then I had to put him into the refrigerator to set up a bit.  I took her out after about 30 minutes and finished piping.

2016-03-06 12.56.53

I kept the cake refrigerated overnight and in the morning added the finishing touches.  The dog bowl with kibble, the dog bones, the bow and the paw prints.

At this point, the cake can set out at room temperature until serving.  Room temperature cake is always better than cold cake.

Happy  Birthday Maddie!  I am quite sure this is a cake that she will never forget!

Enjoy creating!

Angie
Best Carrot Cake With Cream Cheese Frosting…..

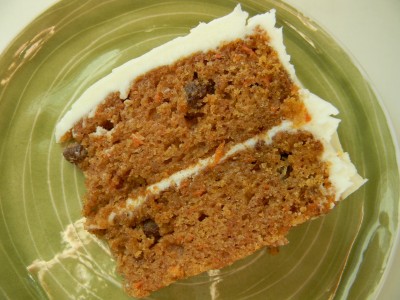
This is the most moist and delicious carrot cake you’ll ever taste!  This has just the right amount of texture.  It’s very moist and slightly dense and is amazing with cream cheese frosting!  I do not enjoy carrot cake that is loaded with thick, grated carrots and too many nuts and raisins.   Too chewy for my taste.  This recipe called for carrot baby food and crushed pineapple.  I’ve made a couple of revisions.  I pureed a 14 oz. can of sliced carrots and omitted crushed pineapple.  I added finely shredded carrots and a small amount of raisins.    Feel free to add finely chopped nuts and more raisins if you wish.   Simply irresistible!
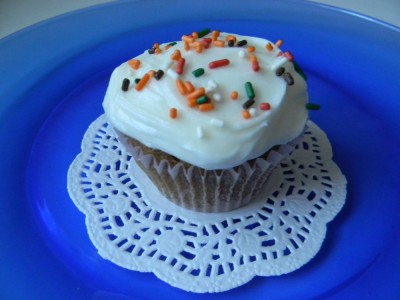
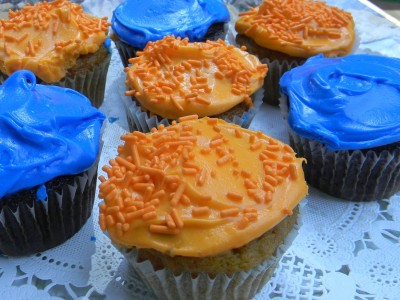
 As with any other cake recipe, you can make cupcakes.  The recipe will make approximately 2 1/2 dozen.  The upside to cupcakes is they take less than half the time to bake and much less time to cool.  They’re easy to serve, and they’re the perfect portion.  Top with sprinkles, who doesn’t love sprinkles???

Best Carrot Cake With Cream Cheese Frosting

2 1/4 cup all purpose flour
1 3/4 cup sugar
2 teaspoons cinnamon
1 teaspoon salt
1 teaspoon baking powder
1 teaspoon baking soda
1/4 cup raisins (optional)
1/4 cup finely chopped walnuts (optional)
1-14 ounce can pureed carrots or 14 ounces carrot baby food
1 cup oil
4 eggs
1 large carrot, peeled and finely grated (3/4 to 1 cup)

1)  Preheat the oven to 35o’.  Coat 2-9″ round baking pans with Pam cooking spray for baking or 9 x 13″ baking pan.  In medium size bowl combine all dry ingredients, raisins and nuts if you’re using.
2)  In large mixing bowl  add the pureed carrots through the grated carrot, mix to blend.
3)  Make a well in the center of the dry ingredients and add the wet all at once.  Mix until all dry ingredients are incorporated, do not over mix.
4)  Pour into baking pans.  For the two 9″ round pans bake 30-35 minutes.  For the 9 x 13″ bake for 45 minutes.  For cupcakes, spray the paper liners with cooking spray and bake for 18-20 minutes.  Test for doneness with a toothpick.   Cool completely.

Cream Cheese Frosting

1 8 ounce softened cream cheese
4 ounces softened butter (one stick)
1 teaspoon vanilla
3 cups powdered sugar
milk as needed

1)  With an electric mixer, beat the cream cheese and butter until creamy.  Add the vanilla and the powdered sugar.  Mix on the lowest speed of the mixer and add milk 1 teaspoon at a time to get a smooth spreading consistency.
2)  Ice the cake generously with the frosting.  Refrigerate until ready to serve and refrigerate leftovers (if any!)

Enjoy!

Angie


Pumpkin Crunch Pie…..

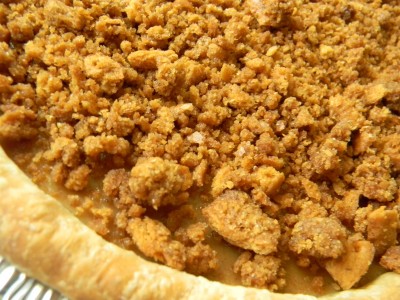
This interesting twist came about today when I baked my Thanksgiving pumpkin pies and one of them did not come out with a pretty, smooth top.  I thought about making a whipped cream topping but then thought I’d try something entirely different.  Originally I thought praline, but my peeps do not like nuts, so I came up with a mock praline topping. So simple, I just baked my crunch creation in the oven to caramelize the brown sugar, butter, and coarsely crushed graham cracker crumbs.  I cooled the concoction and just before serving I’ll sprinkle it over the top of my not so pretty pumpkin pie.   It’ll be a great contrast to the creamy custard pumpkin filling.  This would be quite delicious as an ice cream topping too.  So good!

Mock Praline Crunch Topping

2/3 cup coarsely crushed graham crackers
2 tablespoons brown sugar
2 tablespoons melted butter

1)  Crush the graham cracker crumbs and put into a small bowl.  Add the brown sugar and melted butter.  Mix well.
2)  Pour into a foil lined pie dish and bake at 350′  for 12-15 minutes ( turning every 5 minutes) or until the mixture is nicely browned and caramelized.  Cool completely and add to the top of a cooled pumpkin pie or ice cream.

Happy Turkey Day!

Angie

Graduation Cupcakes…..

I decided on cupcakes for Jack’s graduation cake.    I waffled between a large decorated cake, a large decorated cookie, and cupcakes.   Cupcakes are a great choice for so many reasons.  They bake in about 18 minutes and cool completely in about an hour.  They’re completely self serve with no plate and fork required.   They’re perfectly portioned and easy to eat.  I like that the dessert table looked nice the entire evening.  I left the cupcakes out on the dessert table all day.  At the end of the day I put the leftover treats in the refrigerator.

I chose to make chocolate and pumpkin cupcakes.  I used my Pumpkin Squares with Cream Cheese Frosting recipe.  The recipe made about 2 1/2 dozen cupcakes.  Of course, my go to chocolate cake recipe is the Hershey’s “Perfectly Chocolate” cake. (made about 2 1/2 dozen cupcakes)   This one bowl recipe will become your favorite chocolate cake recipe too!  It’s on the back of the can, but I’m going to give it to you.  The writing is really small!  I’ll also give you the frosting recipe.

I doubled the cream cheese frosting recipe and used Wilton gel colors to make his high school colors.  They work best because you can get very intense color without totally watering down your frosting.  So fun and so hard to resist!

Hershey’s “Perfectly Chocolate” Chocolate Cake

2 cups sugar
1- 3/4 cups flour
3/4 cups Hershey’s Cocoa
1- 1/2 teaspoons baking powder
1- 1/2 teaspoons baking soda
1 teaspoon salt
2 eggs
1 cup milk
1/2 cup vegetable oil
2 teaspoons vanilla extract
1 cup boiling water

1) Preheat oven to 350′.  Line muffin pan with cupcake liners and coat the liners with cooking spray. 
2)  Combine dry ingredients in large bowl.  Add eggs, milk, oil and vanilla; beat on medium speed for  2 minutes.  Stir in boiling water (batter will be thin).  Fill each cup about 2/3 full.
3)  Bake for 16-18 minutes.  A toothpick should come out clean.  Cool completely.  Makes about 30 cupcakes.

*for two 9″ pans, grease and flour pans.  Bake for 30-35 minutes.  Cool for 10 minutes.  Remove from pan onto wire racks and cool completely.

Perfectly Chocolate” Chocolate Frosting

1 stick (1/2 cup) butter
2/3 cup Hershey’s Cocoa
3 cups powdered sugar
1/3 cup milk
1 teaspoon vanilla extract

1)  Melt butter.  Stir in cocoa.
2  Alternately add powdered sugar and milk, beating on medium speed to spreading consistency.  Add more milk, if needed.  Stir in vanilla.  Makes about 2 cups.

Have a wonderful week!

Angie

Peach Crisp…Dreamy!

I am a big cheater on this one.  In the past, I’ve gone through the trouble of blanching fresh peaches, then into ice water, peeling the skin, pitting and cutting up the peach.  I made this dish in winter and purchased the frozen, ready to use peaches….I could not tell the difference. Prep time for this dish is about 20 minutes.

Peach Crisp
For the peaches:

2 lbs. frozen peaches, thawed
½ cup sugar
1 tablespoon cornstarch
2 tablespoons lemon juice, fresh or bottled

Topping:

¾ cup brown sugar
1 cup flour
1 ½ cups oatmeal, quick or old fashioned
1 teaspoon salt
1/8 teaspoon cinnamon
One pinch nutmeg
1 stick butter, softened

1) Butter or using cooking spray, coat  a  9 x 13 baking dish. Set aside. Place thawed peaches in a large heavy pot. Add sugar, cornstarch, and lemon juice. Cook over medium heat, stirring often, until it comes to a bubble, this should take 5-7 minutes.   Pour into prepared baking dish.
2) Preheat oven to 350’. In a medium bowl, combine all dry ingredients well.   Work butter in with your fingers.  Sprinkle crumbs evenly over cooked peaches.
3) Bake for 25 minutes. Serve warm with a scoop of vanilla ice cream. Serves 10-12.

*If you make ahead, refrigerate. It is best to warm, uncovered,  in the oven at 350’ for 20-25 minutes to make the topping crisp again.

Best Butter Pie Crust….

Butter Pie Crust

(single)

1 ¼ cup flour
6 T. cold butter, cut into ½” pieces
½ t. salt
5-7 T. ice water

In a large bowl, mix flour and salt;  add cubed chilled butter. With a pastry blender, incorporate butter into flour. This will take a few minutes, it should resemble cornmeal. One tablespoon at a time, add the water. Mix using a fork. Once most of the flour seems to be moist, use your hands to bring together into a ball of dough, you may need to knead about 4-5 times. You do not want to over handle the dough as this will create too much gluten and warm the butter, it will yield a tough result.   You may refrigerate for up to an hour or immediately roll out on floured surface, trying not to “stretch” the dough.  Roll out from the center to make a large enough circle for the pie plate to sit in the middle with at least 1 1/2″ past the outer edge of the plate.  Flute the edges with your fingers.

True Homemade Cherry Crumb Pie…..

When was the last time you had an honest-to-goodness piece of homemade cherry crumb pie?  If you think you’ve had it at any chain restaurant,  think again.  My friend Kandace was kind enough to invite me to her back yard to pick from her beautiful sour cherry tree.  What a treat!  After arriving home from picking, I got busy.   After a thorough rinsing,  I tried using a “cherry pitter,” but quickly learned that it was much quicker and easier to simply use my thumb nail to remove the pit.  Also, I decided to cook the fruit with the sugar and flour on the stove to cut baking time in half.  I absolutely adore crumb topping.  It is such a treat to have a little crunch on top of the deliciously sweet cherry filling.  Of course, you must top with a dollop of fresh whipped cream or my favorite, a healthy scoop of real vanilla ice cream.   I love Breyer’s Natural Vanilla.   There are only 5 ingredients listed.    Enjoy this recipe made with real  ingredients.  Try comparing to a store bought pie ingredient list, you will be amazed!  You will find the recipe for real butter crust below.  Enjoy!!
Homemade Cherry Crumb Pie

For the filling:
4 cups pitted sour cherries
¼ cup flour
1 cup sugar

For the crumb topping:
½ cup flour
¾ cup sugar
½ teaspoon cinnamon
5 tablespoons softened butter

One single pie crust, recipe below

1) In a large sauce pan, add cherries, sugar, and flour. Mix well. Cook over medium heat until it comes to a bubble, allow to bubble for a couple of minutes. Remove from heat.
2) Preheat oven to 375’. In small mixing bowl, add all crumb topping ingredients. Blend together with fingers until you have a crumbly mixture. Set aside.
3) Prepare pie crust and put into 9” pie plate. Flute edges. Pour in warm cooked cherry filling. Sprinkle crumb mixture over filling. Bake for 30-35 minutes or until crust is nicely brown.

**tip**I bake pies on a piece of foil to catch any potential drippings from messing up my oven.  Cut a large enough piece to fit under the pie and curl up the edges.

Pumpkin Squares with Cream Cheese Frosting….

This is one of those “go to” recipes for just about any gathering.  It is made in a jelly roll pan, so you get many servings out of the recipe.  This is another one bowl recipe that goes together in minutes and will become a family favorite, I promise!  There is nothing like your loved ones requesting something YOU make.  Again, this is a sweet treat that is made with REAL ingredients, so bake with love and enjoy!

Pumpkin Squares with Cream Cheese Frosting

2 cups flour
2 cups sugar
2 teaspoons baking powder
2 teaspoons cinnamon
1 teaspoon soda
½ teaspoon salt
1 cup vegetable or canola oil
4 eggs
1 15 oz. can pumpkin

1) Evenly coat a 18 x 13 x 1” jelly roll pan with cooking spray. Preheat oven to 350’.
2) In a large mixing bowl, add flour through salt and mix well. Make a well in center of dry ingredients and add oil, eggs, and pumpkin. Mix well, do not over mix. Pour into prepared pan. Bake 20-25 minutes. Test with a toothpick for doneness.  Cool completely before frosting.

Cream Cheese Frosting

1 8 oz. package cream cheese, softened
1 stick butter, softened
1 teaspoon vanilla
3 cups powdered sugar

With an electric mixer, beat butter and cream cheese until smooth and creamy. Add vanilla and powdered sugar. Add milk a teaspoon at a time until you get a good consistency to spread over cake. Ice cooled cake. Refrigerate.

**Note** you can lighten up the frosting by using only 4 tablespoons of butter and increase the powdered sugar by 1 cup.   You will need to add more milk at the end.

Fresh Pineapple Cake with Caramel Sauce…..

This is soooo amazing!  This moist cake is a one-bowl recipe, so simple.  I used fresh pineapple in the cake and for the garnish.  Serve with a scoop of vanilla icecream and a drizzle of caramel.  So versatile, serve all by itself, as shown above, or with cream cheese frosting.  (recipe below)  Enjoy!

Fresh Pineapple Cake

2 ¼ cups flour
1 ¾ cups sugar
1 teaspoon salt
1 teaspoon baking powder
1 teaspoon baking soda
2 teaspoons cinnamon
4 eggs, beaten
¾ cup vegetable or canola oil
¾ cup pureed fresh pineapple
1 cup finely diced pineapple
Caramel sauce, optional
Vanilla icecream, optional

1) Preheat oven to 350’. Coat a 9 x 13” pan with cooking spray, set aside.
2) In a large mixing bowl add flour through cinnamon and mix well.  Make a well in center and add the rest of the ingredients.
3) Mix until just blended, do not over mix. Pour into pan and bake for 45 minutes. When a toothpick or cake tester comes out clean it’s done. Cool completely.

Cream Cheese Frosting

1 8 oz. cream cheese, softened
1 stick butter, softened
1 teaspoon vanilla
3 cups powdered sugar

Beat cream cheese and butter until well blended. Add vanilla and powdered sugar. Add a small amount of milk if necessary to get the conistency you like.  Ice cooled cake. Refrigerate covered and let stand at room temperature for 30 minutes before serving.

Pumpkin Spice Bread Pudding

I like to freeze the ends of wheat bread and when I’ve accumulated a good amount, I make my own bread crumbs or make something sweet and delicious like this bread pudding.  I love the ends because they add a bit of texture to the dish.  The beauty of this simple dessert is you can make them ahead, all the way up to baking and refrigerate.  Forty minutes before you want to serve dessert, pop them in the oven.  The smell of pumpkin and cinnamon fill the air.  Serve warm with fresh whipped cream or a small scoop of vanilla icecream.  YUM!
The ramekins at the top make for the prettiest presentation.  They also make for very easy serving.  I like to serve with a fresh ripe strawberry or raspberries on the side.  Beautiful and delicious! 
Pumpkin Spice Bread Pudding

6 cups stale bread ends, whole wheat is best (about 10 pieces)
1 1/4 cup brown sugar
1 cup whole milk or half and half
1 12 oz. can evaporated milk
1 15 oz. can plain pumpkin
4 whole large eggs
1 teaspoon vanilla
1 teaspoon cinnamon
¼ teaspoon cloves
¼ teaspoon nutmeg
Pinch of salt

1) Preheat oven to 350’ and butter a large casserole dish (2 ½ quart) and set aside. Or, you can use 6 oz. ramekins, butter 8 and set aside.
2) Tear bread into small pieces and place in a small bowl, set aside.
3) In a large mixing bowl, add brown sugar through salt, whisk until well blended.
4) Add bread to liquid mixture and stir gently to coat well.
5) Pour into casserole dish or divide evenly among ramekins. They can be filled to 1/4” from the top.
6) Bake casserole for 35 minutes. For ramekins, bake for 25 minutes. Serve warm with a dollop of fresh whipped cream or a small scoop of vanilla ice cream. Add a tiny pinch of nutmeg over the top.

Let me know what you think, comments are always very welcome!

Angie